|
Thread Number: 42399
/ Tag: 50s/60s/70s Vacuum Cleaners
Introduction and a Repair Question |
[Down to Last] |  |
| Post# 445967 9/13/2021 at 13:14 (956 days old) by lotsofkirbys (Oklahoma) | ||
Hi, everyone! This is my first post here on Vacuumland, so sorry if this comes across as a little blunt. I have been collecting pretty much as long as I can remember and have been reading the forums for about five years. I finally decided to join after I realized that I had a problem that I couldn't find the answer to...
I am a fifteen year old collector in need of some advice on what to do with a Kirby Classic 1-CR. I bought it about ten years ago at a garage sale from the original owner. It did not come with anything but a split hose, and I am sure that at some point he re-did the original wiring with his own. It is missing the headlight socket, doesn't have the original foot switch, or cord socket. It does run. I have finally decided to restore it but I am not sure if it's a smart idea to do so. I have very limited funds so I cannot always afford new parts. I guess my main question is. Is it smart to take on a project like this? Or should I buy a new Classic or Classic Omega to refurb? I can post pictures if needed. | ||
Post# 445968 , Reply# 1 9/13/2021 at 13:23 (956 days old) by KirbyClassicIII  (Milwaukie, Oregon) (Milwaukie, Oregon) |
||
lotsofkirbys
Welcome to VacuumLand!
Yes, please do show us pictures of your Classic 1CR, that way we all know better as to how we can help. ~Ben This post was last edited 09/13/2021 at 14:34 | ||
| Post# 445969 , Reply# 2 9/13/2021 at 13:50 (956 days old) by Lotsofkirbys (Oklahoma) | ||
|
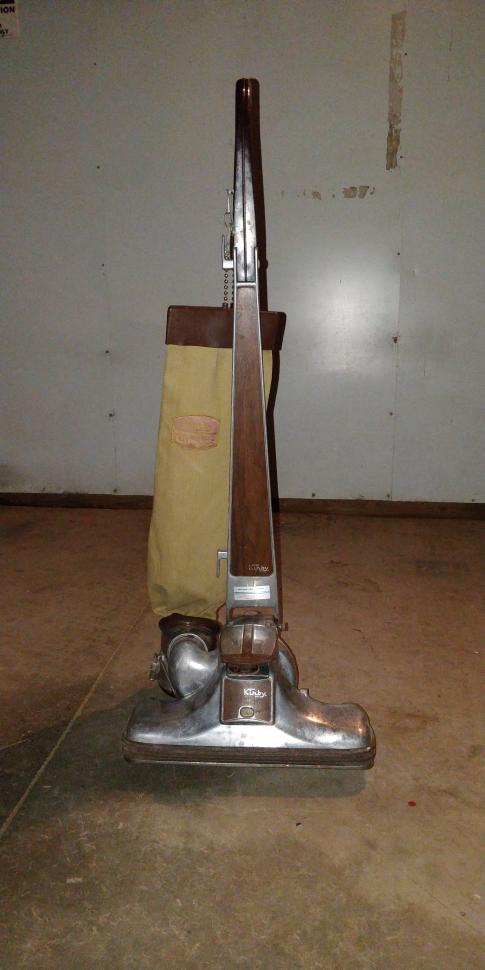
Here are those pictures. The previous owner drilled holes into the body to mount the new switch and cord socket. The cleaner head is severely gouged, he had used it as his shop vacuum for 20 years.
| ||
| Post# 445970 , Reply# 3 9/13/2021 at 13:51 (956 days old) by suckolux (Yuba City, CA) | ||
 | ||
|
Post# 445972 , Reply# 4 9/13/2021 at 14:12 (956 days old) by KirbyClassicIII (Milwaukie, Oregon) |
||
|
lotsofkirbys
I have never seen a Classic 1CR or any Kirby in particular modified like that (in picture 6)!
I wish you the best of luck restoring this. This picture shows what the original cord socket and foot switch looked like. Basically, Kirby used the same foot switch module from models Dual Sanitronic 50 and 80 but re-oriented it vertically. ~Ben
View Full Size
This post was last edited 09/13/2021 at 15:06 | ||
|
Post# 445973 , Reply# 5 9/13/2021 at 14:24 (956 days old) by gottahaveahoove (Pittston, Pennsylvania, 18640) |
||
WElcome!!!! | ||
| Post# 445976 , Reply# 6 9/13/2021 at 15:18 (956 days old) by Lotsofkirbys (Oklahoma) | ||
|
Ben | ||
| Post# 445977 , Reply# 7 9/13/2021 at 15:51 (956 days old) by human (Pines of Carolina) | ||
It's not hopeless...
What's been done to that machine gives a whole new dimension to the concept of a 'frankenkirby' but I don't see why it couldn't be restored closer to original. The most cost effective way to source the parts will likely be to buy another machine that also needs some work and use parts from both to make one good one out of the two. Lots of parts are available online but they ain't exactly cheap. I had to buy a foot switch for a Legend II a couple of years ago and it cost me a little over $20 for a new one. That's probably why the previous owner did what he did. By comparison, in the past couple of months, I bought a complete Classic III with a hose and a few tools from Shopgoodwill.com for $28 shipped and picked up a G3 that was in dire need of some TLC (and a new brush roll) from a local Goodwill store for $10. Thrift shops can be very hit-or-miss but sometimes you do get lucky.
| ||
|
Post# 445978 , Reply# 8 9/13/2021 at 16:05 (956 days old) by KirbyClassicIII (Milwaukie, Oregon) |
||
|
lotsofkirbys
Yes, I do believe you can restore this.
Here's the official parts breakdown and list for this machine from a 1974 Kirby service manual. And as Edgar (human) suggested, you can also buy another non-working Classic 1CR with the parts that you need for yours. ~Ben | ||
| Post# 445979 , Reply# 9 9/13/2021 at 16:25 (956 days old) by Lotsofkirbys (Oklahoma) | ||
|
Thank you,
For all of the advice! Human, I have definitely been looking for a parts machine. There's just not very many "for parts" 1CR's out there. Ben, thank you for the diagram, and more specifically the part numbers! The only other problem is that I think the fan is threadlockered on...
I wish I had something to give for the hospitality! | ||
|
Post# 445980 , Reply# 10 9/13/2021 at 16:35 (956 days old) by KirbyClassicIII (Milwaukie, Oregon) |
||
|
lotsofkirbys | ||
| Post# 445982 , Reply# 11 9/13/2021 at 18:14 (956 days old) by Hoover300 (Kentucky) | ||
 | ||
|
Post# 445984 , Reply# 12 9/13/2021 at 18:42 (956 days old) by KirbyClassicIII (Milwaukie, Oregon) |
||
|
lotsofkirbys | ||
| Post# 445985 , Reply# 13 9/13/2021 at 18:46 (956 days old) by Lesinutah (Utah) | ||
If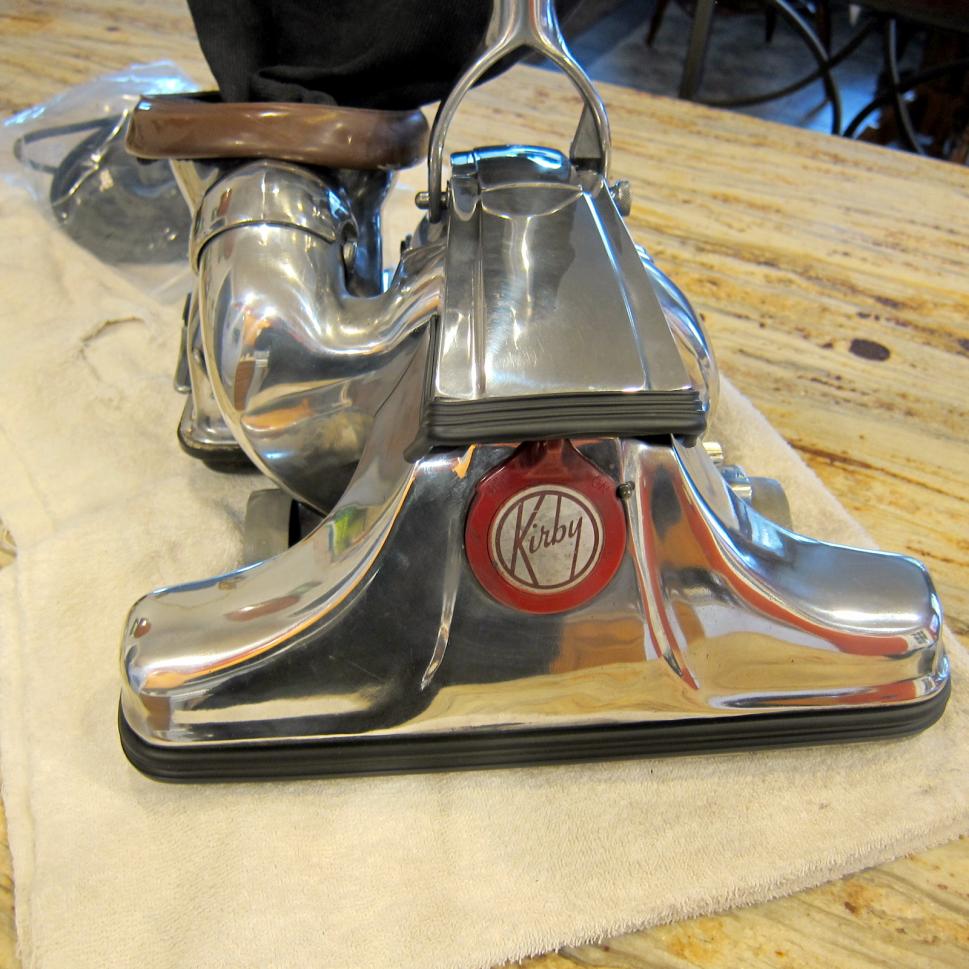
You look up kirby motor units on ebay. Caroljean on ebay in Oregon usually has parts machines. Your going to want a whole motor unit because with the setup on the cr1 it has no skid plate. If you keep the outer motor shell it the screw holes would look bad. Being he wired a new switch the outer shell on the motor unit is needed. The oxidation on the nozzle can be sanded down and polished.
Just know the ds80, classic 1 and classic omega models are not similar to other kirby models. Basically in laymen terms take pics, use diagrams pay attention to parts. I have no doubt you can do it and you will learn alot doing so. | ||
| Post# 445986 , Reply# 14 9/13/2021 at 18:50 (956 days old) by Lesinutah (Utah) | ||
|
Link
The thread attached is on a classic omega. I'm attaching it because it gives you great tips and easy to understand how to's on restoration.
CLICK HERE TO GO TO Lesinutah's LINK | ||
| Post# 445992 , Reply# 15 9/13/2021 at 19:14 (956 days old) by Lotsofkirbys (Oklahoma) | ||
|
Question/Here you go
Here it is put back together.
@Ben. Is there a way to alert him to this thread or do I just have to hope he sees it? @Hoover300. Here are those pictures you wanted. The picture of the coin case is an attempt to show that it's cracked. | ||
|
Post# 445993 , Reply# 16 9/13/2021 at 19:18 (956 days old) by KirbyClassicIII (Milwaukie, Oregon) |
||
|
lotsofkirbys | ||
| Post# 445994 , Reply# 17 9/13/2021 at 19:24 (955 days old) by Hoover300 (Kentucky) | ||
|
| ||
| Post# 445995 , Reply# 18 9/13/2021 at 20:00 (955 days old) by Lotsofkirbys (Oklahoma) | ||
|
Les
I'm not aiming this directly at you, I just thought I should clear some things up.
I've restored other vacuums before, and I have taken apart my entire collection. I've never had a project this big. This Kirby has always frightened me because I honestly didn't really know all of what the guy had done, or what to do about it. I am also very familiar with Kirby models and differences between them. It's just the parts I'm not sure about. What did you mean by "skid plate"? Thank you for the attached thread! Very helpful! How would you go about getting the gouges out of the cleaner head? @Hoover300. Thank you! Can I email you? I take it that you have no headlight socket? | ||
| Post# 445996 , Reply# 19 9/13/2021 at 20:10 (955 days old) by Hoover300 (Kentucky) | ||
|
| ||
| Post# 446003 , Reply# 20 9/13/2021 at 23:02 (955 days old) by Lesinutah (Utah) | ||
|
Pic
Here is a picture of the scuff plate. The omega and every 16" model after has this plate.
View Full Size
| ||
| Post# 446011 , Reply# 22 9/14/2021 at 08:21 (955 days old) by Lotsofkirbys (Oklahoma) | ||
|
Thank you all... | ||
| Post# 446023 , Reply# 24 9/14/2021 at 13:54 (955 days old) by Lotsofkirbys (Oklahoma) | ||
|
Billy | ||
| Post# 446028 , Reply# 25 9/14/2021 at 17:52 (955 days old) by Lotsofkirbys (Oklahoma) | ||
|
One more thing
What would be the correct technique for separating the motor assembly on these pre-omega Kirby's? I can't find a forum thread that has information on these machines. The assembly looks different to the omega and tradition in thread #34091. I don't want to break something.
CLICK HERE TO GO TO Lotsofkirbys's LINK | ||
| Post# 446070 , Reply# 27 9/15/2021 at 12:27 (954 days old) by Lesinutah (Utah) | ||
|
Ben
Has a diagram of the classic. I'm going solely off memory.
If you remove the safety switch screw you should be able to disconnect the safety switch or if there is an opening near the axle you can leave the safety switch attached and pull wiring. Then above the lever that rotates and holds the top of the nozzle above it to the right and the left arescrewz that need to be taken out. You then focus on the outer shell ( the pie that goes over the mot I r that the switch and rear wheels connect to. I'm not sure which near the back where the switch and wheels are since yours is modified. Once the shell is removed there is 1 screw that holds the front plate on(the piece you took the screws out first and the safety switch. . There is a few screws holding it in and they need to be removed. With the outer motor housing and screws off the front and rear motor housing the front of the fan chamber should come off. Leave the carbon brushes in until you remove the fan. There will be a small opening wher you put a screw driver to stop the motor from twisting when you spin the fan to remove it from the top of the armature. Then with the fan off If you remove the 4sma screws holding the bearing plate on. Take the screws off. With the bearing plate off take out the carbon brushes but leave the carbon brush housing. The top of the armature pull the armature out. Leave the coil in and don't mess with the wiring. This should be all you need to do without removing or breaking anything. | ||
| Post# 446071 , Reply# 28 9/15/2021 at 13:11 (954 days old) by Lotsofkirbys (Oklahoma) | ||
|
Thanks for the help!
@Texaskirbyguy. The link I attached to this thread was the same one you put up! It's greatly helped me!
@Les. I have the fan off. I found an old thread (2006-ish) that was someone asking how to remove the fan on a D80. Is the bearing plate supposed to just pop off after the screws are removed? I removed all of them but it's pretty rusty...so I'm not sure if it's just stuck and need to just pry it off, or if I need to do another step. Also. Isn't the fan supposed to have a date stamp/wheel on it? All I can find on mine is 1189 (The Scott Fetzer logo) 14 and three circular indentations right above that. The fan is metal so I would assume it's original right? | ||
| Post# 446076 , Reply# 30 9/15/2021 at 14:35 (954 days old) by Lotsofkirbys (Oklahoma) | ||
|
Ok, that makes sense...
I hadn't thought about it possibly being a replacement from a shop's parts bin. I thought they started replacing the fans with plastic when the tradition debuted?
I know mine is an earlier 1-CR as it has no holes for the Shag-king, so maybe they started doing the date stamps somewhere around the time of the first revision. The lettering on the labels is coming off. Should I try to fix it or hope I get lucky on eBay? I'd prefer to keep it original. After turning it with a screwdriver (and using a lot of penetrating oil!) The bearing plate popped off. The front bearing appears to be riveted in and is absolutely shot. Do I need to buy a new plate? I have no tools to remove rivets. I'm already writing down a list of parts it will need. I've looked at the diagram Ben posted and my bearing plate doesn't match. Though I have a wonderfully rated Kirby dealer about an hour away from me. If I can't find something online I'll check with him. Sorry for asking so many different questions! I'm very concerned with causing an issue I could have prevented. I know I'm supposed to learn myself, but I can't afford to break something and have to replace it. I already have a rapidly climbing parts list as it is! | ||
| Post# 446080 , Reply# 32 9/15/2021 at 15:10 (954 days old) by Lesinutah (Utah) | ||
|
If
The bearing plate isn't like the diagram it may be the one built into the metal rear fan housing. If the bearing plate doesn't have screws holding it in then it's built in like just mentioned. There will be two pieces of the motor housing coming down to almost where the carbon brush housing is. Between the two metal pieces if you use a flat head screw driver prying the inner I believe white hard plastic but it may be metal. I know that the bearing plate housing and the housing holding the armature and coil separate from each other.
I hope this makes sense it's hard to describe the pieces correctly. I have an all original classic that I got given to me from the original owners son. If you take pics maybe we can give exact directions. There are few kirby dealers that can help you. The machine is 50 years old and if they opened a vacuum shop when they were 20 that would make the owner 70. I would call before driving as the closest kirby person near me is Kent oyler who is kirby needs on ebay. The shag king I don't know if it was on the classic. It could've been on cb1,cb2 and cb3. That's omega, classic 3 and the tradition. I'm not positive but I know it's on all the cb models for sure. If it was on thee cr1 aka classic it would be the later models. I'm sorry my posts all over the place. I will check my Google drive and see if I have pics I can attach. Rob nice to see you post and I hope your health is good. Les | ||
| Post# 446081 , Reply# 33 9/15/2021 at 15:18 (954 days old) by Lesinutah (Utah) | ||
|
Edit
Disregard my last post.
I believe if you use a set tool or a socket and tap it the bearing comes off. There is a trick for keeping the bearings in once reinstalled. There not riveted on. If you go to this link. It has Mike's videos. I'm not sure if he uses a socket but the blind pilot bearing puller isn't the only way to remove the bearings. CLICK HERE TO GO TO Lesinutah's LINK | ||
| Post# 446084 , Reply# 34 9/15/2021 at 17:27 (954 days old) by Lotsofkirbys (Oklahoma) | ||
|
Here's the pics/I've think that may be right
@texaskirbyguy. It's still a little dirty, (I took it apart a few minutes ago!). Looking at it closely, I don't believe it's riveted.
@Les. It has an 1/8" "lip" (That's the best I can describe it.) on the motor side of the bearing. That lip appears to be holding it in. | ||
|
Post# 446085 , Reply# 35 9/15/2021 at 17:38 (954 days old) by KirbyClassicIII (Milwaukie, Oregon) |
||
|
lotsofkirbys | ||
| Post# 446087 , Reply# 36 9/15/2021 at 18:16 (954 days old) by Lesinutah (Utah) | ||
|
Pic
Where the red mark is put a socket and hit the socket. The socket will hit the bearing. You should have a bearing with a lip, metal circular piece and a wax bushing that fits in the metal piece.
View Full Size
| ||
| Post# 446091 , Reply# 37 9/15/2021 at 19:03 (954 days old) by Lotsofkirbys (Oklahoma) | ||
|
Ok, thank you!
That pic is exactly what I needed! I'll try it tomorrow.
@texaskirbyguy. Thanks for the advice! You've been a great help. @Ben. Looks like I don't need the bearing plate after all. Thanks for the bearing part number though! The screws, strangely enough, weren't rusty... Y'all have helped me so much, I'll be sure to give updates! | ||
| Post# 446097 , Reply# 39 9/15/2021 at 22:45 (953 days old) by Lesinutah (Utah) | ||
|
Glad | ||
| Forum Index: | 
| Other Forums: |

|

|

|

|

|

 Comes to the Rescue!


;)
;)
;)
;)
;)
;)
;)
;)