|
Thread Number: 16590
Air-Way beater-bar problem |
[Down to Last] |  |
| Post# 176986 4/13/2012 at 13:01 (4,396 days old) by truckerx (Palm Springs, CA) | ||

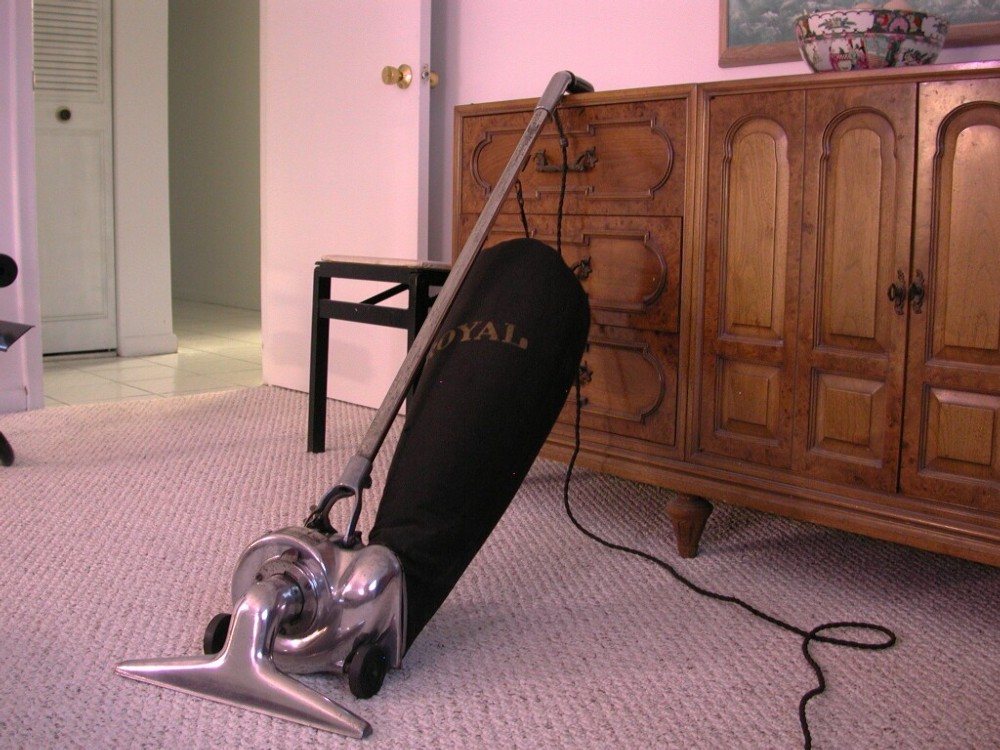
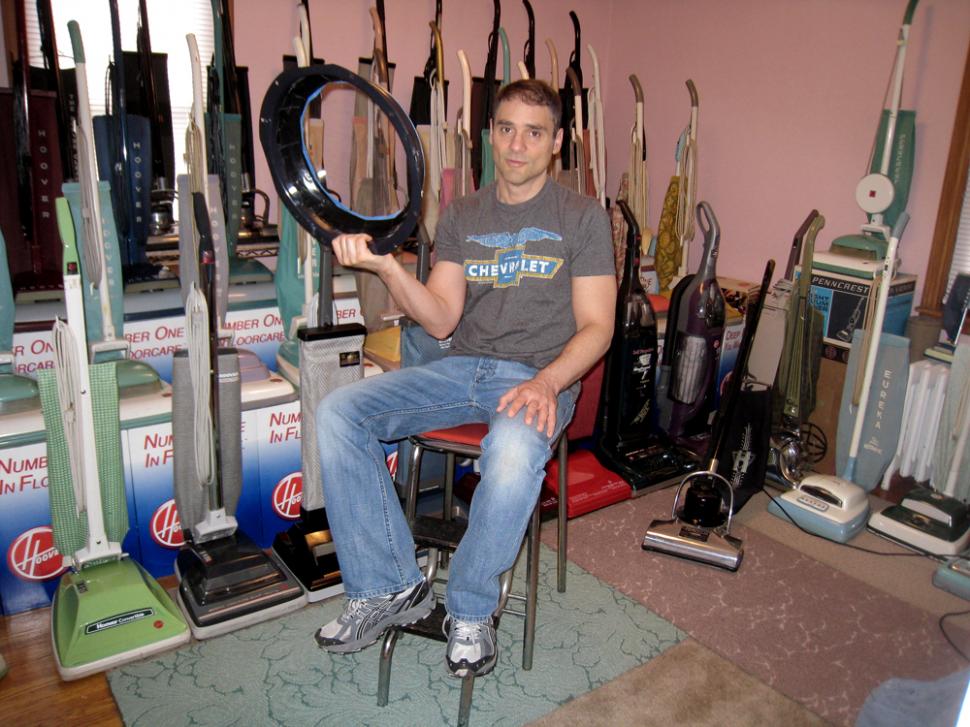
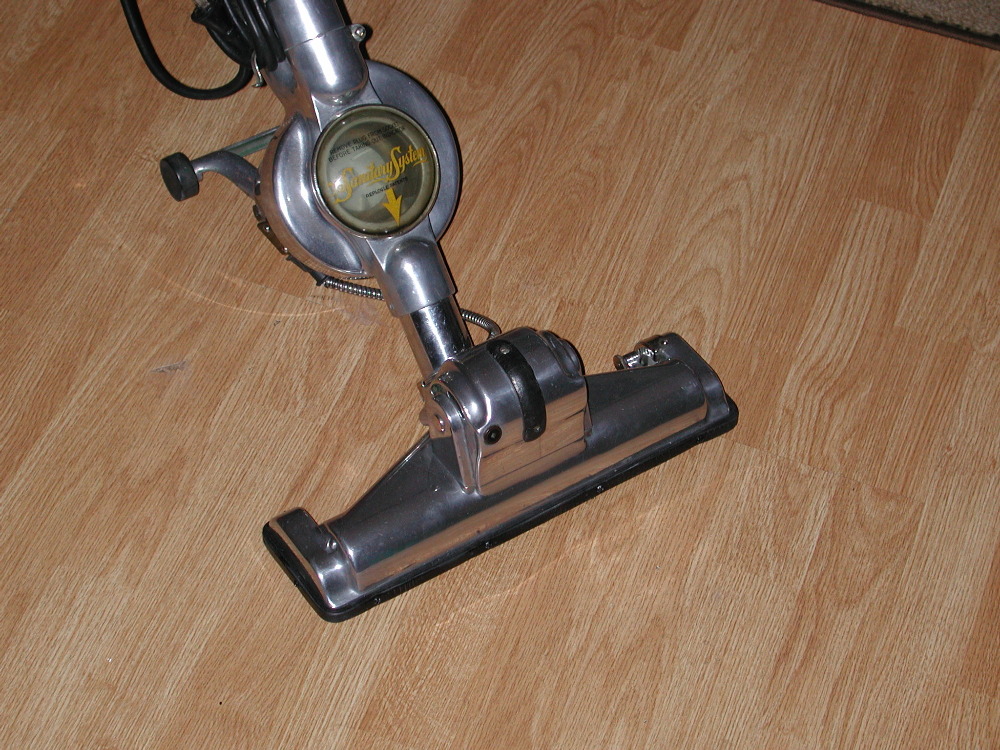
To all Air-Way experts: I am losing the beater-bars on my twin-motor.
I think that I may have had the height setting to low (further away from the floor surface). Chattering resulted losing two of the rubber mounted beater-bars, given the rubber is old and perhaps dry-rotting as well. Has anyone experienced this and is there a known remedy short of trying to fashion some new rubber mounts? Any suggestions would be greatly appreciated. Thanks in advance. Photo attached. 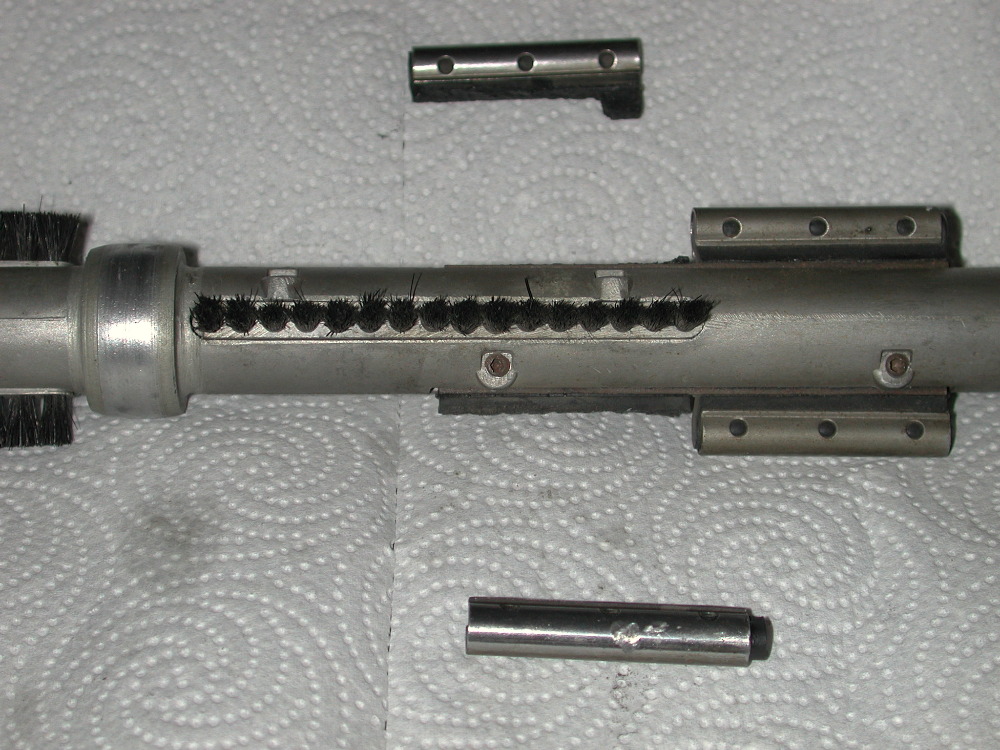
| ||
Post# 177026 , Reply# 1 4/13/2012 at 22:19 (4,395 days old) by Air-WayCharlie  (USA) (USA) |
||

Bernie,
I lost a beater on my DirtMaster and basically don't use it at all other than for conventions or guests that visit. And, then only just to turn it on and off. When the brush roll is going around, the rubber stretchs and causes the beaters to bang against the housing. Ultimately, they get knocked off and trying to find any replacements is really impossible. As you know, the rubber dries out over the years and it's composition changes. A former member suggested removing them from the agitator. I have them on the Chief and Super Chief. Fortunately, they still work very well under controlled conditions. Tania used the Super Chief in March at my home and vacuumed much of the second floor with no issues. I do not use any of those vacuums but still run them fairly regularly. I tried using super glue to repair the one on the DirtMaster but it does not work. Just hope to find another brush roll and use it for spares. Until then, I would minimize using the one you have. Charlie | ||
| Post# 177027 , Reply# 2 4/13/2012 at 22:33 (4,395 days old) by truckerx (Palm Springs, CA) | ||
|
| ||
| Post# 177055 , Reply# 3 4/14/2012 at 08:10 (4,395 days old) by Trebor () | ||
|
Armor-all... is supposed to re-hydrate and recondition all manner of rubber and plastic. What could a good soaking hurt? Thoughts? | ||
|
Post# 177057 , Reply# 4 4/14/2012 at 08:48 (4,395 days old) by Air-WayCharlie (USA) |
||
|
Robert,
You could re-hydrate the rubber to some degree but getting a broken off beater to reattach, (frayed rubber to frayed rubber), is near impossible. It would have to be able to withstand the force of revoling at a fairly high speed and the friction created when put against a carpeted surface. I've even thought of using fine wire and sewing the rubber together like surgical stitches. But, there comes a point when I realize these vacuums are over 70 years old and the practicality of using them is................well, not too realistic. I just look at mine and turn them on and off to keep the motors in good running order. At this point they are pieces of art to be admired for their design and advanced engineering. I do vacuum very small areas on a limited basis and have correct orginal bags for them. Bernie, I believe, (without looking at the owners's manuals or the, "Air-Way Indicator", the company newsletter), that the Chief and Super Chief were manufactured circa. 1936 to 1938. During that time the DirtMaster, (single motor, twin fan), was also in production--for a small period of time due to the Hoover lawsuit. The Green Goddess was also being made. I have read accounts of another model, the Zephyr, that never really saw the light of day. I know nothing about that one. Due to the lawsuit, Air-Way ceased production and then WWII started. When Air-Way launched again post WWII, it was with the model 55. The era of the Air-Way upright was over--forever. | ||
| Post# 177059 , Reply# 5 4/14/2012 at 08:54 (4,395 days old) by aeoliandave (Stratford Ontario Canada) | ||

I'm impressed that 70 year old rubber has lasted this long under such 'abusive' rug-banging conditions but not surprised. My experience with player piano tubing and hoses is that excellent rubber from the era can stay solid right to the present day. It was the introduction of clay fillers to the mix in the 40s as well as modern chemical substitutes - neoprene - that causes short life expectancy.
Having seen a few of these beater bars I would think it not too difficult a task to replicate them. They do unbolt from the bar and a good machinist could make new ones...at a cost. It looks that the rubber can be extracted from the metal bar after knocking out the rivets. Oh wait, there are no rivets - they are locking keyholes which secure the rubber after squeezing the bar around the softer rubber. I would spread the bar ever so slightly and make up a new rubber core from Car Tire rubber or even better, cord-reinforced heavy duty rubber belting of the correct thickness. Dave...musing on the possibilities. | ||
|
Post# 177061 , Reply# 6 4/14/2012 at 08:55 (4,395 days old) by Air-WayCharlie (USA) |
||
|
| ||
| Post# 177077 , Reply# 8 4/14/2012 at 12:25 (4,395 days old) by Trebor () | ||
|
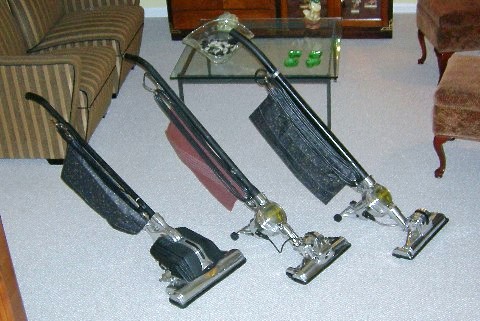
Is the one to the left... in the picture the legendary Dirtmaster? | ||
|
Post# 177078 , Reply# 9 4/14/2012 at 12:40 (4,395 days old) by Air-WayCharlie (USA) |
||
|
The vac to far left is, indeed, the legendary DirtMaster. The other two, going left to right, are the Super Chief and the Chief. Sometimes the Chief is referred to as the, "Scout", but that is incorrect.
The DirtMaster has only one motor with large twin fans at the base of the handle. The suction for above the floor cleaning is not very good but for regular vacuuming it was very effective. The brushroll on the DirtMaster is configured differently from the Chief and Super Chief in that the beaters are ONLY in the center part of the brushroll itself. I hope to bring all three to Milwaukee for next year's convention and hope to do a little, "Show And Tell", to demonstrate the features and differences of the vacuums. | ||
| Post# 177079 , Reply# 10 4/14/2012 at 13:03 (4,395 days old) by truckerx (Palm Springs, CA) | ||
|
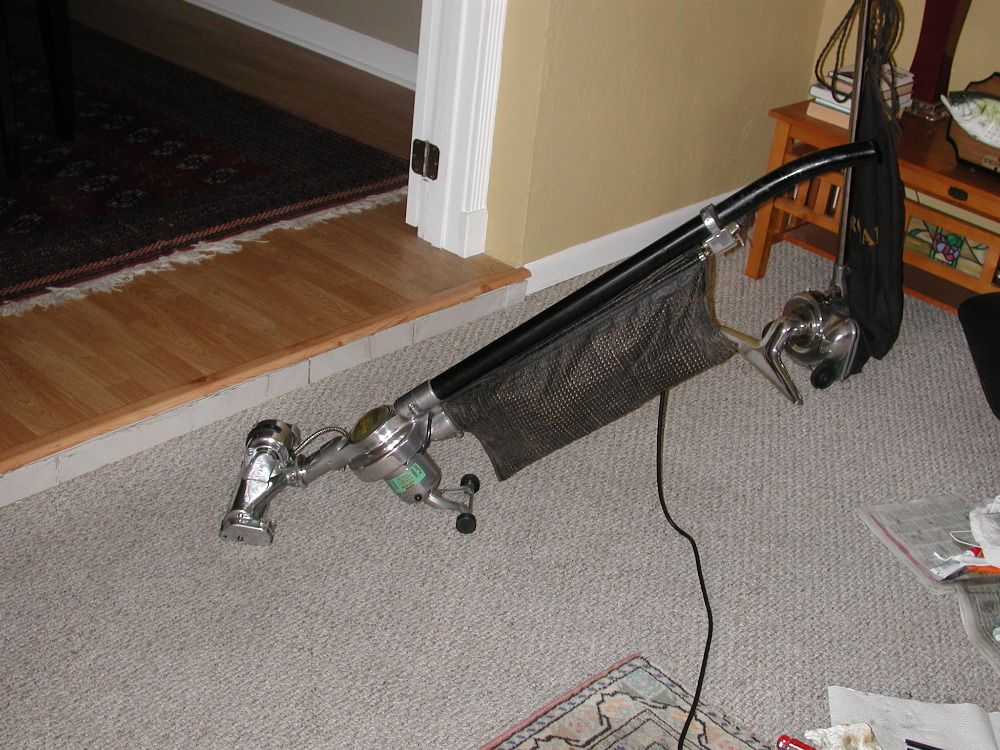
Charlie - The machine in question is just like the one in your photo with the black bag on the opposite end of your Dirt Master. Can you tell me the model name and maybe pinpoint the production year(s)?
Per your suggestion, I removed all of the beater bars - a simple operation as it turned out requiring only a 3/32" hex wrench. The machine runs beautifully now. The remaining brushes in the brush roll actually create quite a vibrating sound on their own. In summary, I believe the beater-bar problem may have been the result of oiling the brush motor, allowing it to spin faster than it ever had before. It was amazing (shortly before the explosion)! My guess is that increased centrifugal force may have caused the old rubber mounts to expand beyond their limits - striking the inside of the rug nozzle, thus separating with quite a clatter. You had to be there. ;-) Now on to fashioning a rubber bumper. As always, thanks much for your help. | ||
| Post# 177086 , Reply# 11 4/14/2012 at 13:20 (4,395 days old) by truckerx (Palm Springs, CA) | ||
|
| ||
|
Post# 177088 , Reply# 12 4/14/2012 at 13:23 (4,395 days old) by Air-WayCharlie (USA) |
||
|
The Air-Way Model 35 | ||
|
Post# 177090 , Reply# 13 4/14/2012 at 13:26 (4,395 days old) by Air-WayCharlie (USA) |
||
|
The Air-Way Model 40 | ||
|
Post# 177092 , Reply# 14 4/14/2012 at 13:27 (4,395 days old) by Air-WayCharlie (USA) |
||
|
Can't leave out the............ | ||
| Post# 177093 , Reply# 15 4/14/2012 at 13:30 (4,395 days old) by Brandon_W_T () | ||
|
My friend has the model 35. 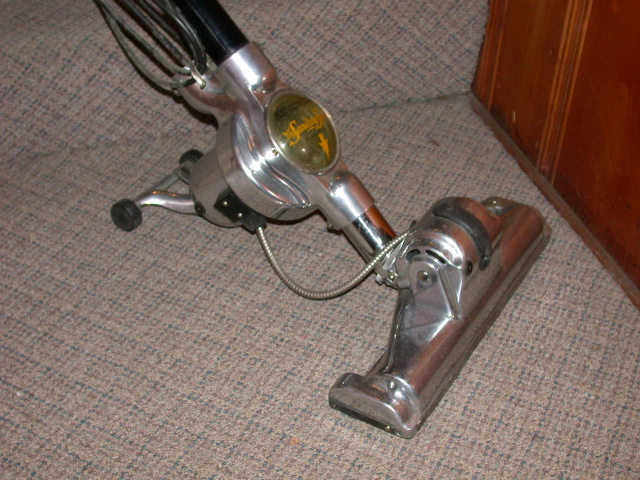
| ||
|
Post# 177095 , Reply# 16 4/14/2012 at 13:31 (4,395 days old) by Air-WayCharlie (USA) |
||
|
More..... | ||
|
Post# 177098 , Reply# 17 4/14/2012 at 13:35 (4,395 days old) by Air-WayCharlie (USA) |
||
|
Original Bag!
Wow Bernie! Those original bags are almost non-existent! Take good care of that one. Typically, over the years they begin to just sort of disintegrate.
VERY nice. I'd post some pics, (glam shots), but I am taking to the air very shortly and heading up to Minneapolis for a layover. I will be seeing Robert and Fred tomorrow. When I get home, I will post some pics and the attachments as well. | ||
|
Post# 177101 , Reply# 18 4/14/2012 at 13:37 (4,395 days old) by Air-WayCharlie (USA) |
||
|
Brandon | ||
| Post# 177103 , Reply# 19 4/14/2012 at 13:42 (4,395 days old) by truckerx (Palm Springs, CA) | ||
|
| ||
|
Post# 177104 , Reply# 20 4/14/2012 at 13:44 (4,395 days old) by Air-WayCharlie (USA) |
||
|
One last thing--if you look carefully at the DirtMasteR pics, you will see two different hood types. One is painted a black hammertone and the other is polished aluminum. Both are correct. I'm not sure which came first but I suspect the painted version.
Probably to reduce cost, the paint stopped and the polished version started. Or, they may have been testing both versions at the time the owner's manual was published. Who knows? Maybe Don Clark would know. I'll have to ask Tania to get in touch with him. | ||
| Post# 177105 , Reply# 21 4/14/2012 at 13:46 (4,395 days old) by truckerx (Palm Springs, CA) | ||
|
| ||
|
Post# 177110 , Reply# 22 4/14/2012 at 13:55 (4,395 days old) by Air-WayCharlie (USA) |
||
|
Bernie,
The Scout is a name that somehow got started because of piece of literature from a Wisconsin dealer gave the 35 that name. The 35 was referred to by that name by members of the club, (including myself), until I found out the correct name. So it is lore that lives on. The Super Chief name was used as the "Super Chief" was a popular passenger train and was the flagship of the Atchison, Topeka and Santa Fe Railway. It's daily run was from Chicago to Los Angeles. It represented power and speed so Air-Way used it too. The Super Chief train: 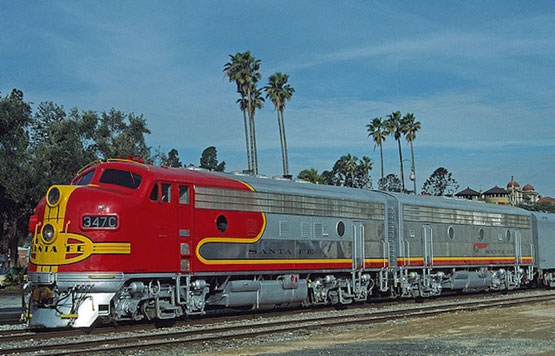
| ||
|
Post# 177111 , Reply# 23 4/14/2012 at 13:56 (4,395 days old) by Air-WayCharlie (USA) |
||
|
We're young......... | ||
| Post# 177148 , Reply# 24 4/14/2012 at 19:52 (4,395 days old) by aeoliandave (Stratford Ontario Canada) | ||
|
Random scattershot thoughts on posting pictures to share.
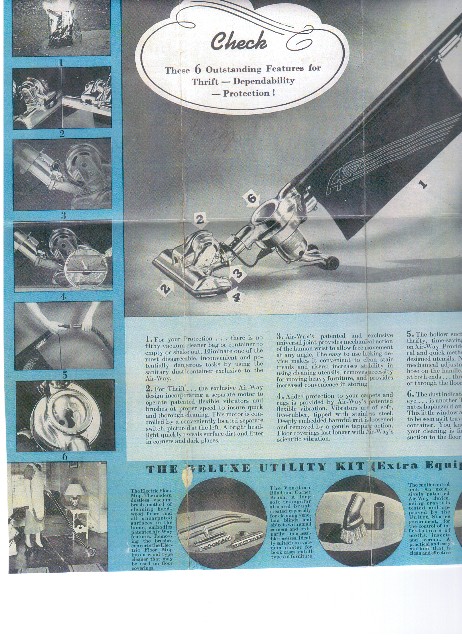
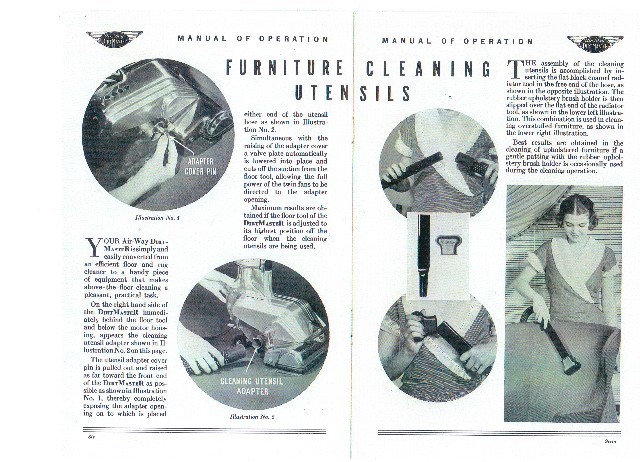
Wowhee Charlie, those are gorgeous Advertising & Manual documents! No wrist-slap intended - these are stunning & valuable resources and I thank you.
A shame they are of too small resolution to be readable or printable. But I do understand that they are nicely framed photos of the goods. These are exactly the sort of scarce paper ephemera that should be scanned and made available in a Vacuumland Daily Doctrine Dispenser like Robert has over on AW.org. I would gladly pay $1.39 for the pdf's. Fred, get on that couch with the scanner...and Robert, of course. LOL If I was located in the USA I would be more than happy to take on the task of scanning valuable ephemera folks could snail-mail me, for posting or conversion to pdf's. In fact I usually travel with two portable flatbed scanners for exactly this reason. (Unfortunately there was simply not enough time to scan the information I found in Fred & Robert's Library about my 1940s Kenmore 6 wheel upright and so I had to make do with well lit photos. But at least I have readable materials to consult) If anyone wanted to email me the full original raw files from your camera or scanner I can do it right here at home... Regarding photos that we post here in the Forums, you all know I always try to post at 1000 pixels wide so that details can be picked out and someone might even want to save them and print them, well a few of them. The reason is: When I first joined Vacuumland photos would be posted by the server software at whatever resolution the poster chose to upload but this led to inadvertent oversize pics of massive file size that had to be scrolled right/left to view - but it did provide huge photos for downloading to one's computer files. That is when I began to post at a standard 1240 pixels wide since many folks have large sharp widescreen monitors now, if not a widescreen laptop. Then the server began to auto-crop all uploaded images to 1000 pixels wide max - the length could, and still can be, any length you choose in portrait orientation. I have on occasion turned a photo 90 degrees to get the biggest possible image to 'my fans'. The mainframe LED monitor I use now is set to 1920 x 1080 because these old eyes like a BIG picture. Of course, image clarity is not simply a matter of pixel resizing but also the camera optics. Nonetheless, even cellphone cameras are capable of fine photographs under ideal lighting conditions. I often take quick pictures of Store displays and the sales tags so that I can read and remember the information of the cards for home research and googling of model numbers - at my leisure. Charlie's superb images make me so wish I had the original digital files from whatever camera you used. A longtime user of Photoshop & Paint Shop Pro graphix editing suites I have become well-versed in cropping & resizing my camera's 12 megapixel raw pictures down to a standard 1000 pixels wide, portrait or landscape, for posting. All digital cameras now come with basic photo editing software on accessory CD...any image from a laptop, tablet, ipod and cellphone camera can be imported to the software for processing. I get many of my Patent Design Document papers by going to the Google Patents page and taking screenshots of the half pages that come up, capturing the lower page half by scrolling so there is an image overlap, then stitching/merging them together into full page documents I can save or print in full. Just to show what Vacuumland servers still allow us to post, here are two of the Air-Way pages cropped, merged and resized to 1000 x 2711. Simply enlarging the original 640 x 480 jpegs are not enough to make the fine print readable. I encourage everyone to process - or google to learn how easy it is - important images to at least 1000 pixels wide for maximum enjoyment to our viewers. long-winded Dave 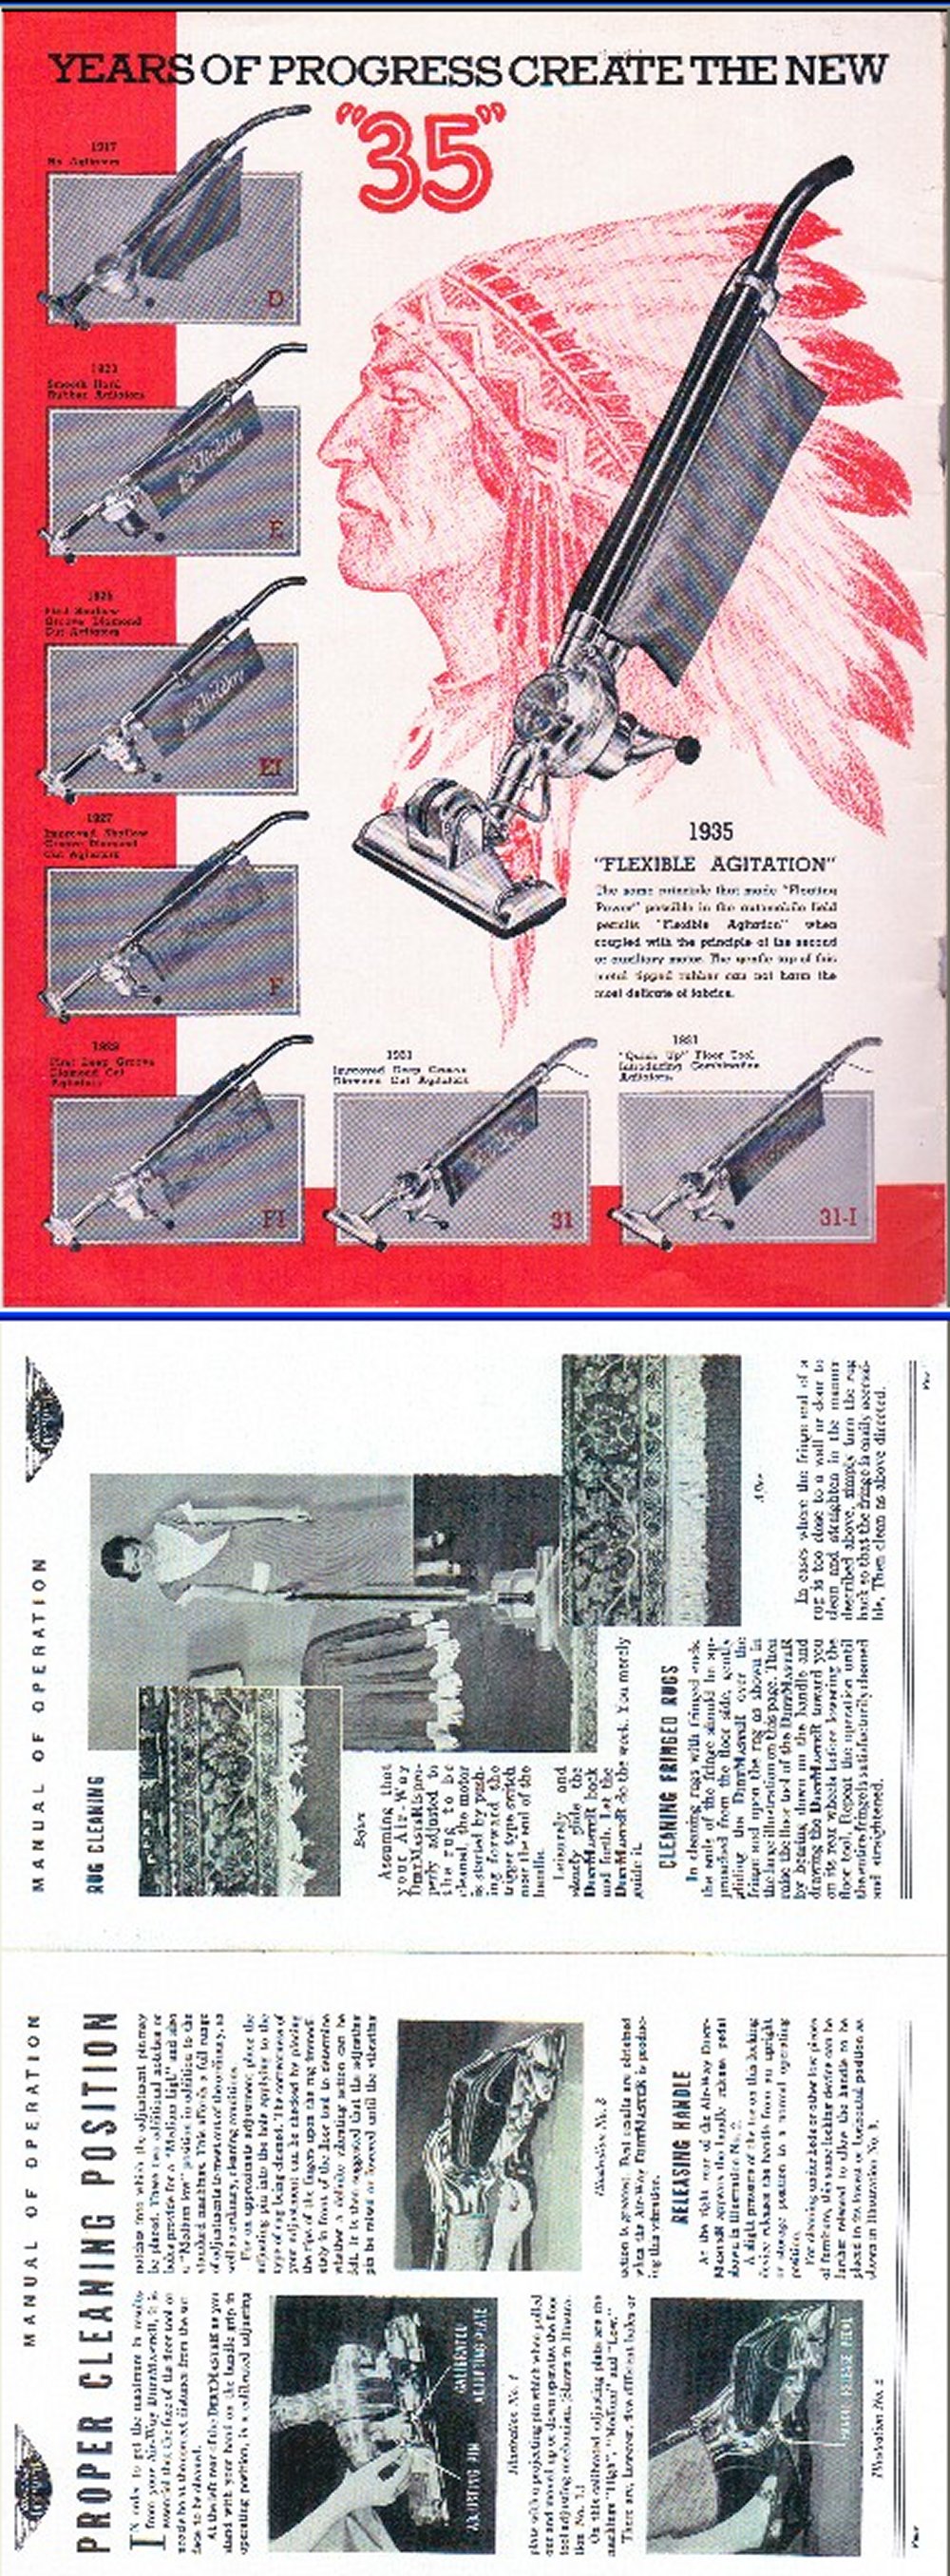
| ||
| Post# 177151 , Reply# 25 4/14/2012 at 21:43 (4,395 days old) by vacuumfreak (Ontario, Canada) | ||
|
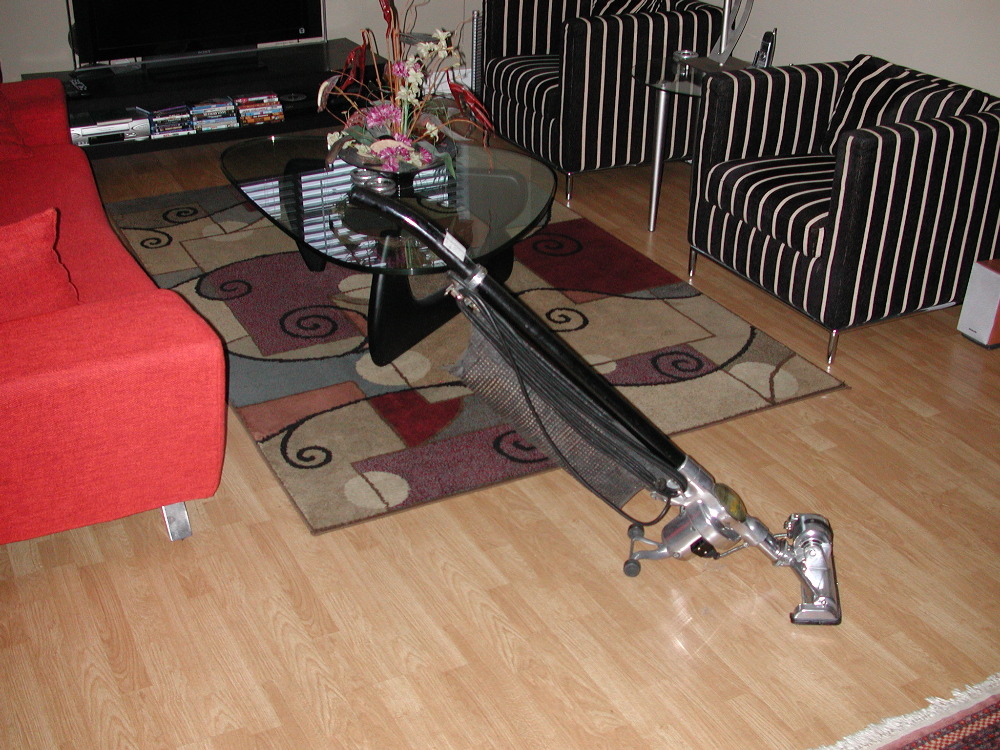
@truckerx... What machine is that behind the airway in your second photo?! Looks really cool. I would love to see more pictures of it if you have any! Daniel :-) | ||
| Post# 177154 , Reply# 26 4/14/2012 at 22:30 (4,394 days old) by truckerx (Palm Springs, CA) | ||
|
Daniel | ||
|
Post# 177160 , Reply# 27 4/14/2012 at 22:51 (4,394 days old) by Air-WayCharlie (USA) |
||
|
Dave.......
Most of what you wrote was like reading Russian for a computer illiterate like me!
Fred said he is willing to scan a lot of Air-Way material I have. They have a really good machine for scanning with all the bells and whistles for pixels and mg's and ram and all that stuff that is terribly confusing to me. Anyway, at some point I will mail that material to Fred and there is stuff that has not been seen by many folks. Designs from Air-Way that never made it beyond the patented drawings. Absolutely fascinating and I hope down the road we can make them available to the membership. I'm in Minny now and will see Fred and Robert tomorrow and we can discuss further. I did resize those pics to, "large web view", using some Microsoft program. They would not load in the original size from the scanner. I hope that means something to you! We'll get this fixed, resolved and available eventually. Charlie | ||
| Post# 177162 , Reply# 28 4/14/2012 at 23:09 (4,394 days old) by aeoliandave (Stratford Ontario Canada) | ||
|
Thanks Charlie for not being annoyed by my 'Random scattershot thoughts on posting pictures to share'.
I do believe through the herculean efforts of a significant few, that such materials will some day be made available for wide distribution to collectors for which I will be more than happy to pay a nominal fee. I should practise what I preach, collate and email the countless Owner Manual scans I have made for inclusion on the home page. I love reading fine print. Dave | ||
|
Post# 177202 , Reply# 29 4/15/2012 at 08:40 (4,394 days old) by Unimatic1140 (Minneapolis) |
||
 Hi Dave,
Scanning files properly will produce color files around 25mb per page in color or 12mb in black and white. For anyone who is scanning I'll set up an FTP user account on aw.org where you can simply drag the files from your hard drive directly into your own directory on the web sever, so there is no need to worry about emailing files so large. FTP is very simple and FileZilla is a great free FTP program for both windows and mac.
If there is enough interest here and I can get lots of stuff to scan (or have good quality scans sent to me), I can start with making at least one day a week dedicated in the Dispenser to vacuum cleaners for sure. We can talk about that further if you wish.
If you haven't seen the samples of the quality of scanning and document cleaning that I'm talking about, please download the samples on the Dispenser Sample Page. | ||
| Post# 177285 , Reply# 30 4/16/2012 at 13:29 (4,393 days old) by westingman123 () | ||
|
@Charlie Oh, thank God, somebody else who is left out of all this computer mumbo-jumbo. Thank you for making me feel better. Pixils, schmixils. Somebody give me a Mixmaster and some butta! | ||
| Post# 177308 , Reply# 31 4/16/2012 at 17:40 (4,393 days old) by aeoliandave (Stratford Ontario Canada) | ||
|
| ||
| Post# 177358 , Reply# 32 4/17/2012 at 08:04 (4,392 days old) by henry200 (Saint Paul MN) | ||
|
But Dave... A Mixmaster IS a powertool! | ||
| Post# 177364 , Reply# 33 4/17/2012 at 09:25 (4,392 days old) by truckerx (Palm Springs, CA) | ||
|
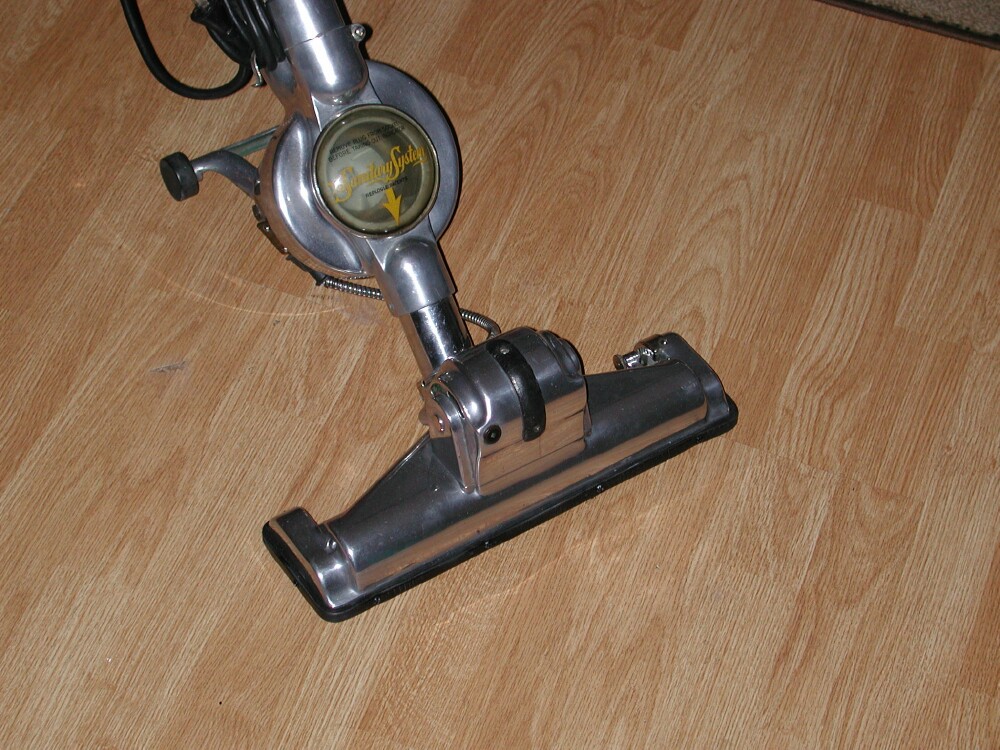
Back to the Air-Way Topic: | ||
| Post# 177368 , Reply# 34 4/17/2012 at 09:35 (4,392 days old) by truckerx (Palm Springs, CA) | ||
|
sorry | ||
| Post# 177369 , Reply# 35 4/17/2012 at 09:37 (4,392 days old) by truckerx (Palm Springs, CA) | ||
|
Air-Way bumper | ||
| Post# 177388 , Reply# 36 4/17/2012 at 15:40 (4,392 days old) by vacuumfreak (Ontario, Canada) | ||
|
Thanks Bernie for that picture. That Royal is beautiful! Daniel | ||
| Post# 177401 , Reply# 37 4/17/2012 at 17:20 (4,392 days old) by KC_Kirby (Kansas City, MO) | ||
|
Looks good to me Bernie! Like Charlie said, no one will probably even know what the original bumper should look like. I'll have to find out how you fashioned the bumper as mine needs one too. Chad | ||
|
Post# 177402 , Reply# 38 4/17/2012 at 17:35 (4,392 days old) by Air-WayCharlie (USA) |
||
|
Perfect! | ||
| Post# 177414 , Reply# 39 4/17/2012 at 20:36 (4,392 days old) by truckerx (Palm Springs, CA) | ||
|
Thanks Fellas...
Chad - you may laugh when I tell you about making that bumper. Here's a quick run-down: Get a 36" black rubber tie-down strap from Home Depot. Cut the hooks off the ends. The strap will have some raised-letter safety warnings on both sides. You need only concern yourself with the side that will be showing. The lettering needs to be removed to make the strap smooth. Who would want a bumper that says "WARNING?" OK - I took a very sharp razor and gradually shaved off the raised nomenclature. Measured the width the old bumper would have been and with a straight edge and sharp box knife cut the strap to the proper bumper width. Then drill out the old rivets with a 1/8" drill. The rug-plate will come off as well. Get a package of (8) 3/4" 6-32 screws from Home Depot. Begin on one back side and secure it on one end with a screw - stretch the bumper VERY TIGHTLY across the front and around to the other back side and tack it with another screw. The bumper should be in place and stretched tightly now. Reinstall the front rug plate then make small holes through the bumper at the remaining rivet holes and screw in place. The 4 front screws will be long enough to also attach the rug plate. The finished product will have silver metal screw heads showing. Put a dab of black paint on each screw head to minimize their appearance. That's it, Bud ! Hope this helps and good luck.
| ||
| Forum Index: | 
| Other Forums: |

|

|

|

|

|

 Comes to the Rescue!