|
Thread Number: 27230
/ Tag: 50s/60s/70s Vacuum Cleaners
Help! |
[Down to Last] |  |
| Post# 305198 11/7/2014 at 11:22 (3,458 days old) by Caligula (Wallingford, Connecticut) | ||
Hi guys.
Yes I know how to repair Electrolux ejection systems but a little thing has me stumped. This morning the Belden plug came off the cordwinder of my model LX. I've always had people to fix these cords for me, now I must do it. So here's the question. How do I take the plag apart? that round insert won't budge, and I don't want to damage the prongs by forcing. So all you cord expert out there, let me know the procedure. No, I do not want a replacement plug, I want to reattach this one, and keep my LX original. And to add to my problems, it's just started snowing!! Thanks, Alex Taber. This post was last edited 11/07/2014 at 11:58 | ||
| Post# 305207 , Reply# 1 11/7/2014 at 12:42 (3,458 days old) by aeoliandave (Stratford Ontario Canada) | ||

Alex, this is how I've done it - twice.
Recently did one for my A-W DirtMasteR. Assuming the plug is complete detached from the cord, you want to first dribble oil (thin sew machine oil flows well - I would not use WD40) inside the plug at the cord end, then work more oil in and around the circular seam between the two pieces. Unlike modern plugs, the Belden is two pieces that press together. That is, the centre section cylinder is molded with the blades in place and the outer shell is hollow. The parts mate and lock together with a rim on the blade piece that engages with the shell's inner grove. Work the oil into the circular seam with a very thin blade or micro-screwdriver to free up the aged grip between the pieces. The oil will not damage the rubber. Rather it will penetrate and lubricate the inner mating surfaces of the blade and shell groove. With luck, there will still be enough give to the room temperature rubber to wiggle the blade end out without fracturing the shell. One tip is to tilt the blade end slightly sideways as you wiggle in a circular motion around the circumference (do not attempt to twist one section against the other) and again with patience, one side of the blade 'grommet' will begin to pop out of the inner shell groove. Once that happens the blade section slips out easily. You will see the the power cord ends are soldered directly to the blades so re-assembly is straightforward from there, running the new cord end through the shell before soldering to the blades. Clean up all the oil as best as possible. There will be enough residual 'slip' to pop the pieces back together. Hope I've explained it well enough. Take your time and good luck. Dave | ||
| Post# 305213 , Reply# 2 11/7/2014 at 13:14 (3,458 days old) by caligula (Wallingford, Connecticut) | ||
|
Thanks Dave. | ||
| Post# 305252 , Reply# 3 11/7/2014 at 17:37 (3,458 days old) by super-sweeper (KSSRC Refurbishment Center) | ||
|
Hey, I had the original end of my Eureka model 10 (Or was it 9? Calem, you're the expert here!) explode off on me during use! Well, not explode, but i plugged it in, heard a "pop". the machine had no power to it, then when i un-plugged it, the plug could do a 360 around the cord! Yikes! that had to be the only area of dry-rot on that cord, the rest is as supple as new! the plug did have signs of drying, though. thankfully, replaced it with a nice old replacement plug!
| ||
| Post# 306753 , Reply# 4 11/19/2014 at 18:43 (3,446 days old) by caligula (Wallingford, Connecticut) | ||
|
Hi Dave: | ||
| Post# 306838 , Reply# 5 11/20/2014 at 14:06 (3,445 days old) by caligula (Wallingford, Connecticut) | ||
|
Heres the cord. | ||
Post# 306842 , Reply# 6 11/20/2014 at 15:09 (3,445 days old) by luxlife  (Under a Pecan Tree) (Under a Pecan Tree) |
||
|
You might want to be sure and secure the end of the cord.... until you get the plug back on. Tie a loose knot in the cord or put a clothes pin on it. The last thing you need right now is for that cord to go all the way into the winder and start unwinding itself. | ||
| Post# 306849 , Reply# 7 11/20/2014 at 15:44 (3,445 days old) by Bikerray (Middle Earth) | ||
Belden plug
I've seen two different plug blades for the Belden plugs
1. the wires are soldered into a hole in the side of the metal blade, so you would unsolder the old wires from the plug and solder the new wires into the holes the old wires came out of. 2. the wires are clamped into little teeth that are at the bottom of the metal blade, these you just very carefully spread the teeth and take the old wire out of the put the new wire in and carefully close the teeth with pliers to clamp the wires in place. Generally I use silicon spray to get the rubber piece out of the center of the plug, then when I'm done sliding the metal blades back into place I gently pop it back into place. This holds the whole plug together. Have fun | ||
| Post# 306850 , Reply# 8 11/20/2014 at 15:45 (3,445 days old) by caligula (Wallingford, Connecticut) | ||
|
Hi luxlife
It's not that cord.
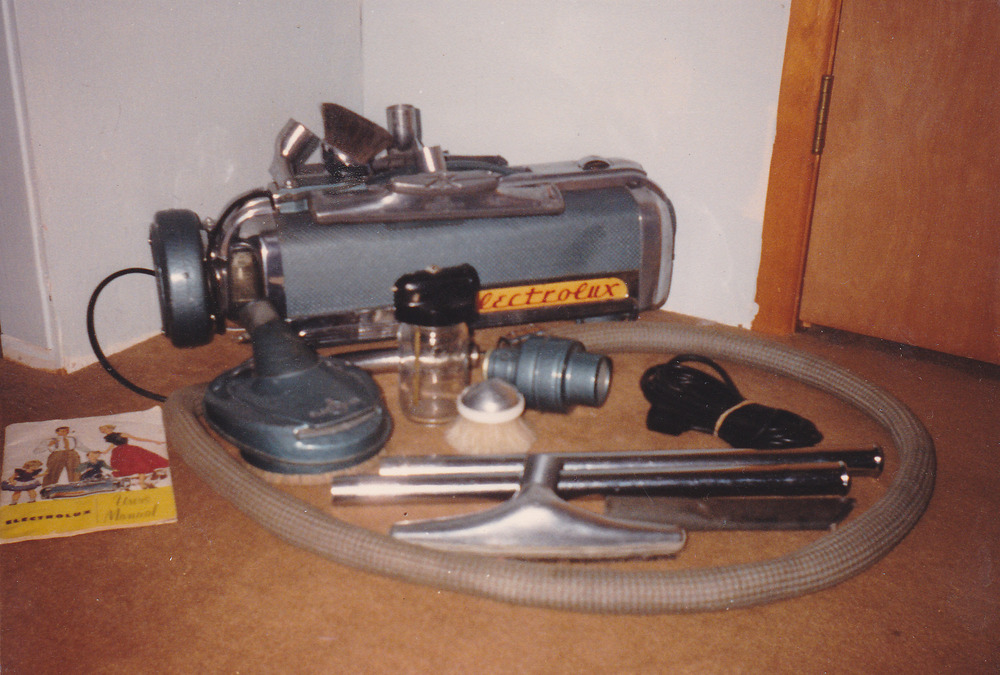
Look at the picture of the LX, it's the cord resting on the floor next to the wands, vaporizor, and white dusting brush. The cord-winder I use is the original in chrome. It's fine, but due to age, I no longer pull out the cord. I don't want it to spring so I can't rewind, been there, done that on other winders. By the way, I have other cords, so I can use the LX, but this is the original, and want the Belden plug repaired. Thanks. Alex Taber. | ||
| Post# 306851 , Reply# 9 11/20/2014 at 15:55 (3,445 days old) by caligula (Wallingford, Connecticut) | ||
|
Hi Bikerray. | ||
| Post# 306886 , Reply# 10 11/20/2014 at 21:35 (3,444 days old) by Bikerray (Middle Earth) | ||
|
| ||
| Post# 306890 , Reply# 11 11/20/2014 at 22:15 (3,444 days old) by caligula (Wallingford, Connecticut) | ||
|
Thanks Bikerray and aeoliandave. | ||
| Forum Index: | 
| Other Forums: |

|

|

|

|

|

 Comes to the Rescue!