|
Thread Number: 8198
1969 Electrolux 1205 motor question |
[Down to Last] |  |
Post# 91189 2/10/2010 at 12:55 (5,181 days old) by kloveland  (Tulsa) (Tulsa) |
||
|
I am back with another Electrolux Question. I just bought a model 1205 off of ebay, after a good exterior cleanup it really looks great. I removed the cord winder and the plastic housing that surrounds the motor and blew out the excess dirt in there as well. I haven�t opened the motor any further. My problem is that when I first turn on the canister it makes a buzzing sound followed by a faint electrical smell after that the motor sounds okay. What could be the problem? Carbon brushes, armature, bearings. I will open the motor further to see how worn down the carbon bushes are. I know that canister was purchased February 18, 1969(the day after my birthday in 1985) so I can�t expect it to run perfectly. The suction on the unit is about equal to my model L although I think the model L may have just a little more. One of the most interesting aspects about this machine is that it can use both the newer style electric hose and the older pigtail style. I am currently using one of my pigtail style hoses from my model L. I may end up ordering a new motor for it from an online vac shop, but the new motors are around $120. I am concerned that the quality might not be as good. In the perfect world it would be nice to have my equipment running as it should, because I do rotate my Electrolux�s for different tasks. Thanks, Kenneth Loveland -I am really glad that we can now pay by paypal. I plan on becoming an official member after my next paycheck. I would really love to read the newsletters and it would make me feel more responsible, instead of taking all this great advice and not giving anything in return. | ||
| Post# 91274 , Reply# 1 2/10/2010 at 20:12 (5,180 days old) by kenkart () | ||
|
DO NOT buy a new motor!! You will probably get a Lamb replacement..Not a genuine Lux motor,there are several guys who can fix your motor for 1/4 that amount, come on all you guys who run vac shops!!help this guy out. | ||
| Post# 91293 , Reply# 2 2/10/2010 at 22:13 (5,180 days old) by electrikbroomgu (Rome, NY) | ||
1205 motor
I have worked on 100's of these motors over the years. Luckily the fatality rate of these is very low. 98% of the time I can bring a 1205/L motor right back to good health. There are certain years that you need to watch the carbon holders on these motors but that was generally in the early 70's as a rule. The inner portion of the carbon holder would slide out and eventually into the communtators. If let go too long the end result is not pretty. I doubt that is your case however. A good spring cleaning, bearing grease or replacement, non gumming motor bearing oil in the back sleeve bearing and running a good stone over the commutators with the motor running usually does the trick. Having high pressure air is a must too to clean out all the fine dust from the motor windings and armature. If you have never worked on a vac motor you may want to consider taking it in to a local vac shop or to a knowledgeable friend. If you want to tackle it yourself the first thing to do would be to remove the long slender screws holding the fan cover in place (once you have removed the motor out of the vacuum). The top fan should be now visible. Remove the nut holding the top fan in place. Pull the fan off and you will now be able to pull off the bottom fan cover portion. Sometimes a screwdriver and hammer are necessary when doing this but be careful to not distort the fan covers too much. After removing the lower fan cover you will now be able to take off the lower fan, spacers etc. Next thing to do is to remove the small white plastic brush covers on both sides of the commutator end of the motor. You can then remove the wire and tabs that hold the carbon springs in place and pull the carbons themselves out. Warning! Always mark your brushes with a screwdriver or something that will etch a small mark in the carbon. I always label them L and R by using the writing on the back end of the motor for refference. If you put them in backwards your motor could arc and burn up if run too long that way! You are now all set to remove the screws that hold the fan end bearing cover in place. It should slide right off with the bearing still in place. Note that the bearing should be held in with rivets. You will need to drill these rivets out to gain access to the bearing it'self. You now should be able to pull out the armature. Take note that on the sleeve end of the armature there will be a washer. This must be in place when re-assembling the motor. This will be a good time to air blast the motor out. You can always do this by visiting a local car garage or even some canned air will do the trick. After this step you are going to want to get at the sleeve bearing. Take a look at the back end of the motor. Notice there is a round cap or cover that can be pried off with a fine tipped screw driver. Work the screwdriver around it until it comes free. Take a ear swab with some rubbing alcohol and work it up and down the sleeve bearing until it is clean. Get your self some non gumming motor bearing oil at the hardware store and saturate the felt that sits inside the end cap you just removed. Re-install sleeve bearing end cap and tap back on with your hammer carefully. Now replace your armature and set aside the motor. You are now going to want to deal with the front bearing plate assembly. You are going to either need some new rivets or some equal sized screws and nuts to use for the bearing cover plates front and back. Drill out the rivets and discard. The bearing covers will fall off and the bearing will now be visible. I always assume the worst with bearings in a 41 year old vacuum like yours or even a 21 year old one. I recommend replacing the bearing. It will come out by tapping on it with a ball pean hammer! This is a standard size vacuum cleaner motor bearing unlike the earlier Lux 30's and 60's etc which have a larger sized bearing and most any vacuum store should have one or even the local hardware store. When getting your new bearing just clean out the hole where the old one resided with some fine 400 grit sand paper and push the new bearing in place. With your new replacement screws you can now secure the bearing covers back in place. The larger hole goes on top towards the fans. Replace the bearing plate on the motor along with your spacers, fans and covers in the same order you took them off. I also recommend cleaning out your fans. Look inside the air passages and you will see lots of built up fine dust. Obtain a small skinny brush from the hardware store and clean out every passageway under water until they are clean! Put your carbons back in place with the end caps. Your motor is now fully assembled back together but there is one more crucial step that will decide the fate of your Lux motor. The commutators still need to be cleaned up. You can do this with a running motor in a bench press and a commutator stone or some 400 grit fine sand paper will also do the trick. Your objective is to get the commutators nice and shiny clean so that both brushes will seat in place nice and smooth. Pay close attention for arching and sparking as the motor runs full speed. After running the stone or 400 grit sandpaper you will notice the motors RPM's pick up considerably. If you have a nice smooth barely noticeable spark then you are good to go. Your Lux motor should be good for years more service. I seem to remember a thread a while back with pictures of a complete Lux motor tear down but can't remember for sure. The very best of luck with your 1205 motor! Cheers | ||
|
Post# 91302 , Reply# 3 2/10/2010 at 23:23 (5,180 days old) by kloveland (Tulsa) |
||
|
Actually this evening it seemed to run fine. I did not hear the buzz sound that I have heard before. The machine probably has been sitting for awhile would this have any effect? Other than the buzz sound the motor seems to run fine. I will keep a close eye on it to see if any other problems occur. I could go to the local Electrolux/Areus dealer but they are so pricey. We also have the House of Vacuums here in Tulsa that I could take it to as well. Although I am kind of weary about having just anybody look at it. I don�t know how much knowledge local vac shops have about older equipment. It would be nice if there was vac shop that specialized in older Electrolux canisters. I took some pictures that I would like to share. The original hose came with the unit but it leaks and is bent especially near the machine end. I wish these older hoses were made out of a different material. Most of the older women that I know who have an Electrolux still use their vacuum with a leaky hose. One of my mother�s friends who is in her early eighties just bought a new hose because the plastic handle broke on hers. I remember using her Electrolux to clean her furnace filter and there was barely any suction at the hose end. It is also really irritating that Electrolux did not include upholstery brush holder on this model. It makes it really inconvenient not to have the combination tool stored on-board. Not sure why they did this. But overall I like the 1205 I have been wanting one for a long time. One of my earliest memories of a vacuum cleaner stems from this machine. My grandmother had one and before I was born she broke the Power Nozzle and the only other tool I remember she had besides the two long wands was an after market white upholstery tool. She said she cleaned her entire 3 bedroom house with just the upholstery tool. Later she got a Kirby Classic Omega and she was much happier with the Kirby. Today she has a Kirby Generation 3. Anyway thanks for the help (electrikbroomgu, Joel). I had a feeling that if I bought new carbon brushes that they would have to be somewhat worn down to get the right groove for the communicator. I may just take it in and have it serviced after all. It sounds like a process to get the motor apart. A little mothers aluminum polish goes a long way!!! 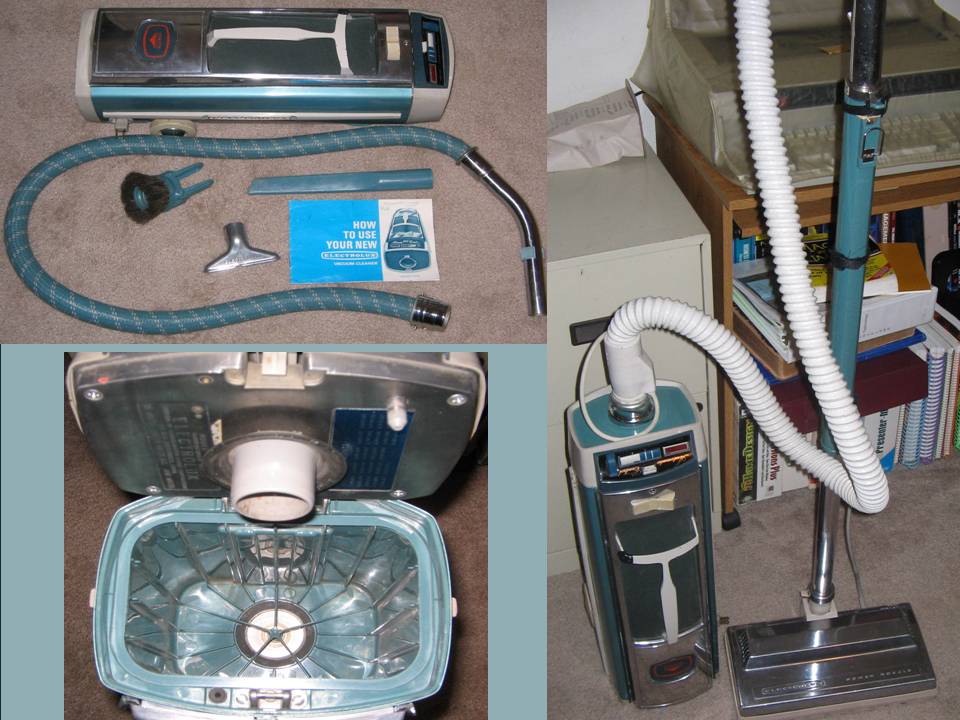
| ||
| Post# 91332 , Reply# 5 2/11/2010 at 10:48 (5,180 days old) by luxg () | ||
|
YAY Kenny, I am so glad to hear that you will be joining the club!! I know that you are going to enjoy it. Welcome!! Terry | ||
|
Post# 91383 , Reply# 6 2/11/2010 at 20:13 (5,179 days old) by kloveland (Tulsa) |
||
|
| ||
| Post# 280413 , Reply# 9 5/13/2014 at 22:16 (3,627 days old) by BikerRay (Middle Earth) | ||

I'm guessing the contact (or Terminal) block on the side of the housing melted, this happened a lot on the 1205's. They had a repair kit that bypassed the block and wired to the connectors on the cord reel. The motor may be fine, it's just not getting any power.
If I remember correctly it should be the top and bottom connector of the block that contact the cord winder. The middle connection is an internal connection between the bag switch and the power for the motor. | ||
|
Post# 280516 , Reply# 10 5/14/2014 at 16:58 (3,627 days old) by kloveland (Tulsa) |
||
|
| ||
| Post# 280629 , Reply# 14 5/15/2014 at 15:27 (3,626 days old) by rugsucker (Elizabethton TN) | ||
|
1205 1.First had telescopic wand with direct connect hose that was somewhat troublesome with latch wear and cracked hose handle.Then back to older style and then improved direct connect without telescopic wand. 2.I think all were blue. 3.Early 1205 had PN outlet at bottom center of door.Swivel lock was no longer needed. | ||
| Post# 367051 , Reply# 19 2/18/2017 at 00:39 (2,616 days old) by kenkart () | ||
|
They must have Sold a gazillion Electroluxes in NC down thru the years,they are still plentiful, even 30s 60s and Gs. | ||
| Post# 367070 , Reply# 20 2/18/2017 at 11:08 (2,616 days old) by Caligula (Wallingford, Connecticut) | ||
Happy Birthday from the V.C.C.C. | ||
| Post# 449110 , Reply# 21 1/7/2022 at 06:14 (832 days old) by Gvox (Georgia) | ||
|
Can you still get the carbon brushes for the 1205 motor? Also does anyone know of a good source for a replacement bearing? | ||
|
Post# 449113 , Reply# 22 1/7/2022 at 09:38 (832 days old) by Kloveland (Tulsa) |
||
|
Yes, you should. I believe the earlier 1205 had the same or similar motor as the model G. Then they changed to the larger brushes with the Super J. You can try searching eBay. Or any good vac shop repair place would have them I would think.
You could also try an online retailer such as vac parts plus. The bearings I don�t know about. I�m thinking the fan side bearing is a sleeve bearing. | ||
| Post# 449262 , Reply# 24 1/15/2022 at 11:13 (824 days old) by Gvox (Georgia) | ||
|
Thanks, I have a 1205 motor. My goal is to rebuild it for the experience. Right now all I have is an Electrolux Silverado, but I want to get a 1250 since for nostalgia purposes. I remember playing with my mom's when I was a kid. Pretending it was a spaceship (LOL!) | ||
| Forum Index: | 
| Other Forums: |

|

|

|

|

|

 Comes to the Rescue!