Thread Number: 5376
polishing the Royal
[Down to Last]

Vacuumland's exclusive eBay Watch:
scroll >>> for more items --- [As an eBay Partner, eBay may compensate vacuumland.org if you make a purchase using any link to eBay on this page]
Post# 59863   2/4/2009 at 06:26 (5,552 days old) by vacuumfreeeke ()        

Well, I got my first power tool. I *almost* feel like a man. Scary, I know! Since I live in an apartment, I can't really do a bench grinder for polishing my machines. But, I realized that I needed more than elbow grease. So, I went to Lowe's and came home with a corded basic POWER DRILL (heaven help us all) and some polishing/buffing pads. I've been experimenting on one of my Royals with the new toy and some Mother's metal polish. It doesn't look "good" yet, but if you had seen this machine before the picture, you'd know what an improvement this is!

Anyone have any tips for polishing Kirbys and Royals? How do you wash the polishing pads when finished? Or are you not supposed to? Also, I had a stick of polishing compound, but it's hard as a rock. Is there any way I can make it to where I can use it again? Has anyone tried the Mothers Powerball? I'm thinking it might help me get in nooks and crannies... I'm NOT taking the machine apart to polish it!

Thanks :o)


Post# 59866 , Reply# 1   2/4/2009 at 09:12 (5,552 days old) by kirbysthebest (Midwest)        
First

You have had "powertools" for a long time. A vacuum is a power tool.

Mother's is wonderful. I just hand polished my Kirbys with it two days ago; they shine like mirrors.

I wouldn't wash the pads, too many contaminants that will stay behind, just throw them away when they are worn. (At least this is what I was told with car pads metal may be different) The hard Polishing compound can be used by starting your pad and then placing the stick against the revolving polish pad, kind of like a crayon.

Others can give you better advice I am sure.


Post# 59883 , Reply# 2   2/4/2009 at 16:56 (5,551 days old) by aeoliandave (Stratford Ontario Canada)        

aeoliandave's profile picture
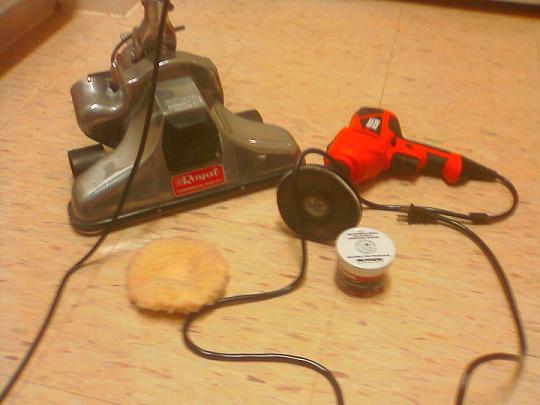
"hard Polishing compound can be used by starting your pad and then placing the stick against the revolving polish pad, kind of like a crayon."

Absolutely right But the idea is not to completely color the pad with too much compound - it takes very little to effectively polish the metal surface. Use sparingly. Watch the surface slowly start to shine, then really bear down on a flat area and watch it come up dazzleing. It is this heavy pressure bearing down that will remove the surface tarnish and 'water spotted' effect. as you polish up the flat areas the edges of the pad will peripherally get in the inside curves and crevices.

Practise , practise, practise on the flat areas and then go specifically after the crevices.

I mainly use the hand drill method and follow up with a smaller dremel tool pad for difficult areas, then do the whole thing on the bench buffer if necessary.

Dave


Post# 59884 , Reply# 3   2/4/2009 at 17:12 (5,551 days old) by aeoliandave (Stratford Ontario Canada)        
Whoops, bad pic.

aeoliandave's profile picture
Wasn't until I posted the pic I realized it looks shiny, yes, but also appears severely pitted with sandblasting.
It's dust from the carpet vacuuming. Here is the polished aluminum Electrolux PN-4 (goes with my 1205) after wiping off with a towel. LOL

This PN was very sad looking, dull and badly scratched when I got it but since I didn't have a polished one and the filthy rubber bumper was otherwise in great condition I brought it home. Last week I gave it the 'treatment' with high hopes. The water spotting effect sometimes seen on aluminum was gradually eliminated with serious bearing down with the buffer. It does require the piece being buffed to be firmly seated or secured to something lest the spinning wheel shoot it across the room. In this case I used a board with a bump stop nailed to it and then a towel over the board. I laid this on the floor against the wall's baseboard and just put my full determined 135 lb weight behind the drill.

Dave


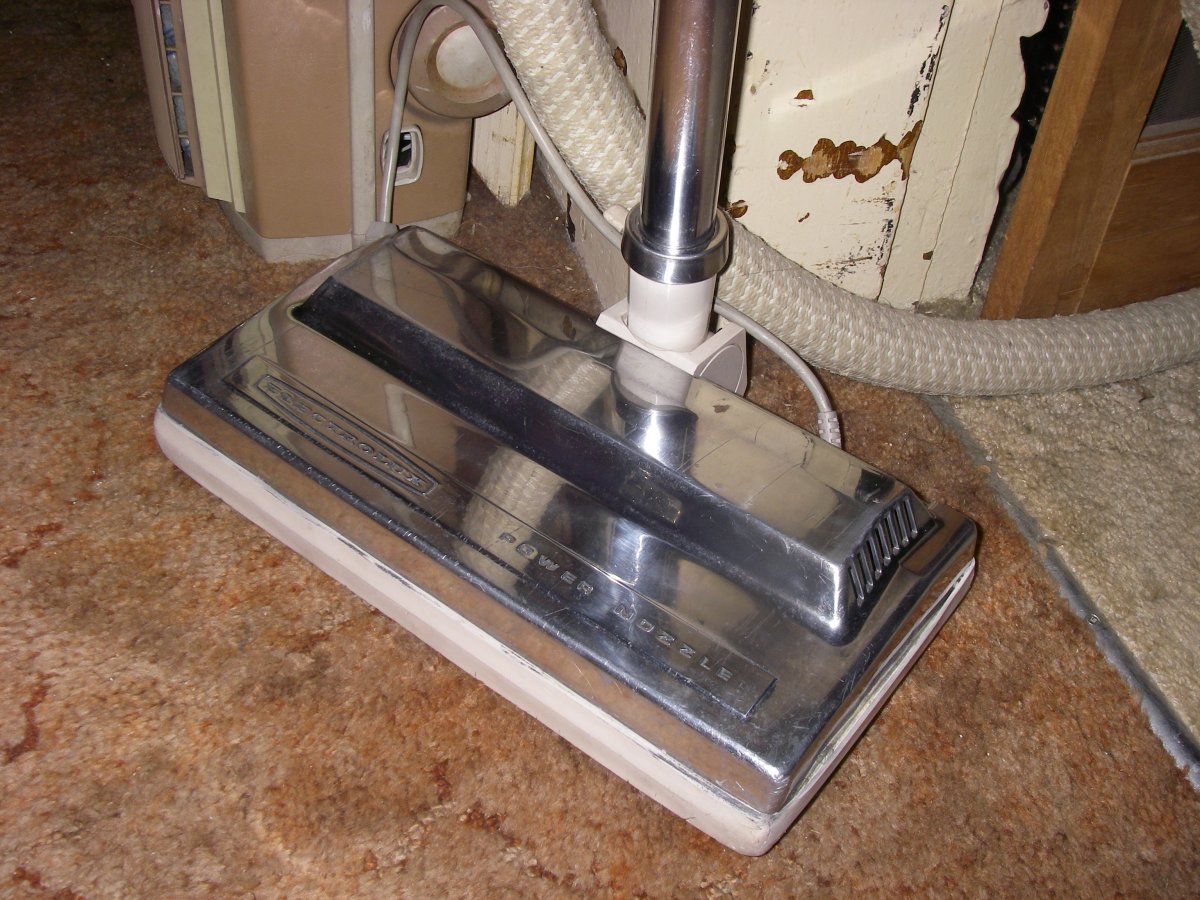
Post# 59885 , Reply# 4   2/4/2009 at 17:31 (5,551 days old) by aeoliandave (Stratford Ontario Canada)        

aeoliandave's profile picture
The before pic.

Post# 59887 , Reply# 5   2/4/2009 at 17:39 (5,551 days old) by danemodsandy ()        
About Drills and Polishing:

One thing you should know if you plan to polish with a drill very much - the bearings in a drill are not designed to take lateral (side-to-side) loads for very long, so plan on buying a new drill once in a while. This is not to say that you should not use a drill for this purpose, and it is not to say that you will wear your drill out in a week or two, but it will wear out faster than if you used the drill only for drilling. How much faster will depend on how much you use the drill for polishing. I use a drill for this purpose, but it's my old, single-speed Black & Decker. My nice new Craftsman variable-speed reversible drill is kept only for drilling and screwdriving jobs.

Once you've polished, be sure to wax. Waxing will cut way down on re-tarnishing. I use regular old Turtle Wax car wax; it does a nice job.


Post# 59893 , Reply# 6   2/4/2009 at 18:39 (5,551 days old) by xraytech ()        

I have 2 of the Mothers Power Balls. I have not tried them on any of my Kirbys yet but they do a great job on the Aluminum rims on teh Deville and the Crown Vic. It works especially well in small hard to get to areas.

Sam


Post# 59903 , Reply# 7   2/4/2009 at 22:35 (5,551 days old) by luxg ()        

What are Mother's Power Balls and just wondering where you get them? Thanks

Post# 59921 , Reply# 8   2/5/2009 at 13:08 (5,550 days old) by vacuumfreeeke ()        

The Powerball is a foam sphere shaped attachment that fits on the end of the drill to polish things... I bought one today (the mini) and am NOT impressed.

The G5 was a DREAM to polish with all its flat surfaces! Older Kirbys and Royals are going to be a pain with the round surfaces... I'd get a Dremel, but I've already spent enough money on the drill.

My G5 has never looked so good! BTW, does anyone have any tips for getting deeper scratches/gouges out of the metal? My DS80 and the Royal have some pretty deep ones...

Thanks :0)


Post# 59926 , Reply# 9   2/5/2009 at 14:11 (5,550 days old) by whirlpolf ()        

hello :-)

funny, just a few days ago I polished my G4 (and it was NASTY! stood unused beside someone's kitchen range for years, grease, water spots, corrosion all over).
Here is what I found useful when you do not want to disassemble anything and what to do to keep the job (relatively) short:

First attempt: Tried to polish it the way how it was presented in some password-protected PDF that I got mailed years ago (do not even remember from whom here). No "miracle recipies" were in that instruction that you would not find in ANY regular metal workshop. The idea to use finest steel wool to fight tougher stains proved to make the polishing job even harder.

Second attempt: I use "Commandant 4", a stuff I got from the Netherlands (for polishing old weather-worn car paint, there is probably similar stuff in other countries). Rub in with an old cloth or sponge until it gets black. Dry buff with an old T-shirt until shining. This stuff is really fast!
For tougher areas and corrosion (even minor scratches) I use Commandant4 along with a Dremel and those little polishing brushes (nylon bristled, mainly the wheel shaped one). On medium speed and holding the dremel like a pen you can do a very precise job: With little strokes and only very little pressure you "erase" the dents and corrosion stains just as you would use a regular eraser. You can work up to the edges of stickers and name plates without touching them (mind the G4 belt lifter badge on the power nozzle). BUT: Try to practice on some oven tray first, to get the "feel".

Of course, "dremeling" will get the aluminum very cloudy, but with some final hand buffing (see above, Commandant and a T-shirt) the job is done WAY faster than if I had used fine steel wool.

The Dremel brushes: www.dremeleurope.com/dremelocs-de...

Commandant car & body work products here:
www.commandant.nl/produkten1.htm...

(Btw.: I gave up on using a regular drill, you can slip off too easily and the marks that the shaft of the buffing wheel will knock in your vacuum will get your eyes wet) Just my 2 ct: Either real workshop buffing wheel (and disassembling the vacuum) or kitchen job with Dremel (as an eraser pen), Commandant and T-shirt.

Good luck!


CLICK HERE TO GO TO whirlpolf's LINK


Forum Index:       Other Forums:                      


Comes to the Rescue!

Woops, Time to Check the Bag!!!
Either you need to change your vacuum bag or you forgot to LOG-IN?

Discuss-O-MAT Log-In


New Members
Click Here To Sign Up.


automaticwasher.org home
Discuss-o-Mat Forums
Vintage Brochures, Service and Owners Manuals
Fun Vintage Washer Ephemera
See It Wash!
Video Downloads
Audio Downloads
Picture of the Day
Patent of the Day
Photos of our Collections
The Old Aberdeen Farm
Vintage Service Manuals
Vintage washer/dryer/dishwasher to sell?
Technical/service questions?
Looking for Parts?
Website related questions?
Digital Millennium Copyright Act Policy
Our Privacy Policy