Thread Number: 4911
So how do you rebristle...
[Down to Last]

Vacuumland's exclusive eBay Watch:
scroll >>> for more items --- [As an eBay Partner, eBay may compensate vacuumland.org if you make a purchase using any link to eBay on this page]
Post# 54724   11/11/2008 at 17:54 (5,634 days old) by funvacfan (Canada)        

funvacfan's profile picture
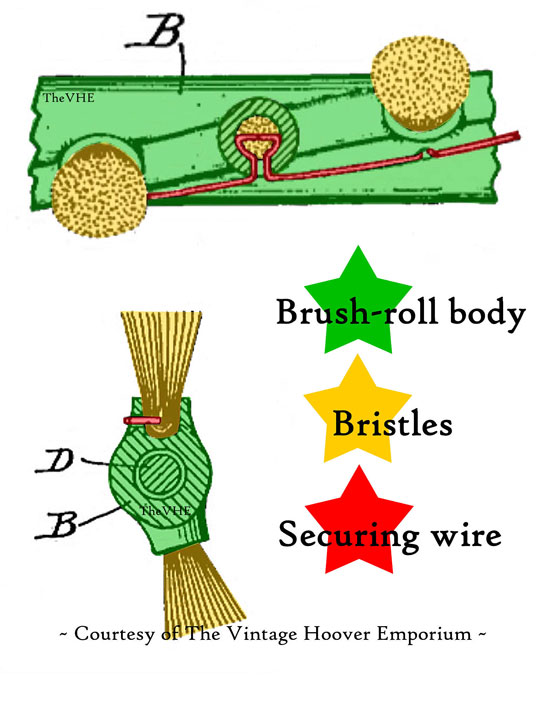
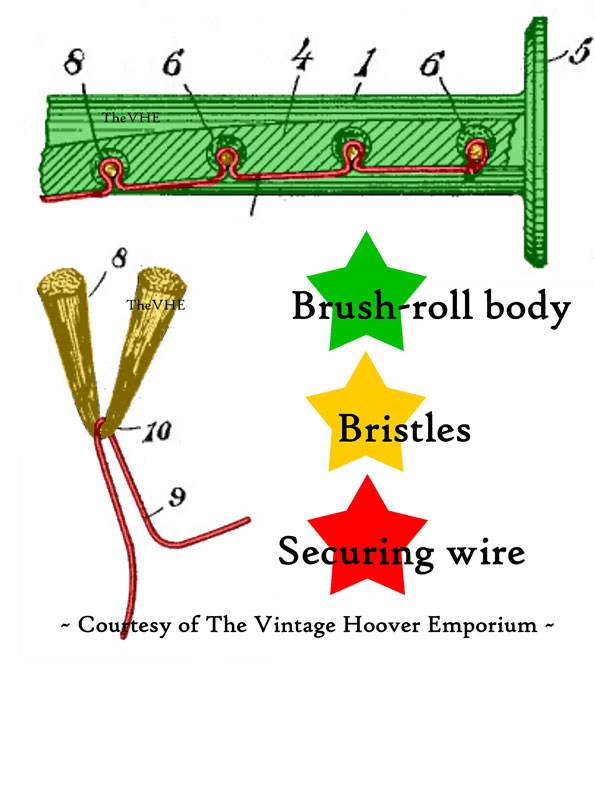
I'm enjoying using my Hoover 619. I like the heft of it. So since finding new brush strips is like impossible...how does one do it themselves? The bristles certainly don't need to be horsehair!

Has anyone done it before? Without taking the brushroll and strips apart, I'm imagining that you "stick" new bundles of bristles through the holes in the old metal strip? But then what would hold them from the back?

Any ideas?

Guy


Post# 54730 , Reply# 1   11/11/2008 at 19:41 (5,634 days old) by truckerx (Palm Springs, CA)        
bristles

truckerx's profile picture
with some brushes there is a thin metal strip that holds the bristles in place. A club member and vac store owner in Youngstown,OH, does rebristling.

Post# 54732 , Reply# 2   11/11/2008 at 19:46 (5,634 days old) by vintagehoover ()        

The Hoover 541-style brush roll is simple enough to rebristle, although it takes quite a while to do. I couldn't say about later brush-strips, though.

Post# 54741 , Reply# 3   11/11/2008 at 21:55 (5,634 days old) by hoovercelebrity (Germany)        
The Hoover 541-style brush roll is simple enough to rebristl

Jack?

Have you done that yourself?


Post# 54758 , Reply# 4   11/12/2008 at 00:04 (5,634 days old) by vintagehoover ()        
Hi Fred!

Good to hear from you - I hope you got my email thanking you for the Convention Newsletter? You did a wonderful job! :)

Yes, I have finally managed to rebristle the brush-roll on my 541. I'd been wanting to do it for ages, since the bristles had worn to the point where they didn't contact the carpet any more! I was hesitant to attempt rebristling it myself, in case I wasn't able to put it back together (the 541, and any parts for it, are ultra-rare over here). I decided I couldn't make it any worse than it was already. And it's not like I could find anyone else to do it!

After studying it closely, it's actually pretty simple. The task is more time-consuming than difficult. After all, they were designed with the intention of being rebristled periodically.

Here's a diagram I made which may help if you're planning on trying it. A picture demonstrates the process more clearly than I could with words! I used H.E.Hoover's patent diagram as the basis. I think the method should apply to any post-1911 Hoover non-Agitator cleaner, since Francis Mills Case's original design uses exactly the same principle.

I wasn't able to re-use the original copper wire when rebristling - ordinary fuse wire did the job fine. It just needs to be strong enough to hold the bristles in place, but flexible enough to be manipulated though the tiny holes.

I cut bristles from an ordinary dustpan-type brush. I don't know how well they'll hold up under use, but it's not like they'll get used a lot, and they do a better job than the stubble that was there before! It may be a case of trial and error to find the bristles which work best.


Post# 54760 , Reply# 5   11/12/2008 at 00:23 (5,634 days old) by vintagehoover ()        
Part 2:

Here's a second diagram, from a much older patent. Same principle, however, and it shows more clearly how it all goes together.

After removing original brushes and wires, and removing any dirt from the bristle sockets:

- Thread wire though hole from outside

- Loop round length of bristle. This will be folded in half when you pull the wire taut. You need enough bristles to fill the socket and fit tightly. They also need to be long enough to contact the floor. I'd estimate VERY roughly about 4" in total - so 2" when folded in half. They can then be trimmed as needed. I found it tricky to get a brush with bristles long enough to use, although I tracked one down eventually. Perhaps someone else can think of a better source? A lot of this process is trial and error! If you can't get bristles long enough, use shorter ones and put the brush-roll on setting 3 when you reinstall it in the cleaner.

- Thread the wire out through the hole again from the inside to the outside. Pulling the wire taut should pull the bristle into the socket, folding it in half and securing it in place.

- When you get to the last socket in the row, anchor the end of the wire by wrapping it round the exposed wire between the final socket and the one before it. I've got a 'before' picture of the brush-roll somewhere which shows this clearly, if my description is confusing!

I think that's everything...hope it's helpful! Let me know if you give it a try! Not quite as neat as the original, but as close as we can get 80 years on :)


Post# 54768 , Reply# 6   11/12/2008 at 15:27 (5,633 days old) by funvacfan (Canada)        
Well thank you!

funvacfan's profile picture
I will have to try this. As you say, there is no one around to do it for me, and the one screw brush strips are too hard to find!

Guy


Forum Index:       Other Forums:                      


Comes to the Rescue!

Woops, Time to Check the Bag!!!
Either you need to change your vacuum bag or you forgot to LOG-IN?

Discuss-O-MAT Log-In


New Members
Click Here To Sign Up.


automaticwasher.org home
Discuss-o-Mat Forums
Vintage Brochures, Service and Owners Manuals
Fun Vintage Washer Ephemera
See It Wash!
Video Downloads
Audio Downloads
Picture of the Day
Patent of the Day
Photos of our Collections
The Old Aberdeen Farm
Vintage Service Manuals
Vintage washer/dryer/dishwasher to sell?
Technical/service questions?
Looking for Parts?
Website related questions?
Digital Millennium Copyright Act Policy
Our Privacy Policy