|
Thread Number: 42090
/ Tag: 50s/60s/70s Vacuum Cleaners
Kirbys 501, 517 & 519 |
[Down to Last] |  |
| Post# 443754 , Reply# 1 7/10/2021 at 14:57 (1,017 days old) by Hoover300 (Kentucky) | ||
 | ||
Post# 443755 , Reply# 2 7/10/2021 at 15:20 (1,017 days old) by KirbyClassicIII  (Milwaukie, Oregon) (Milwaukie, Oregon) |
||
fantomfan57
I think you mean one of your Kirbys is a 510 or 511 or perhaps even a 561, not a 501.
~Ben This post was last edited 07/10/2021 at 17:17 | ||
|
Post# 443757 , Reply# 3 7/10/2021 at 15:36 (1,017 days old) by KirbyCollector (Columbus Ohio USA) |
||
You must mean 511 or 561 | ||
| Post# 443760 , Reply# 4 7/10/2021 at 16:25 (1,017 days old) by fantomfan57 (Central Texas) | ||
|
Oops, I am sure I read it wrong. I will double check. In the meantime, I found the front brush roll hosing, it had a broken belt changer plastic cover. I replaced it with the one on the carpet brush housing. Exact match. Which means, I need a replacement early brush roll. | ||
| Post# 443772 , Reply# 6 7/11/2021 at 02:03 (1,017 days old) by Lesinutah (Utah) | ||
Look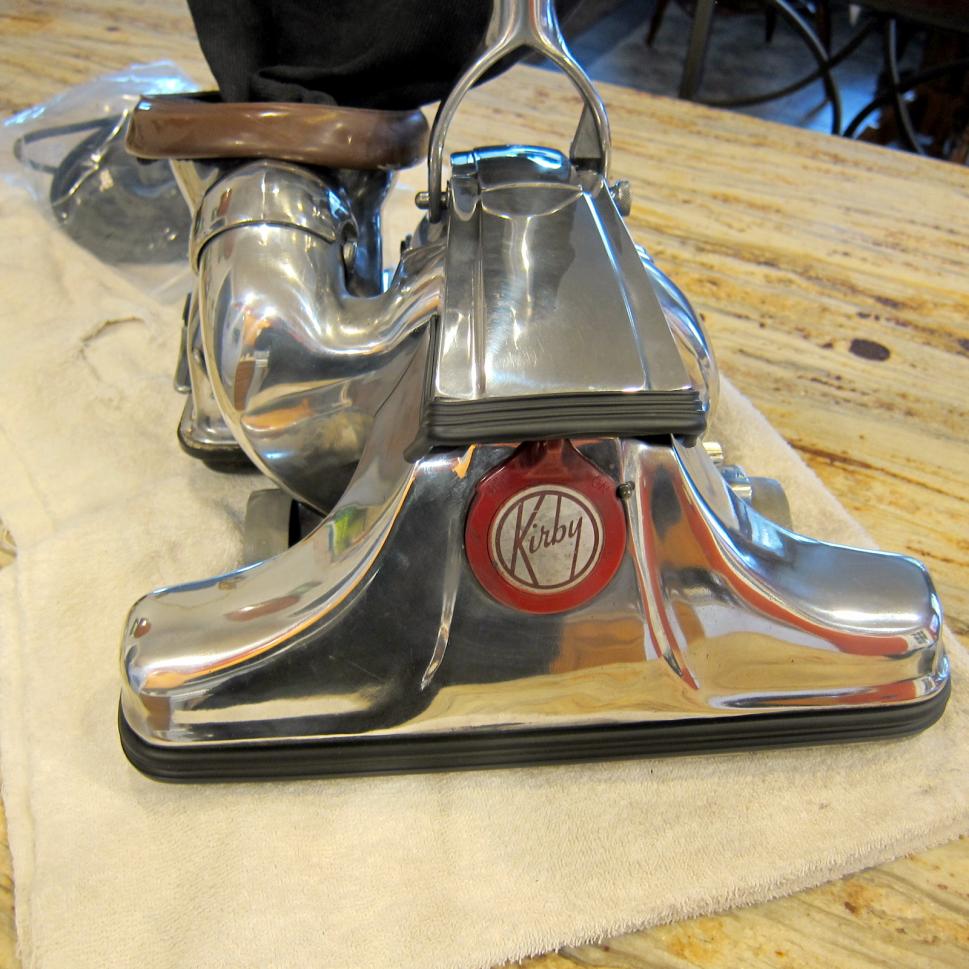 | ||
| Post# 443775 , Reply# 7 7/11/2021 at 06:11 (1,016 days old) by fantomfan57 (Central Texas) | ||
|
Les, Very nice restoration. What process did you use to clean and polish your? I know it is important to use good tools to dismantle vacuums to avoid damaging the fasteners. | ||
| Post# 443777 , Reply# 8 7/11/2021 at 11:06 (1,016 days old) by Lesinutah (Utah) | ||
|
I
Took each piece off one at a time. You clean it and make sure no calcium build up or anything after cleaning it. The screws sand the head of the screw before removing them. Keep track of where the screws go. Polish the screws with polishing wheel.
Sand from 100 grit to 200 grit to 2000 grit. When done standing lightly clean off excess sanding dust. If you have small imperfections you can hit it with cutting rouge with a buffing wheel. If you reach the point where it's flawless get a microfiber towel and apply generously. You keep rubbing polish in circular motion until polish becomes black. Lightly remove polish and spots the polish isn't black yet at a little bit at a time while keeping circular application motion. It will take some time but once polish is removed go over the body and ensure there is no residue left. The restoration of the 510 was hard as it was in a barn for over 50 years. The screws if cleaned make them easier to install and are already polished for install. You see people completely disassemble the vacuum and polish ever piece. I wouldn't recommend this until you know where everything goes, good at polishing metal and have enough time. Just because the vacuum is polished doesn't mean everyone completely cleans the inside of the vacuum. If you have the motor housing empty use a degreaser. The degreaser gets off almost everything. Then I'd dry it use steel wool if any blemishes. You don't polish the inside but imagine a car restoration that has grease around the motor. It's the details that make it good to great. If you get a cleaner for cars to clean electrical components you use that to clean field coil and the armature. If that lost you I can recommend looking up texaskirby guys thread I'm attaching hyperlink. He has pictures and his explanation and instructions are great. | ||
| Post# 443803 , Reply# 9 7/12/2021 at 15:35 (1,015 days old) by fantomfan57 (Central Texas) | ||
|
Les, I found on the inside of the emptor, a removable metal grid that was a holder for what looks like the felt material. My guess is it was used for the Sweetaire drops. | ||
| Post# 443806 , Reply# 10 7/12/2021 at 17:14 (1,015 days old) by Lesinutah (Utah) | ||
|
Yes
That's exactly what it's for. If you use steel wool the aluminum grate will come clean. Did yours come with a sweet sure cap? The cop would be on the outside upper portion. The cap on 510 I believe is black as I've only had red, grey, tan blue(Kirby never made a blue cap). I've painted tan and red ones.
You have a pic of the bags? The 508-512 bags are super hard to find. The 510 cord I believe is a dark grey bell female end that plugs into the machine. If you look at the back of the attachment boxes in the center is a number. The 510 would be 50 and 517 would be 57(1957)and 519(1959). The 519 is the last of the plastic belt lifters. The 560 has the metal belt lifters with the plastic bezel. | ||
| Post# 443902 , Reply# 11 7/17/2021 at 05:53 (1,010 days old) by fantomfan57 (Central Texas) | ||
|
Hey Les No, the screw in cap is missing on mine. Someone used to sell the caps on Ebay years ago. But I found that same cap was used on older Handi-Butlers. I suppose I can use a piece of felt as a replacement for the material behind the grate in the Emptor. | ||
| Post# 443927 , Reply# 12 7/17/2021 at 19:11 (1,010 days old) by Lesinutah (Utah) | ||
|
I | ||
| Forum Index: | 
| Other Forums: |

|

|

|

|

|

 Comes to the Rescue!


