Thread Number: 1255
Lux Model Info..?
[Down to Last]

Vacuumland's exclusive eBay Watch:
scroll >>> for more items --- [As an eBay Partner, eBay may compensate vacuumland.org if you make a purchase using any link to eBay on this page]
Post# 12767   4/18/2007 at 12:17 (6,214 days old) by scooterbug25 ()        

Hey Everyone, I just got this Lux from a friend of mine.. I'm not sure what kind it is, Would you be able to tell me anything about it? I have tried looking for the Thread Charles~Richard had with the "lux life line" poster??

What would i use to polish this up and clean it up?

Thank you for all your info.


Post# 12769 , Reply# 1   4/18/2007 at 13:29 (6,214 days old) by akabent (LEFT Coast)        
LUX ID

Hello Jerry,

You have acquired a 1948 or later model XXX Electrolux. The model and wattage will be on the chrome band on the bottom at the FRONT of the cleaner. If it is 475 watts, it is 1948. If it is 535 watts, it is 1949-1951. (In 1952, this model came with a blue waffle vinyl top/cover) They are wonderful machines, and if the motor is kept dry, greased (required very infrequently) AND good carbon brushes, it will almost last forever. When you run it, if the motor takes a while to come to a stop (motor run-out) after you shut it off, the bearings and grease are fine.
I would start with Windex on the chrome, Mother's Aluminum Mag Wheel cleaner on the aluminum, and a mild to moderate detergent on the grey leatherette cover with a soft rag. Be sure to dry the chrome, esp the edges, so it does not begin to rust down on the edges. Good luck!!!
Rick


Post# 12771 , Reply# 2   4/18/2007 at 17:08 (6,214 days old) by scooterbug25 ()        
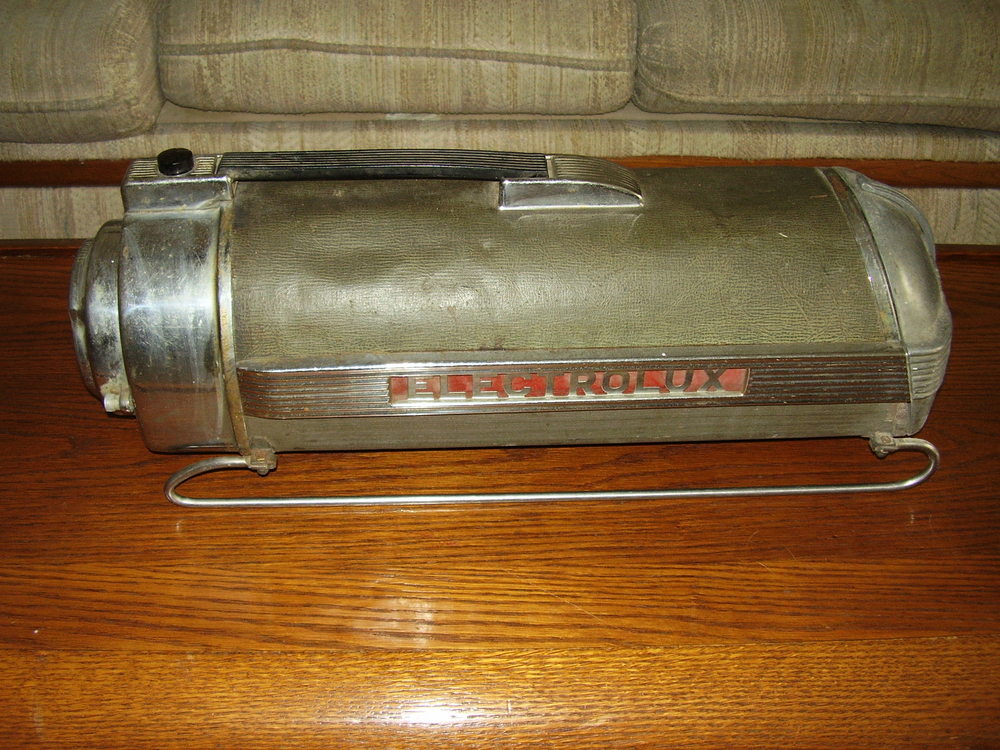
Thank you Rick...

It is 475 watts..What would i use to grease this motor with? Also, I have not really taken it apart other then cleaning the cloth bag (that came with a load of vintage dirt). Any Suggestions on what to do first?
Thank you,
Jerry


Post# 12796 , Reply# 3   4/18/2007 at 22:33 (6,214 days old) by vacjwt ()        
SHE LOOKS LIKE

SHE NEEDS HELP HAVE FUN AND GOOD LUCK

Post# 12850 , Reply# 4   4/20/2007 at 00:05 (6,213 days old) by scooterbug25 ()        

yes, it looks nasty for sure, you can tell it was used ALOT!! I hope too get it cleaned up and looking good again. Will that Mothers Cream work on the attachments?

Post# 12851 , Reply# 5   4/20/2007 at 00:16 (6,213 days old) by vacjwt ()        
yes

but you may need to use some steal wool first

Post# 12852 , Reply# 6   4/20/2007 at 00:20 (6,213 days old) by vacjwt ()        
by the way

do you have a hose this is the one that went with it

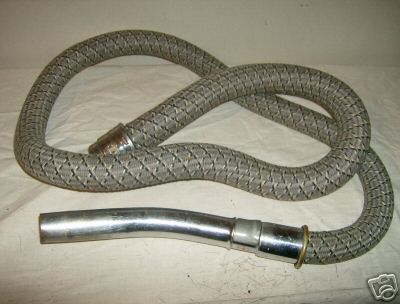
Post# 12854 , Reply# 7   4/20/2007 at 00:45 (6,213 days old) by scooterbug25 ()        
I do have a hose,

It does not look like that, This is plastic.

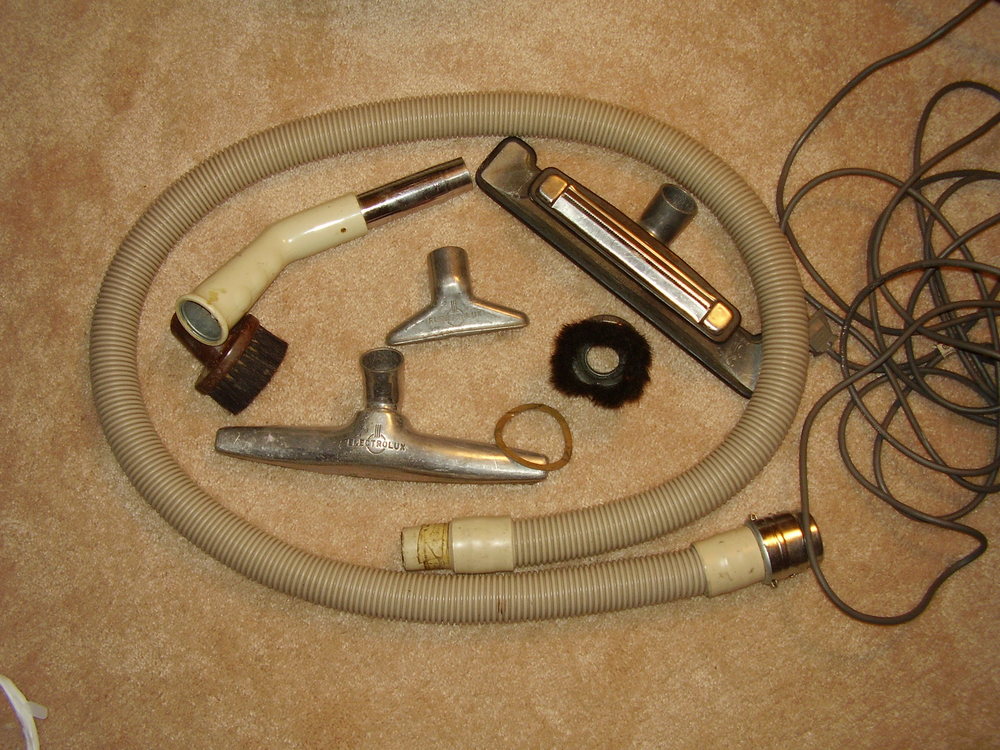
Post# 12859 , Reply# 8   4/20/2007 at 01:36 (6,212 days old) by vacjwt ()        
the hose is a bojack and so is the cord

but the tools are grate and you can just clean them up I have not found a set of tools nearly as nice as those I love them this is the cord that came with it
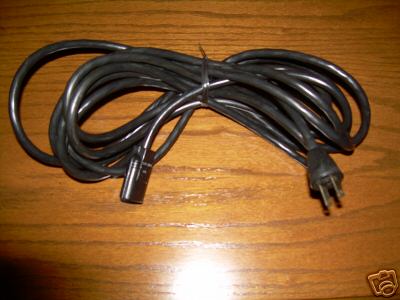
Post# 13220 , Reply# 9   4/30/2007 at 08:01 (6,202 days old) by electrolux-dude (Canyon, TX)        
To Jerry-Motor Service Instructions

Hey, there, Jerry--Nathan Thomas here, at your service. I will be glad to share with you on how to service the motor on your machine. Those old XXX's or 30's run forever! Here are some step-by-step instructions on how to work on the motor.

The first thing you will need to remove is the blower cover, which is held on by a round knob on each side, so there are a total of 2 knobs. After removing the blower, the next step is to unscrew the two little nuts at the bottom of the threaded shaft on each side of the machine. This shaft is threaded, and the knobs screw onto it which holds the blower on. You don't have to unscrew the nuts clear off. After unscrewing the nuts you will then be able to pull the 2 threaded shafts toward you. The end of the shafts have a little hook that fits into a groove that holds the front cover on. After loosening the nuts and loosening the shafts, you can then pull the front cover off and you will then need to pull the two wires from the motor out of the switch. The wires will come out, they simply plug into the rear of the switch. To remove the motor for service, there are three nuts that hold the motor in. Loosen the nuts, and pull the motor unit out. To dis-assemble the motor, there are 4 long screws and nuts on the fan housings. Remove the screws, and the top fan housing will come off. Loosen and remove the large nut in the center of the top fan. It's a good idea to label your fans, the first fan is the Top Fan, so label it "TOP". Remove the top fan, and the second fan housing, and then remove your bottom fan, labeling it "Bottom". The fans have little round nubs in the center of them, the bottom fan's nub faces up, and the top fan's nub faces down. The reason to label your fans is so they will be replaced in the proper order. Take an old brush, and with warm soapy water, thoroughly clean the fans, you want all that dirt out of there, so your machine will have good suction. To continue dis-assembly of the motor, and to gain access to the bearings, remove the three screws holding the bearing housing on. Also loosen the two screws at the front of the motor, on top of the side of the motor nearest to the commutator/armature. The two screws at the front of the motor is what holds the front bearing cover on. It will need to be removed so you can pull the armature and bearing assembly out. With the same brush and soapy water, clean the inside of the motor, and after cleaning all parts make sure to dry them good. Use a hair dryer. You will need a bearing puller to use to remove the bearings. Most bearing places have them. Usually when I service a machine I replace both bearings. Remove the carbon brushes by loosening the little brass screw on the side of the carbon brush housings, and also clean the inside of the carbon brush housings, using a brush and a little lime-away. The lime away will get those insides of the housings shining like new! To assemble your motor, simply reverse the directions, assemble, and test. If you will carefully follow my directions, and with a good cleaning, your machine will work like new! Should you have any further questions or need help--feel free to contact me. My e-mail is kingofsteam@midplains.coop.

Sincerely,
Nathan L. Thomas


Forum Index:       Other Forums:                      


Comes to the Rescue!

Woops, Time to Check the Bag!!!
Either you need to change your vacuum bag or you forgot to LOG-IN?

Discuss-O-MAT Log-In


New Members
Click Here To Sign Up.


automaticwasher.org home
Discuss-o-Mat Forums
Vintage Brochures, Service and Owners Manuals
Fun Vintage Washer Ephemera
See It Wash!
Video Downloads
Audio Downloads
Picture of the Day
Patent of the Day
Photos of our Collections
The Old Aberdeen Farm
Vintage Service Manuals
Vintage washer/dryer/dishwasher to sell?
Technical/service questions?
Looking for Parts?
Website related questions?
Digital Millennium Copyright Act Policy
Our Privacy Policy