Thread Number: 1124
fixing loss of suction in old hoses
[Down to Last]

Vacuumland's exclusive eBay Watch:
scroll >>> for more items --- [As an eBay Partner, eBay may compensate vacuumland.org if you make a purchase using any link to eBay on this page]
Post# 11319   3/24/2007 at 00:26 (6,236 days old) by vacjwt ()        

I have tryed many things to fix the loss of suction but I have found one thing works you take 3 bottles of rubber cement and take the back of the hose and por 2 bottles of the stuff into the hose and roll the hose around and make shore you get it all the way threwout the hose let it sit 15 minets after that hook the hose up to the blower on the vacuum do this out side put on some gloves and use the golve to keep the air from coming out of the hose and the ruber cement will work its way in to the cracks of the hose hold your hand over the hose for 1 minnet no more no less after this lay it out strate and let is sit for a day or so it will not bring all the suction back but if you do it rite it will pro long the life of your hose but the frist you do it do it with a hose that is not worth that much to you it took me 2 hoses to get the hang of fixing them try it this will make you very happy but in 1 to 2 year you may have to do this agen

Post# 11320 , Reply# 1   3/24/2007 at 00:47 (6,236 days old) by charles~richard ()        
Better than rubber cement...

... is liquid latex because it is not as sticky as rubber cement. But I would caution people to proceed with great care --- if you have a vintage hose that looks great but doesn't have good suction, consider whether you may want to risk totally ruining it.

That having been said, here's an article I wrote about repairing cloth hoses. Again, keep in mind that you proceed at your own risk if you decide to try this.


--------------------------------------------


THOSE OLD CLOTH HOSES

How To Restore Old, Inefficient Hoses To Their Former Airtight Glory

by Charles Richard Lester

How many of you have, as I do, a lot of old vacuum cleaner cloth or woven vinyl hoses that look great but fall far short of having a good seal for cleaning?

Those old hoses were pretty complicated affairs - their construction and manufacturing details vary somewhat from brand to brand; but basically, first there was an inner cloth or rubberized cloth layer, then a coiled steel innerspring to keep the hose's round wall shape, then a thick rubber layer and finally the outer decorative woven cloth or vinyl layer.

In many cases, the old hoses may, from the outside, look brand-new yet are not functional for cleaning because they leak air so badly from the inside.

The reason for this is that the rubber and cloth inner linings have deteriorated, in some cases to the point where all that's left inside is some dry-rotted fabric and the steel innerspring - the rubber having long-ago crumbled away.

I have many beautiful hoses in my collection, most of which - in fact, ALL of which, except for one or two notable exceptions, are absolutely useless for cleaning. Yes, the machines sit around looking beautiful but I can't have any fun vacuuming with them because I have to use some hideous plastic replacement hose so the darned things will actually cleaned!

And I don't know about anyone else ... but to me the original hose is very important in terms of having the machines "look right." Those who know what I mean "will know what I mean;" the others among us will just think I really have lost it and am totally certifiable, and that's fine. Just keep your nets and straitjackets away from me!

Anyway ... over the years I had tried to devise various ways to remedy this. I looked around for some sort of plastic sleeves to insert into the hoses to make a seal. Even if I could have ever found such a sleeve, which I never could, it would probably not have worked very well. The plastic would not be very flexible so the hose would not bend properly, and there would be a problem in sealing the plastic lining to the inner wall of the hose to hold it in place and to give a tight seal at both ends.

Well, one day I had quite a brainstorm. I was looking at some of my hoses and musing about the inner linings being made of rubber. Then that word hit me in the head like a brick - RUBBER!! Of course!! They key to the tight seals inside these hoses is the RUBBER lining! So then, the next matter for consideration was, "How do I get a tight rubber seal inside this old hose?"

In a flash, my mind shot back to the old days when I was active in community theatre and became very proficient at character and prosthetic (i.e., monster and "gore") makeup. One of the tools of that trade is latex, in various forms - foam, solid, liquid, sponge, and so on. Liquid latex is readily available (at least, it's readily available here in Los Angeles -- Land of Make Believe!). It is used for many things, including old-age makeup and making rubber "appliances" such as noses, cheeks, jowls, bald heads, wounds, monster and alien masks, and so on.

The makeup artist can either apply the latex directly to an actor's face, which is quite an ordeal because the latex is suspended in ammonia and smells like a nasty old cat-box! Or, it can be poured and "sloshed" into molds to make artificial features.

And this is where the old hoses come in! I just happened to have in my closet a gallon jar of liquid latex left over from a very ambitious Halloween project a couple of years ago. I got to thinking, I wonder if I could slosh some latex into an old hose, let it dry, and produce a tight seal?

To cut to the chase ... IT WORKED!! I taped shut the machine end of the hose and poured about a quart or so of latex into the handle end. I worked the hose back and forth and wiggled it around and up and down to cause the latex to run down along the inner walls and to the other end.

When I could tell by the weight that it had gotten fully coated inside, I hung the hose in a "U" over some newspapers to allow the surplus latex to drain out (removing the tape from the taped-up end). I left it that way for several days because I knew it would take a long time for the latex to fully dry.

If you try this, please heed a couple of warnings and save yourself some heartaches:

First, make sure the hose is clean inside. Connect it to the vacuum cleaner and let it run for a minute or two to remove any dust or excess loose rubber or cloth. If there is a clog, I would not suggest dumping latex into the hose as it will just totally and completely clog up the hose for all eternity!

Second, DO NOT try to hasten the drying process by connecting the hose to the blower OR the suction end of a cleaner and turning the sweeper on.

If you connect it to the suction end you are going to suck liquid latex into the dust bag. If it's a cloth bag it is going to get ruined. Once latex has solidified, there is absolutely no way to remove it from fabric. Which is a good thing in terms of sealing your hose, but a bad thing in terms of what it will do to the bag. If it's a paper bag, the latex could seep through the paper lining and get into the motor, which would make a terrific mess and probably ruin the motor.

And if you put the hose into the blower end, it will cause the liquid latex to bubble up and close off the inner walls, ruining the hose. Trust me. I learned the hard way and ruined a perfectly good Electrolux XXX hose on my experiments. Well, not really ruined. It still looks beautiful. But it's totally blocked up; no air can pass through at all.

You must let the latex dry slowly and naturally.

After the latex has thoroughly dried (and I would allow at least three days to be safe), dump a pretty good amount of talcum powder into the hose and work it around so that all the latex gets covered.

The reason to do this is that fresh latex sticks to itself, and to a lot of other things, so you could get a nasty clog either by sucked-up stuff clinging to the sticky latex, or by it's clinging to itself when the hose bends and flexes. The talc renders the latex UN-sticky so this extra precaution will help avoid possible trouble.

I conclude with the caveat that you must do this carefully! If you ruin a prized old hose, I cannot take any blame or responsibility. Do this at your own risk! I say this not to scare you or discourage you, or to make you think it won't work. It will work. At least, it did for me. But in this litigious age, this disclaimer is necessary to protect myself and the club from some sue-happy member who ruins her beautiful 1921 Hoover cloth hose and starts looking for someone to blame!

I would strongly suggest doing your first tryout on an old hose that's not all that important to you. Pick one you have doubles of, or that is not cosmetically immaculate. Don't start with your ONE gorgeous Electrolux XXX hose or you might be sorry if you mess it up.

Oh --- I guess you'll want to know where to get the latex. Those who live in large cities can start with theatrical makeup supply stores. Some costume shops also sell theatrical makeup but those that do usually have limited inventories, and probably won't carry liquid latex in large quantities. They usually sell ounce bottles and at, what, 5 or 10 dollars an ounce, your hose restoration project will get quite expensive!

You need to get it in bulk - minimum of a gallon. Even at gallon quantities, it's not gonna be real cheap, probably $50 or so a gallon. But if you want to restore your old hoses, and have a lot of them, it will be a good investment. As a rough estimate, a gallon of latex is enough to do at least 10 or 15 hoses. A trick to recycle some of the latex would be to let the excess drain back into the bottle before hanging the hose up to dry.

I bought my latex at Burman Industries in Van Nuys, California - 818-782-9833; I actually went to the store but they very likely will take mail orders. Or you can check on the Internet - search for "liquid latex." Certain types of floor tile adhesive are made of rubber-based liquid compounds, but I'd be wary about trying anything other than "straight" liquid latex.

I'd be thrilled to hear of other's hose restoration projects --- let me know how it goes!


Post# 11323 , Reply# 2   3/24/2007 at 08:50 (6,235 days old) by kirbymodel2c (Nottingham, England)        
Great info!

kirbymodel2c's profile picture
Great info.

Here's a question.
How do you keep old rubber cables from going stiff/dry rotting?

Any Ideas?????

james


Post# 11330 , Reply# 3   3/24/2007 at 13:52 (6,235 days old) by charles~richard ()        
Old rubber cables (cords)

are a different matter entirely. And I suspect you are thinking of early Kirby cords in particular, which seem to develop dry-rot at the plug ends and at the hook that attaches the cord to the machine. No idea what to do about that. Of all my Kirbys, only 3 of them have the original cords and believe me I treat them as if they are worth their weight in gold -- which, of course, to me they are!

There was one cord in particular, apparently only used a very short time, that develops dry rot and an incredible stiffness. It's a gray cord with the red plugs as used in models 516 through 561, but this is an early example of that type as the logo on the male plug is the older more ornate Kirby logo. Or perhaps it may have been an after-market replacement cord; I am not sure. I have found a couple of these cords and they have both literally become petrified -- they are hardened so solidly that you can't even uncurl them. The rubber does appear to be a different material than the other cords -- it "feels" different and the gray is a slightly different color, having a slight greenish cast to it.

The cords that fare the best are the later vinyl cords as introduced in the 514 and 515 (large round machine-end plug) and then used in the 516 and thereafter (Flat machine end-plug) until the early Heritage.

Of course, Kirby cords were made by Belden and the change in material reflects the change that Belden made at the time in their cord stock.


Post# 11338 , Reply# 4   3/24/2007 at 14:59 (6,235 days old) by seamusuk (Dover Kent UK)        
Rubber cords....

Hey James/Charles

Ive settled on Armor All- It cleans and protects Vinyl, Rubber and plastic. Ive used it on the original cables and handgrips on my 119 Juniors and earlier cleaners- also hoods etc on later models.

Seamus


Post# 11343 , Reply# 5   3/24/2007 at 17:19 (6,235 days old) by kirbymodel2c (Nottingham, England)        
Where can you get that?????

kirbymodel2c's profile picture
Thanks Seamus for that.
Where can you get it?

Also are you sure it ok on rubber as some things like that can rot rubber like vaserline.
Ok not that I use that on my cables but I hope you know what I mean?

james


Post# 11344 , Reply# 6   3/24/2007 at 17:34 (6,235 days old) by kirbymodel2c (Nottingham, England)        
Mind you.

kirbymodel2c's profile picture
Its a shame we can't get those original vacuum bags to look the same once they have faded/ gone discolored!!

any ideas on that????

james


Post# 11345 , Reply# 7   3/24/2007 at 17:41 (6,235 days old) by charles~richard ()        
Old Bags

I have tried dying a couple. Big flops both times. In one case, all the silkscreen lettering dissolved away, leaving only a trace of the original pattern. In the other case, the silkscreening held up but the dye job was not even -- despite using like six boxes of dye and letting the bag soak for several hours. Once the dye was rinsed out, as it has to be, it left streaks and splotches and uneven dying.

I'd say the only way to restore a bag to original condition - keeping in mind you're going to risk losing the silkscreening - is to take it to a commercial clothes dying establishment. Some dry-cleaning places do it. Also, good luck in getting an exact match on the original color.......

Another problem with dying gray Kirby bags is that they all have that red "cord" around the top flap. There's no way to keep it from getting dyed as well. Then of course the later Kirby bags with the specked finish -- well, how would one ever duplicate THAT?!


Post# 11347 , Reply# 8   3/24/2007 at 18:12 (6,235 days old) by vacuumkid3 ()        

Well, Charles...

I bought a silkscreen kit that I will try. First I need a template...But about getting some areas from dying, there is a technique called batik that you need to try. It is using melted wax on certain areas to prevent dye from dying it. Specked finishes might be duplicated by splattering dye, although I don't exactly know what kind of finish it is. My first bag of duplication will be a Kirby model C bag. That is, once my friend sends the template! I got some thick fabric, but I don't know how good it will look. Also, I will need a spring for the bag, as well as the top bag holder. Also got to get me some gold and red ink for the silkscreen! This will be a fun little project! Then maybe I can try pouring some latex down my Rexair hose! Then I can use a somewhat original hose, although this one is white. More like a pale white with a lighter white stripe down it. Still functions okay, but it could be better. And how about that car tire filler they make? That might work! Maybe I can try that...if I can find another hose for the Rexair B...I will let ya'll know when I get all of this worked out!

~~K~~


Post# 11348 , Reply# 9   3/24/2007 at 18:55 (6,235 days old) by charles~richard ()        
Calling David Watters, Calling David Watters

David had done a pretty good job of retouching some Kirby bags whose lettering was faded -- he actually did it freehand with liquid paint and a brush!

The thing with silkscreening Kirby logos is that a silkscreen stencil or template has all the "reverse" areas cut out of it. If you look at a Kirby logo you will see that this is impossible to do because of the way the lettering and the dotted lines are constructed. Doubly impossible because they have two colors - red and silver (or gold on the really old ones).

I don't know how Kirby created the lettering on these bags originally, but I am pretty sure it was not silkscreening.


Post# 11352 , Reply# 10   3/24/2007 at 19:21 (6,235 days old) by seamusuk (Dover Kent UK)        
James

I got mine from Halfords- its actually ment for car trim etc- it says it cleans and protects vinyl, rubber and plastic :).

Also you are quite right bout the vasaline thing- anything oil based rots rubber- as any erm contraceptive leaflet will remind ya lol!!

Seamus

P.S

Charles- I see Armorall came from your "neck of the woods" as it were!


CLICK HERE TO GO TO seamusuk's LINK


Post# 11354 , Reply# 11   3/24/2007 at 21:32 (6,235 days old) by charles~richard ()        
Armor All

is probably safe for use on rubber as it is an acrylic sort of liquid and not oil or petroleum based. It reminds me somewhat of Future Floor wax if you're familiar with that product.

It's great stuff. You can spray it on just about anything and it'll look better!

I did not know it came from California though!


Post# 11355 , Reply# 12   3/24/2007 at 21:38 (6,235 days old) by vacuumkid3 ()        

Charles!

The silkscreening process can be done several different ways. You may use multiple colors simply by taping off a shellacked-on stencil of what you are copying. So, two colors are definitely possible. Now, the stencil can be very complicated by using a method of light exposure, just like film in a camera. You can get it as thin as a hair, or so I hear. So, it is possible they did this back in the day. If not, shellacking on a stencil is another way. That does not offer as complicated stencils, but still, it is pretty good. But to answer your question about if it really was silkscreening, someone told me it was. It makes since, as it goes on fabric well, and it is certainly thin enough, and can be done quickly if you are good at it. I will let you know how a little test on some fabric does with it! Charles, would you happen to have some pictures of a Kirby C bag? I would LOVE to get an idea of what I am looking at! Thanks!

~~K~~


Post# 11356 , Reply# 13   3/24/2007 at 22:35 (6,235 days old) by charles~richard ()        
Kirby Model C Bags

All the Kirby machines from the first Model C through 505 (C, 2C, 3C, 4C, 505) had the same bag EXCEPT for the R series (the version with the switch in the handle and sold in retail stores instead of door-to-door -- see below).

Here are two shots of the black bag for that series. The bag is made of a sort of canvas material - not the cordoury used in the 508 and thereafter through the first Classic.


Post# 11357 , Reply# 14   3/24/2007 at 22:36 (6,235 days old) by charles~richard ()        
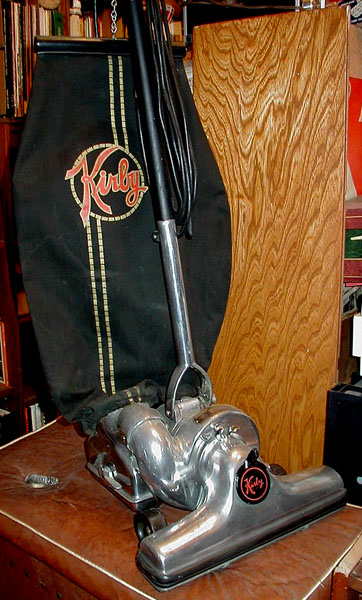
Model C Bag

Closeup of logo

Post# 11358 , Reply# 15   3/24/2007 at 22:50 (6,235 days old) by charles~richard ()        
Model R Bag

I have a Model R in very rough shape that I just haven't gotten around to restoring. I really need to do that since it's such a rare machine.

The R series was comprised of four models -- R, 2R, 3R and 4R that corresponded to the four C models. The difference was that the motor switch was up in the top of the handle instead of at the bottom in the cord housing. The R series were sold in retail establishments instead of door-to-door. There was also a version of the earlier Scott & Fetzer Sanitation System with a switch in the handle. I have one of these as well, but again not yet restored.

I have only seen one Model R in person, the one I have, but I have a photocopy of a 2R manual and it clearly shows the same bag you will see in the photos below, the one from my R.

So I am assuming this version of the bag, with the solid gold circle instead of hollow, was used specially for the R series.

As you can see the bag is in really good shape except at the bottom -- when I (VERY CAREFULLY) removed it from the machine, it was so dry-rotted and stuck to the Sani-Emptor that one side of it just pulled apart. The spring inside the bag collar is intact but very rusty. I don't know how I am going to be able to restore this bag when I do the machine but I'll figure out something...


Post# 11359 , Reply# 16   3/24/2007 at 22:51 (6,235 days old) by charles~richard ()        
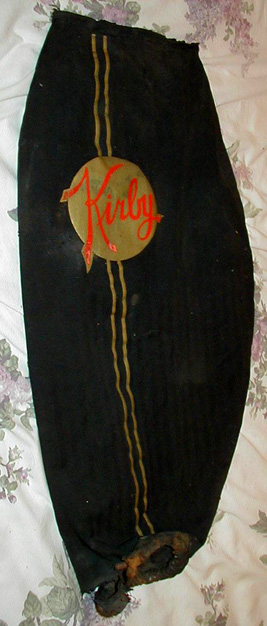
Model R bag

close-up of logo


Post# 11360 , Reply# 17   3/24/2007 at 22:55 (6,235 days old) by vacjwt ()        
what a nice bag

that is a rare find charles
by the way I have fixed about 25 hoses with rubber cement and only trashed 2 but yes try this on hoses that do not mean much to you till you get the hang of it


Post# 11371 , Reply# 18   3/25/2007 at 08:27 (6,234 days old) by vacuumkid3 ()        

WOW Charles!

Those bags are AMAZING!! I LOVE the way the R bag looks! The C is in excellent shape, too! Those are my dream machines, too! :-D You never see them on eBay! It is pretty sad...Well, thanks for the pictures, Charles! They are BEAUTIFUL!!!

~~K~~


Post# 11373 , Reply# 19   3/25/2007 at 09:06 (6,234 days old) by kirbymodel2c (Nottingham, England)        
Early Kirby model C

kirbymodel2c's profile picture
Hi,
My early kirby model C (The one with no head lamp)
Has the same bag as the R series with a solid gold color logo.
But the spring has snapped at the bottum:-((

james


Post# 11374 , Reply# 20   3/25/2007 at 09:47 (6,234 days old) by petek (Ontario)        

Charles do you think that somehow very gently steaming the bag would help restore the fibres. Say with one of those small handheld steamers used for drapes and such that way you can work slowly and avoid spots you might not want touched like the logo. Of course some of it depends on what the fabric consists of but I'm assuming it's natural fibres and not synthetics for that period.

Post# 11378 , Reply# 21   3/25/2007 at 11:19 (6,234 days old) by marukap (Saint Louis, MO)        
Your stunning Model-R Bag

Could you show us a close up shot of the mouth of the bag? I think it is very repairable. If the fabric around the base is not too terribly deteriorated, I would:

1) Open the seam of the pocket holding the rusted metal spring with a seam ripper or a pair of sharp, straight manicure siscors.

2) Discard the spring

3) Clean the trapped dust and rust from the pocket.

4) Repair the damaged fabric ON BOTH SIDES with iron-on black patch fabric (available at most any fabric/sewing notions store). I would then hand stitch the edges of the patch(es) for extra security.

5) Replace the metal spring with a standard-issue Eureka round rubber agitator belt

6) Enclose the rubber belt into the pocket by hand stitching. Make sure the pocket remains generous enough so the belt can stretch and slide easily enough. Also be sure you don't "catch" the belt with the needle.

If the fabric around the base is too far gone to be patched, I would "amputate" at the level of the highest damage, cut a piece of heavy black twill to match, open the seams on the salvaged bag where it will meet the new section and "splice" the two together as meticulously as you see fit. Install the Eureka belt at the base of this new section. Basic sewing techniques will see you through this exercise. A sewing machine would be a help for most of this work, but I, personally, would NOT use a machine to sew the pocket seam discussed above.

As for revitalizing old hoses, I am fascinated as to how we all have "converged" on largely the same solution!

I did not use pure latex, but rather PERFORMIX brand "Plasti Dip." It is available at hardware stores and auto parts stores. It is supposed to come in several colors but I have yet to see anything but black. A 14.5 oz jar costs up to $9.95.

I treated my hose much as you did, Charlie, with the following difference:

1) I washed the hose inside and out, in my bath tub in very warm water, laundry detergent and Clorox 2 (or equivalent). I happened to have a dryer duct cleaning brush set which includes multiple 3-foot rod sections that get attached one to the next as it is fed into the duct, or in this case the hose. The business end can be fitted with a bottle-brush like affair intended for cleaning out the lint trap. I used this to scrub out the deteriorated fabric lining and the considerable soil built up inside the hose.

2) I drip dried the hose, then attached it to the blower end of the vacuum for 10 minutes or so of forced air drying. Only when I was convinced it was completely dry did I proceed to the rubber coating phase.

3) After I filled the innards with the rubber solution and poured out the excess, I did, deliberately, attach the hose to the BLOWER end of the vacuum, and WITH THE OPPOSITE END OF THE HOSE COMPLETELY PLUGGED with a heavy rag, I used the positive pressure of the blower to force the still wet rubber deeply into the pores of the hose.

4) Once it was dry and set, I ran the "bottle brush" through it again to be sure there were no blockages.

Yes, the colored rubber can bleed through to the outer jacket if you are not careful. Minor to moderate boo-boos can be cleaned up with Naptha.

Yours in St. Louis,

Marty Kaplan


Post# 11379 , Reply# 22   3/25/2007 at 12:10 (6,234 days old) by sukething ()        
David Watters here...sorry for the delay...

Yes I have carefully restored several painted Kirby logos back onto bags that had been worn off. I went to Walmart and got fabric paint, as best I could in matching colors, such as red, gold and silver. I then carefully put the paint back on the same as the logo before by have one to look at or one to copy. If you need help with this I would be glad to help you. Screening these might take an awful long time to do so, but I am not sure if they will be more perfect than painting as I have done. I do take my time and make sure it done correctly.

I have also repaired the springs in the bottoms of Kirby bags. Yes Marty sounds like he has done an excellent job and I have done the same with other clothe materials adding if needed and I have also taken the springs or other rubber rings from newer Kirby replacement bages that I did not need and used those rings to repair the older bags that have broken, due to rust or age.

I have done the hose thing yet. I have so many hoses that I have collected and I mean many. Some yes are old rubber hoses and Reggie could tell you he found a coulple he needed.

David


Post# 11380 , Reply# 23   3/25/2007 at 14:36 (6,234 days old) by charles~richard ()        
Thanks for all the tips

When I can get to my Kirby R bag, I'll post more pix of it. Right not it's stored in the bottom of my vacuum cleaner display unit and it's a bit of a hassle to get to it.

Marty, I'll check on that PlastiDip stuff. Hope it works!!


Post# 291826 , Reply# 24   8/3/2014 at 21:49 (3,546 days old) by Paul (USA)        

Since there was no response to Marty's reply (no. 21), I'm just checking to make sure that washing a woven hose as he describes is safe to do both on non-electric and electric hoses.

Post# 291855 , Reply# 25   8/3/2014 at 23:24 (3,546 days old) by DesertTortoise ()        

Any ideas how to seal loose cuffs on older straight hoses? The hose itself is fine, but the cuffs are loose on the hose ends. One vacuum shop suggested clear RTV silicone but in my experience it's flexible to a point but it doesn't survive a lot of handling or movement as you would have in a vacuum hose.


Forum Index:       Other Forums:                      


Comes to the Rescue!

Woops, Time to Check the Bag!!!
Either you need to change your vacuum bag or you forgot to LOG-IN?

Discuss-O-MAT Log-In


New Members
Click Here To Sign Up.


automaticwasher.org home
Discuss-o-Mat Forums
Vintage Brochures, Service and Owners Manuals
Fun Vintage Washer Ephemera
See It Wash!
Video Downloads
Audio Downloads
Picture of the Day
Patent of the Day
Photos of our Collections
The Old Aberdeen Farm
Vintage Service Manuals
Vintage washer/dryer/dishwasher to sell?
Technical/service questions?
Looking for Parts?
Website related questions?
Digital Millennium Copyright Act Policy
Our Privacy Policy