Thread Number: 5620
Help with machine buffing
[Down to Last]

Vacuumland's exclusive eBay Watch:
scroll >>> for more items --- [As an eBay Partner, eBay may compensate vacuumland.org if you make a purchase using any link to eBay on this page]
Post# 62235   3/10/2009 at 21:39 (5,524 days old) by brandon_w_t ()        

I am looking to buff my kirbys out.

I need- a buffer machine- need it cheap- any ideas what to get?

I also need- tips on what polishes to use and in what order and stuff.

And how do I go about doing this? Like a list, 1) do this, 2) followed by this..


This would be of great help to me! I really want to get my 512 looking shiny and my already perfect 518 even more perfect when I get it!


Post# 62237 , Reply# 1   3/10/2009 at 22:14 (5,524 days old) by jdinstl ()        
Brandon...

...there is already a thread on machine buffing - I'll link to it.

Something to bear in mind -- if your 518 is "already perfect" LEAVE IT BE! :-)

Anyhow, here's the link to the previous discussion...


CLICK HERE TO GO TO jdinstl's LINK


Post# 62253 , Reply# 2   3/11/2009 at 07:26 (5,524 days old) by brandon_w_t ()        
grinder

Where can I buy a cheap grinder though? the home depot?? What about the one that goes on the drill? Is that one any good?

Post# 62260 , Reply# 3   3/11/2009 at 12:14 (5,524 days old) by vacuumfreeeke ()        

I have the one that goes on a drill.... it's not as easy to use (you need a strong steady hand), but it's better than a bench grinder if you don't want to take the whole machine apart. I got a variable speed black and decker drill for 30 bucks and the grinding attachment for 5 to 10 at Lowes. Had to buy the polishing pad and the buffing pad separately. I use Mothers or Maas polish usually. Starting with really fine steel wool helps too. The thing is that Kirbys have so many round and curved parts, it's hard to make good contact with the flat polishing pad. Machine buffing definitely produces superior results to hand buffing.

Post# 62263 , Reply# 4   3/11/2009 at 12:37 (5,524 days old) by vacfanatic (Omaha, NE)        
Bench Polisher

vacfanatic's profile picture
Brandon,

I got a cheap bench polisher, one side has a grinding wheel and the other has an 8" polishing pad here in Omaha. I got it at Harbor Freight off 90th and Maple. I think I paid $49 for it. Works great, for the infrequent use of restoring the shine to a Kirby.

Andrew


Post# 62269 , Reply# 5   3/11/2009 at 15:33 (5,524 days old) by brandon_w_t ()        
Thanks!

Thanks all... I think I am going to go with vacfanatics idea! maybe even buy the drill one too.

So, I just apply the polish to the metal, and then put it under the machine?


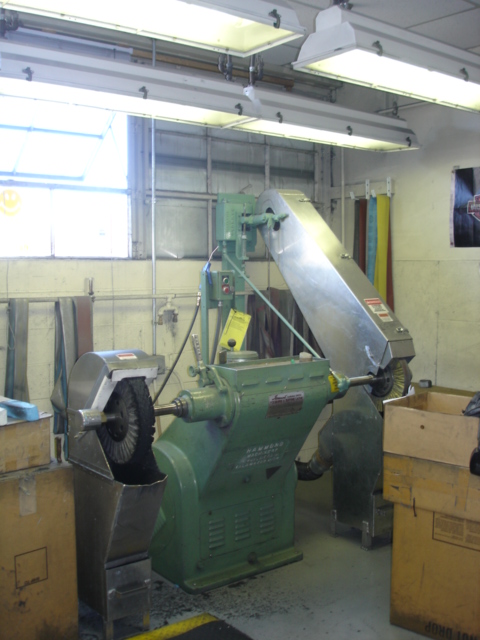
Post# 62270 , Reply# 6   3/11/2009 at 15:39 (5,523 days old) by chestermikeuk (Rainhill (Birthplace of the Railway),England, UK.)        
After..!!!

chestermikeuk's profile picture
Making sure the bench polisher is so heavy it doesnt move or its screwed to a workbench!!!also hold on securley to said items for polishing, avoid any distraction and concentrate for the few minutes needed to complete the polishing!!!

Its so easy to lose concentration and get the metal item caught on the wheel and flip it either up into your body or fling it across the room with a great force....

done right its a great aid to workshop polished vacs..

look forward to seeing your handiwork!!!


Post# 62273 , Reply# 7   3/11/2009 at 16:07 (5,523 days old) by jdinstl ()        
Oh YES!!

Anchor that buffer! And also, be mindful of where the part goes when it slipped out of your hands! They can leave the machine at speeds of up to 80 miles per hour and do some severe damage. Also -- invest in a pair of good work gloves. How the compounds work is both by heat and abrasion. When you lean a part into the wheel, the friction generates the heat. A To be effective, the heat has to be around 150 degrees or so -- which is too hot to touch. I actually have a small convection oven that I use as a parts warmer when I'm working a project.

And Brandon -- yah didn't look at the other thread, kiddo, otherwise you would have known what to do! :-) Gotcha! :-)

Below is a link to where I get my buffing supplies. They also have a forum about buffing and polishing -- the folks on there are pros, some have their own shops and do it for a living.

There is also a downloadable introduction to polishing and buffing booklet. Read that, and you will be on your way to some really nice looking work.

John


CLICK HERE TO GO TO jdinstl's LINK


Post# 62274 , Reply# 8   3/11/2009 at 16:15 (5,523 days old) by brandon_w_t ()        
sweet

I really cant wait to do this!!!

So the buffer pads on the link will work with any standard buffing machine?


Post# 62291 , Reply# 9   3/11/2009 at 19:04 (5,523 days old) by jdinstl ()        
Some yes, some no...

In the booklet on the site, you'll see a chart on machine horsepower, number of wheels you can put on a spindle, and the diameter of those wheels.

The average benchtop buffer or grinder has a 1/2" shaft, hence you'll see a lot of buffing wheels with 1/2" holes in the center.

Other wheels will have very small center holes. These you can use on a drill, along with a mandrel. A mandrel looks like a large screw with the lower half smooth. You put the smaller center holed wheels on the mandrel, tighten it down with a nut and washer, then insert the rig into your drill.

Or, you can use these on a bench buffer with a threaded spindle adapter (see below). These slide over the shaft and are tightened down with two small hex-head screws. You then twist the pad on until it is tight.

Something you might consider to get you started. At Lowe's or Home Depot, you can get a small kit that has three buffing wheels, a mandrel, and three bars of compound. Emery (black), which is the hardest and does the deepest cutting. Tripoli (brown), which is midrange, does cutting and begins to bring out the luster, and white -- very little cutting, and higher luster.

Before you even glance at your vacs with the idea of doing this operation, I suggest you practice on some type of scrap metals. Find some old pots and pans, both aluminum and steel.

Before any polish work, you'll want to sand the scratches and flaws out until they are GONE. Otherwise, you'll just end up with a very well polished, lustrous, shiny scratch in your end product. Start with 400 grit sandpaper. Use soapy water and wet sand. If this isn't getting the scratches out, drop back to 320 grit sandpaper, or 200. At Wal-Mart automotive section, you can get a packet of 200, 320, and 400 grit papers for about $4.00.

Once you have a smooth satin-like surface sanded to 400 grit, you can move onto the buffing wheels. Start with the emery, and cut until you have a uniform surface with an almost brushed-steel type of look. Then go to emery. Cut until it starts shining, but yet has car-wash like lines in it. Use the white to really bring out the gloss.

Use a different wheel for each compound. Also, easy does it on the compound. Just a short jab, not even 1 second, is enough to load the wheel. As you work, about every few minutes, give the wheel another jab of compound. Also, "rake" the wheel with a wire brush from time to time to remove metal particles.

Didn't expect a book on it did you? :-)

Ok...now I have to add...I read something scary in this thread. Parts flipping. That is very scary. There are safe and unsafe areas on a bench buffer. ALWAYS be aware of the direction of spin. On a bench buffer, the wheels spin towards you. You want to use the BOTTOM half of the wheel. DO NOT USE the top half, as if the part catches, it's going to head straight for you. That buffer is turning anywhere from 1500 to 3500 rpm, and if the wheel gets a good grip on the part, like in a hole for a vet or belt lifter. Offer the work to the wheel in the same direction the wheel is going where there are holes and areas where it could catch.

This ends my lecture. Class dismissed.

John


Post# 62293 , Reply# 10   3/11/2009 at 19:28 (5,523 days old) by brandon_w_t ()        
Cut?

Define cut... as if you were talking to a 15 year old... Haha.

Anyways- does this mean to just buff down till there is no scratches.

What if there are very light scratches? Do I have to still use sandpaper, or will the wheel pull em out?

So I thought it was all wheel and nothing else? Well- only if there is NO scratches? Am I right?

Just trying to make sure I can do this the right way, and not ruin a perfectly good 518, and 512


Post# 62297 , Reply# 11   3/11/2009 at 19:44 (5,523 days old) by aeoliandave (Stratford Ontario Canada)        

aeoliandave's profile picture
Brandon, that is why it is strongly advised to practice on aluminum pots & pans and lids FIRST - to build up confidence and become familiar with the effects of different polishing/cutting compounds - used very sparingly as John emphasizes. You don't want to color the wheel, just tint it. With this experience under your belt you'll be able to determine if it is a gouge, scratch or scuff that needs to be removed first.

At first it feels so very wrong to sand scratches into a perfectly good looking metal surface but trust us, you'll be amazed at the mirror finish that emerges at the end.

Once you feel good to go, wear gloves, eye protection, have a good strong light overhead for no shadows and wear your least favorite shirt. When your wrists get tired & trembling, take a break before going back at it.

Dave - been there, smashed that.


Post# 62320 , Reply# 12   3/11/2009 at 22:51 (5,523 days old) by crevicetool (GA )        
Been there - smashed that!!!!

Dave, My sides hurt from that one.

Isn't it funny too how this thread has taken off....and the other one just died? Isn't it funny that I have just now added to this thread - Isn't it sad that this thread will now cease to exist?

Rick


Post# 62329 , Reply# 13   3/12/2009 at 02:53 (5,523 days old) by chestermikeuk (Rainhill (Birthplace of the Railway),England, UK.)        
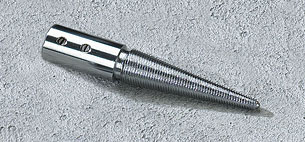
Buffing

chestermikeuk's profile picture
Hey Crevipoo well we`ll just have to prove you wrong then...LOl

keep practising the buffing !!! all great tips, it looks easy to start with , thats until you get used to it, now what about this for a buffer!!!


Post# 62330 , Reply# 14   3/12/2009 at 03:18 (5,523 days old) by chestermikeuk (Rainhill (Birthplace of the Railway),England, UK.)        
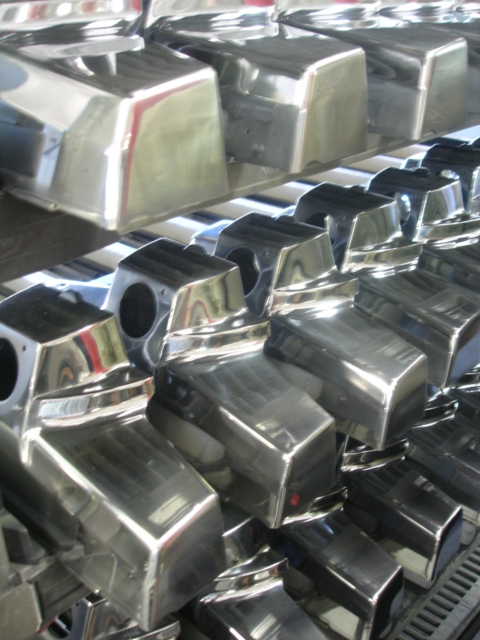
Heres some we prepared earlier...!!!

chestermikeuk's profile picture


Forum Index:       Other Forums:                      


Comes to the Rescue!

Woops, Time to Check the Bag!!!
Either you need to change your vacuum bag or you forgot to LOG-IN?

Discuss-O-MAT Log-In


New Members
Click Here To Sign Up.


automaticwasher.org home
Discuss-o-Mat Forums
Vintage Brochures, Service and Owners Manuals
Fun Vintage Washer Ephemera
See It Wash!
Video Downloads
Audio Downloads
Picture of the Day
Patent of the Day
Photos of our Collections
The Old Aberdeen Farm
Vintage Service Manuals
Vintage washer/dryer/dishwasher to sell?
Technical/service questions?
Looking for Parts?
Website related questions?
Digital Millennium Copyright Act Policy
Our Privacy Policy