|
Thread Number: 31657
/ Tag: Recent Vacuum Cleaners from past 20 years
Found a $5 Filter Queen |
[Down to Last] |  |
| Post# 349775 4/8/2016 at 09:33 (2,933 days old) by human (Pines of Carolina) | ||

Forget $5 foot-longs...
Yesterday, I scored a $5 Filter Queen Majestic at Goodwill. I needed the thing like I need another hole in my head but at that price, I just couldn't leave it sitting there. I actually tried to walk away from it. I left the store feeling like I needed to call my vacu-holics anonymous sponsor, if there were such a thing, and got about a mile up the road before I turned back, laid down a picture of Lincoln, and brought it home, rationalizing my purchase by saying that at that price, I couldn't possibly go wrong. Yeah, the machine looks like it's had some tough use. It looks like someone's been vacuuming up dry wall dust with it, but the inside is relatively clean and has new looking filters in place. That indicates to me it was well used but perhaps not outright abused. The machine is complete with hose, power nozzle, floor nozzle, upholstery brush, dusting brush and a crevice tool that obviously came from a different machine since it's brown and everything but the power nozzle is charcoal gray. The power nozzle has a cheezy looking chromed plastic finish with a grid pattern on top. The good news is everything works as it should. The machine has good suction and the hose has no leaks but the brush roll on the power nozzle has seen better days. Motors on both the vacuum and power nozzle are quiet with no discernible squeals, squeaks, grinds or other worrying noises. I'm going to clean it up this weekend (good excuse not to clean the house) and I'll also post some photos. As I messed with it last night, I was struck by a sense of deja vu. The canister's design is remarkably similar to the pink and gray Lewyt model 130 we had when I was a little kid. Is it a coincidence or does the Filter Queen have some Lewyt DNA in it? I tend to think the latter may be true. | ||
| Post# 349777 , Reply# 1 4/8/2016 at 09:55 (2,933 days old) by delaneymeegan (Mary Richards lived here) | ||
cool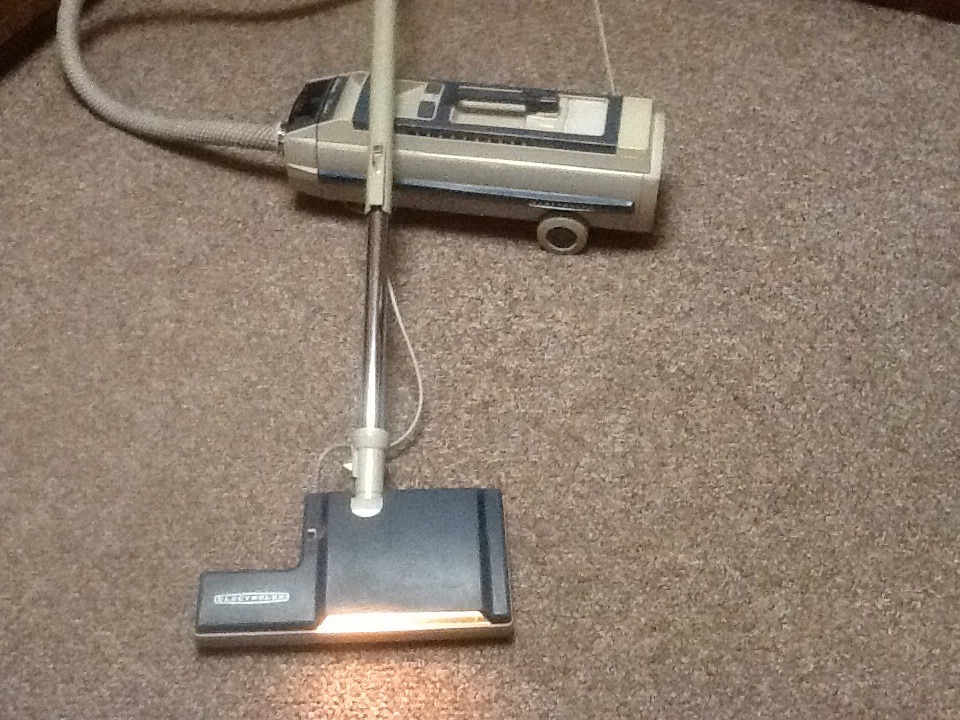 | ||
| Post# 349778 , Reply# 2 4/8/2016 at 09:55 (2,933 days old) by dysonman1 (the county) | ||
Lewyt has Filter Queen DNA. Lewyt copied the Filter Queen in 1947, while the FQ still held a valid patent. Filter Queen sued Lewyt, and won a huge judgment which allowed them (FQ) to open their own factory and begin making the machine themselves. Until this time, Royal was the manufacturer of the models 200 and 350. The Golden Monarch model 500 was built in Health-Mor's own factory, by their own workers, beginning in 1955. Lewyt would take out the cone (which infringed FQ patents) and put in a bag.
Here's a bit of irony, which means, the opposite of what you'd expect. Many years later, Filter Queen would take the filter cone and cyclonic action out of their machine, replacing it with a bag (just like they forced Lewyt to do 40 years before) - calling the machine the Optima. The Princess model disappeared overnight, and the Optima was born. When I saw an Optima for the first time, my comment to the representative showing it to me was "Oh, so Filter Queen invented a Lewyt". He replied "what's a Lewyt". | ||
| Post# 349781 , Reply# 3 4/8/2016 at 10:44 (2,933 days old) by Kirbysthebest (Midwest) | ||
|
$5 Sounds Like you got a great deal. | ||
| Post# 349782 , Reply# 4 4/8/2016 at 11:28 (2,933 days old) by human (Pines of Carolina) | ||
|
Yeah, definitely a great deal considering that most of the time, this store badly overprices their vacuums. I guess the guy in the stock room didn't know what a Filter Queen was and priced it cheap because it looked dirty. I actually had to put on my glasses to make sure I was seeing the price correctly. The thing had literally a dozen $5.00 price stickers all over it. I've never seen so many on one item. I joked with the cashier that I hoped it wasn't $5 per sticker!
I just found another deal to go along with it on eBay: a package of 12 Envirocare filter cones (they look like giant coffee filters), a brush roll and a belt, all for $15 shipped. Looking forward to giving this machine a thorough cleaning over the weekend and tuning up the power nozzle when the package from eBay comes. | ||
| Post# 349797 , Reply# 5 4/8/2016 at 16:47 (2,933 days old) by human (Pines of Carolina) | ||
|
A Clean(er) Queen
So I cleaned up the Filter Queen and it's looking pretty good, considering how it started out. My biggest concern is its cord. There's about an inch in the middle where the outer jacket is completely gone, although the inner leads' insulation is intact. Looks like I'm into a power cord, although the redneck engineer in me wants to get a male and a female power plug to put where the break in the insulation is. I wish it was a plug-n-play solution like a Kirby. Has anybody ever replaced a cord on one of these? Any savvy tips you can share? I guess this will be an opportunity to give it a thorough internal cleaning while I have it apart.
I finally found a model number under the lid that covers the blower outlet. It's a 95X. My immediate assumption was that the number corresponded with the year, but on examining the power nozzle, a model 834G, more closely, I found the numerals '3 92' stamped onto the upper right corner of the identification plate on the bottom. Assuming that's a date code, and assuming the power nozzle has always been with this machine, it would be right at 24 years old. Here are a few photos of this machine for your enjoyment. Just imagine how nasty it was before I cleaned it up. | ||
| Post# 349799 , Reply# 6 4/8/2016 at 17:35 (2,933 days old) by human (Pines of Carolina) | ||
|
Power Nozzle Needs Help
Forget what I said earlier about this machine not being abused. I just took the Power Nozzle apart to see what kind of light bulb I needed and found that the plastic retainer that holds the elbow in place is completely shattered, as in nothing recognizable left. That is apparently a weak spot on those power nozzles but from what I've read, usually just the ears where the retaining screws go break off. There was also a huge wad of black dog hair in there that hadn't made it up the hose, thanks to this missing piece, and a wicked dog piss odor to boot. I've got it all cleaned out, now and found the part I needed on eBay for $7.95 plus shipping. Oy! just one more thing.
So by the time I put in the new brush roll, the belt, the bulb and now this piece of plastic, I will have practically rebuilt that power nozzle. Oh well, as the late Robert Heinlein would say, TAANSTAAFL (There ain't no such thing as a free lunch). | ||
Post# 349805 , Reply# 7 4/8/2016 at 19:53 (2,933 days old) by countryguy  (Astorville, ON, Canada) (Astorville, ON, Canada) |
||
 | ||
| Post# 349814 , Reply# 8 4/8/2016 at 21:26 (2,933 days old) by kirbysthebest (Midwest) | ||
|
Good advice from countryguy. No tip, follows you right along.
| ||
| Post# 349827 , Reply# 9 4/9/2016 at 00:21 (2,933 days old) by human (Pines of Carolina) | ||
|
Thanks for the tip about tipping. That makes good sense. I was kind of surprised to discover that the casters were mounted to a separate ring instead of directly to the bottom of the canister.
I've now ordered all of the parts I need to fix this machine up properly and my $5 investment has now increased tenfold. Oh well, I knew that would happen. But I'll still have fun putting it all together, though. And then I'll have a little more fun putting it through its paces. | ||
| Post# 349840 , Reply# 10 4/9/2016 at 08:15 (2,932 days old) by rugsucker (Elizabethton TN) | ||
|
FQ caster ring Removing the wheels allows the FQ to sit on a stair or other areas without rolling off.Also the 4 plates the wheels are mounted on can become bent and might need to be flattened and aligned. Great vac!You should find it makes little noise and much suction. | ||
| Post# 349876 , Reply# 11 4/9/2016 at 15:37 (2,932 days old) by human (Pines of Carolina) | ||
|
So I'm starting to tear into the motor housing on this machine, in preparation for replacing the cord. It seems to be a pretty simple and straightforward proposition except for one minor detail. There's a grommet where the cord enters the motor housing that locks it into place, effectively preventing the cord from sliding in or out, which is a good thing. The problem is how to remove this lock grommet to get the old cord out and then put it back in with the new cord to lock it in place. Any ideas?
On a little tangent, I have to say that the machine's filtration system works exceedingly well. The motor compartment is amazingly clean and free of all but the smallest amount of very fine dust. I've got the whole machine totally cleaned out, even scrubbed out the lower bucket portion of the vacuum with Pine-Sol and a toilet brush. Just waiting for replacement parts so I can put it back together. | ||
| Post# 349879 , Reply# 12 4/9/2016 at 15:55 (2,932 days old) by delaneymeegan (Mary Richards lived here) | ||
|
| ||
| Post# 349918 , Reply# 14 4/9/2016 at 20:42 (2,932 days old) by human (Pines of Carolina) | ||
|
#Fantomfan57, you're certainly right about the cost creeping up. Fortunately, I got into this one right (i.e., for next to nothing), so I'm still okay having spent a little more than $40 on parts for it, especially seeing what they're selling for on eBay. Now, the really interesting question is whether I would have paid $40 or $50 for the same machine in the condition it will be in once I finish fixing it up and will have that much in it? Knowing my insane mind, I'd say probably not. I'd likely look at it and think well, maybe I'd pay $20 or $25 for it, $30 at the outside, but not $40 or $50. Even though I've spent far more on parts and supplies than I paid for the machine itself, I can still say--master of rationalization that I am--that I got the Filter Queen for five bucks. While it's hard to put a price tag on the satisfaction of doing the work myself, I do find that I often fail to sufficiently value my time.
#DelaneyMeegan, Per your request, here are some more photos of the Filter Queen. The first two photos show inside the motor housing, which I didn't even have to clean since it's almost shinier than the outside, and the inside of the lower bucket after a good scrubbing with the toilet brush. The last two photos show the grommet where the cord passes through the motor housing. | ||
| Post# 349922 , Reply# 15 4/9/2016 at 21:44 (2,932 days old) by human (Pines of Carolina) | ||
|
Update:
I just got the cord off of the FQ. The grommet just took a little twisting and pushing with a pair of pliers. It wasn't as hard as I thought it would be. Rather than untwist the wire nuts and remove the leads, I just cut them, leaving an inch or so in place to mark where the black and the white should connect when the new cord arrives. Now, if those darn parts would just hurry up and get here...
| ||
|
Post# 349927 , Reply# 16 4/9/2016 at 23:41 (2,932 days old) by Durango159 (State College, PA) |
||
|
That's a bargain!!
The Filter Queen dealership that I left about 2 years ago is selling new Filter Queens for $2398.00. You found yours for $5!! The belts seem to stretch on those older power heads fairly quick. So definitely keep an eye out on that. You'll be able to tell when your rugs aren't looking as well groomed. When working properly that machine will produce gorgeous vacuum prints!! Airflow and suction should be excellent on that machine when working properly. Always be sure to keep your premotor filter clean. That is very thin grayish black disk like filter that rests underneath the plastic cage. There is plastic retainer ring that holds it in place. Watch your muffler batting-- That is filter that is visible from the outside of your machine going all the way around through the vent holes. It should be white. Yours looks brown. If too dirty it may restrict airflow and not produce as good of emissions. Not sure if it's washable or not. It's possible you may be able to replace it with some generic creative filter material such as muslim cloth??? Tips I used to tell customers: 1. Clean pre motor filter 2. All 3 tabs from filter cone visible upon mounting motor unit 3. Power Switch, over hose over wheel--- Keep all your ducks in a row-- as the saying goes 4. Wait until your motor is completely dead silent before you lift up the motor. By doing this you can lift the motor up without moving the filter cone at all. 5. You can empty the bin virtually mess free by dumping the bin upside down and letting it sit like that on some newspaper or a pizza box, etc. Pat the back of the bin a few times and wait about 15 seconds. Then lift off the bin. Give the bin a little swirl while still upside down and low to the ground to knock some of the dirt off that may get stuck by the rubber gasket. Roll up the newspaper like a burrito and throw away! I emptied these machine in hundreds of customers living rooms without a problem. Never ever went outside to empty a Filter Queen tub like I've had to do with just about every bagless vacuum I've ever used! You can wash that bin with just water and mild soap. Don't need anything harsh. Dry it well so so that there is no moisture left around the metal intake chute as you don't want to rust the grommets on the intake chute. The gasket does remove and should be removed every few washes to remove dirt caught up under the gasket. If you lose suction: You don't necessarily have to empty the bin or throw away the cone! Let the motor completely go silent. Lift off your motor. Then gently with your fingers just flick the inside white part of the cone in various places, just to knock some of the dust off the other side of the cone as thick dust will build up on the other side of the cone. The inside of your cone where the motor sits will and should always be BONE WHITE!!! If after flicking the cone you decide to dump the bin, you may but you don't necessarily have to discard the cone. That's your call and depends on how full your tub is!! Your dirt bin tub will hold 2.5 gallons of filth. But don't get dust inside the cone in the process, otherwise it will dirty your pre-motor filter and then you'll have to clean the pre-motor filter. Best of luck with your machine and keep us posted!! | ||
| Post# 349973 , Reply# 17 4/10/2016 at 13:28 (2,931 days old) by human (Pines of Carolina) | ||
|
#Durango159: Thanks for the detailed maintenance instructions. I've added the muffler batting to the shopping list. By the time I put this thing back together, it's gonna be clean as a whistle from stem to stern. While it's torn down, I took a close look at the motor and was pleased to see that looks to be in great shape--no excessive wear on the commutator or the brushes.
I'm looking forward to getting it put back together and seeing what it will really do. My brief test drive after I got it home was somewhat unimpressive, but once I took it apart and started cleaning it, I understood why. I don't anticipate having to scrub the tub with a toilet brush again. That was a case of extreme maintenance. I take better care of my stuff than the previous owner apparently did. It seems like a well designed, well built machine--built to last--and more importantly--built to be repaired. Even though I've now sunk about $50 into this machine, I know I'm still well below retail. Used ones on eBay start around $250. When I bought the machine, I knew that in a worst case scenario, I could part it out and make a good profit. But I'm glad I didn't have to go that route. | ||
| Post# 349976 , Reply# 18 4/10/2016 at 13:58 (2,931 days old) by suckolux (Yuba City, CA) | ||
 | ||
| Post# 349995 , Reply# 19 4/10/2016 at 15:24 (2,931 days old) by human (Pines of Carolina) | ||
|
Yeah, I do enjoy these sort of repair jobs. By the time I do all that work, I feel like I've put enough of myself into it that it's really become mine.
I just checked tracking on my various parts orders and it looks like the most critical pieces will arrive Tuesday. The rest of it should be here by the end of the week. My 'punch list' of remaining tasks looks something like this: Vacuum -Install new power cord -Replace all filters -Reassemble Power Nozzle -Replace elbow cover -Replace belt -Replace headlight bulb -Reassemble When I put the motor assembly back together, I'm thinking of adding a second nut to each of the long bolts that hold everything together to make them stationary. This will make it much easier to take that assembly apart--and more importantly put back together--in the future. | ||
| Post# 350024 , Reply# 20 4/10/2016 at 21:14 (2,931 days old) by suckolux (Yuba City, CA) | ||
|
Isn't it satisfying to do it and have it turn out so nice? I feel they are part of the family after that, save one's life! Weird? maybe. I can't sell one if I spent a lot of time with it and hard work. Give to a friend, for an easy life? maybe. I know it will be great when you are done Edgar. I had one ages ago, nice machine, well made!
| ||
| Post# 350053 , Reply# 21 4/11/2016 at 10:10 (2,930 days old) by jodan3399 (Brownsville, PA) | ||
|
Great find! I wouldn't have been able to pass it up either. | ||
| Post# 350065 , Reply# 22 4/11/2016 at 13:18 (2,930 days old) by dysonman1 (the county) | ||
|
One HUGE tip: NEVER EVER use any filter cone OTHER than a Genuine Filter Queen filter cone in your machine. Filter Queen genuine cones are made of two layers of cellulose. Generic cones from DVC, Envirocare, etc. are NOT the same and will leak dust and cause trouble.
Your filter BAT at the top by the exhaust holes is cotton. This was discontinued almost 20 years ago. The mesh filter that's sold now will NOT muffle the motor sound nearly as well. If you replace the cotton batting (which I DON'T recommend), it will make the cleaner MUCH louder when running. | ||
| Post# 350081 , Reply# 23 4/11/2016 at 15:52 (2,930 days old) by human (Pines of Carolina) | ||
|
I wasn't expecting any deliveries until tomorrow, but the postman brought a good cache of FQ parts and supplies today--power cord, filter cones and discs, belt and elbow cover for the power nozzle--but a couple of items (light bulb for the power nozzle and replacement motor batting) are still in transit, so I can't do a final reassembly until they arrive. The elbow cover is black and the plastics (with the exception of the chromed top cover) on my power nozzle are graphite/charcoal gray but I don't care; it doesn't look bad and just a tiny bit of black plastic is even visible. The important thing is it's a perfect fit.
The filter cones and discs are Envirocare, so I'll keep a close eye on them and make a point of replacing them a bit more frequently than I might otherwise and look for genuine FQ filters when I run out. I'm not sure what the motor batting was made of, but it didn't feel like cotton and it was so badly deteriorated that it crumbled to dust when I touched it, so there's not much choice but to go with fiber mesh on that one. It will be what it will be... | ||
| Post# 350133 , Reply# 24 4/12/2016 at 09:34 (2,929 days old) by kirbyvertibles (Independence, KS) | ||

Amen Tom NEVER EVER use the awful generic cones. I've never seen a generic cone I couldn't SEE through.
You can also date that model on the model tag at the exhaust. You might need a flash light to see it stamped into that little metal ring. Also if the power nozzle motor is original it too will be dated. But yes 1992 is the date | ||
| Post# 350134 , Reply# 25 4/12/2016 at 09:36 (2,929 days old) by kirbyvertibles (Independence, KS) | ||
|
| ||
| Post# 350158 , Reply# 26 4/12/2016 at 14:12 (2,929 days old) by human (Pines of Carolina) | ||
|
It's a model 95X, serial no. 754262. If the model number is the date code, then it's a 1995 model and the power nozzle is a few years older. If the date's somehow encoded into the serial number, then I'm not exactly sure how to decode it.
The power nozzle has a sticker for a local vacuum dealer on it, so I suppose it's possible the dealer could have cobbled some pieces and parts together to come up with a complete machine. The crevice tool and the pigtail cord that runs between the hose and the wand are both brown, so they're obviously not original to the machine. As you can see from the photos in earlier posts, everything else on the machine, which has a black/graphite color scheme. | ||
| Post# 350269 , Reply# 27 4/14/2016 at 09:12 (2,927 days old) by Human (Pines of Carolina) | ||
|
Reassembly almost complete
The motor batting arrived in the mail yesterday, which allowed me to finish reassembling the FQ canister. I had a problem with the lock grommet for the cord. It broke apart and the smaller half went flying, never to be seen again, so I swung by Home Depot on my way to my girlfriend's for supper and got a package of regular rubber grommets (package of 8 in 4 different sizes for $3.29). It was late when I got back home, but I decided to at least test fit the grommets to see which one would best fit the hole in the motor housing. The one that fit the best had a hole too large to hold the cord snugly, so I took the two that were the next size down and put one on either side of the hole to help immobilize the cord. It's not a perfect solution but I'm not one to jerk cords so it should be okay until I can come up with something better.
Given the lateness of the hour, I had only intended to test fit the grommets, but one thing led to another and by 12:45 a.m., I had the reassembled entire canister. I was too tired to plug it in and test it, so I'll do that when I get home this afternoon. USPS tracking shows the headlight bulb should arrive in today's mail so I'll be able to get the power nozzle finished and hopefully put a "done" stamp on this whole project well before suppertime. The machine was surprisingly easy to tear down without any sort of diagram or instructions. I was very surprised the wiring was just held together with simple plastic wire nuts and not crimp connectors, which are much more common in modern appliances. That's proof this machine was largely hand assembled at the factory. In reassembling the unit, I discovered a date stamp on the metal serial number ring that I had missed earlier. It reads '9 91' so the canister was manufactured a full six months before the power nozzle, which is stamped '3 92'. It seems kind of odd the manufacturer would let a $2,000 canister sit around half a year waiting on a power nozzle. I think it's more likely the original power nozzle, or at least the sole plate, was replaced at some point. | ||
| Post# 350287 , Reply# 28 4/14/2016 at 11:32 (2,927 days old) by Human (Pines of Carolina) | ||
|
FQ Majestic Tear-Down Instructions
After tearing down my Filter Queen to replace the cord and the motor batting, I decided it might be helpful for others to offer a step-by-step procedure for tearing down the motor unit to gain access to the wiring, motor components or batting. Going in blind wasn't all that bad, but I could have saved some effort if I had known what I know now. The only tool necessary is a Phillips screwdriver and maybe a pair of pliers.
1. Open the canister's latches and lift out the motor assembly. 2. remove the screw at the pointed end of the cone-shaped basket, take off the basket and discard disposable filters. 4. Set the motor assembly on a flat surface, remove the exhaust port cover, and remove the three screws surrounding the exhaust port. If the unit has an older style pedal type power switch, carefully pull the rubber cover off of it in order for the pedal to fit through the opening on the top motor cover. 5. Carefully lift the motor cover off. You will still need to disconnect several wires before you can completely separate the outer top cover from the motor. Be sure to label the wires before you undo the wire nuts holding them together so you'll know what connects where when you go to reassemble it. 6. To access the motor in order to replace the brushes, unscrew the three bolts that hold the two halves of the motor cover together. To reassemble, just reverse the steps above, replacing the paper filters as you go. If you replace the motor batting, you will need to save and reuse the cardboard ring that was underneath the old batting. The bolts holding the two halves of the motor cover together go with the nuts at the bottom. One of the more challenging parts of reassembly is lining up the screw holes on the top of the motor cover with those on the metal basket and the serial number ring that go in the exhaust port. They are unevenly spaced so they only line up one way. | ||
| Post# 350310 , Reply# 29 4/14/2016 at 15:04 (2,927 days old) by human (Pines of Carolina) | ||
|
Project complete.
The mail came a few minutes ago and my headlight bulb was in there so I installed it, finished buttoning things up and took the machine for a little post-repair test drive. Performance is definitely head and shoulders above what I experienced when I first brought it home a week ago but it's not nearly as well mannered as my Electrolux canisters. But I'm not saying I regret the purchase. Even with the cost of replacement parts, I'm still into it for a steal. I guess time will tell how much--or if--I fall in love with it.
Because of its marked similarity to my childhood Lewyt model 130, working on this machine unlocked an early memory. One of the things I really loved about that pink and gray vacuum cleaner was that it was the first machine I figured out how to dismantle, albeit not to the extent I did this FQ, and put back together when I was about four or five years old. I didn't know the phrase 'power user' back then but that's how it made me feel. | ||
| Post# 350653 , Reply# 31 4/19/2016 at 09:46 (2,922 days old) by kirbyvertibles (Independence, KS) | ||
|
| ||
| Post# 350664 , Reply# 32 4/19/2016 at 11:25 (2,922 days old) by Human (Pines of Carolina) | ||
|
Yes, I found the date code on the vacuum when I was shining a strong flashlight onto the serial number plate to align it and the exhaust basket upon which it rests with the holes on top of the plastic motor housing. The date stamp reads '9 91'. The numerals are stamped faintly into the plate, not even deep enough to break through the black paint covering that part of the plate.
| ||
| Forum Index: | 
| Other Forums: |

|

|

|

|

|

 Comes to the Rescue!


;)
;)
;)
;)