Thread Number: 20632
Repairing over-sized axle holes in Kenmore uprights
[Down to Last]

Vacuumland's exclusive eBay Watch:
scroll >>> for more items --- [As an eBay Partner, eBay may compensate vacuumland.org if you make a purchase using any link to eBay on this page]
Post# 231015   5/3/2013 at 00:20 (4,008 days old) by gmerkt (Edmonds WA)        

I work on lots of Kenmore uprights, the abundant common machines of 10-15 year old vintage. One of the things I find out of order from time to time concerns the wheels. They are mounted on a common metal axle at the bottom of the main case/housing. The metal axle is held in place by tabs molded into the plastic main case. Sometimes people get too rough with the machine and drop it on a wheel. They won't take a great deal of this before the material that holds the axle in place breaks. The hole becomes over-size. There isn't too much clearance between the wheel and the main case. When the hole gets broken out, it causes interference between the wheel and the case. The wheel is plastic and usually has a rubber tire over it held in place by a groove. When I get one of these missing the tire, it usually means that the machine has been dropped and someone removed the tire from the wheel to recover some of the clearance between it and the main case. So the machine will actually roll again.

To fix this problem requires changing the main case. Usually, I have enough donor machines around for parts to do this. But I get tired of changing everything from one case to the other. Especially the hose. So I decided to come up with a repair to save the broken case.

I considered a number of possibilities but settled on coming up with some kind of bushing to replace the material broken out of the original hole. I pawed through my selection of bronze bushings in the garage, but didn't have what I wanted. The axle measures .25 and the broken out hole sizes in the plastic main case vary. So I thought about using a spent brass cartridge case for making my own bushing. I found that .30 US Carbine cases work well. The hole may only be broken out so far by the limiting factor of the wheel diameter. The .30 US Carbine case measures .35 o.d.; I found a drill bit sized 23/64 (1/4 was a little too large) that worked. I decapped the cartridge case primer and drilled the flash hole and primer pocket out to .25.

Having drilled out the broken hole in the main case to 23/64, next I took some epoxy compounded for plastic and cemented the new "bushing" (cartridge case) into the new hole. I placed the axle through the bushing to get it aligned with the existing hole on the opposite side. After the initial epoxy dried, next I mixed up some bulk epoxy (like they sell for repairing boats, comes in pint cans) and flooded the well area where the new bushing protruded into the inside of the main case. Before applying this bulk epoxy, I roughed up the surface (with a Dremel tool and abrasive bit) of the area in the case where it would make contact to give it a bit of extra "tooth."

Also, check the axle to make sure it's straight. When a machine gets thrown or dropped hard enough to break the case, sometimes the axle also gets bent. A bent axle usually can be easily straightened in a vise.

On this project, I was working on the cases of two machines. The hole was broken out in different sides of each. The machines I was working on happened to be Direct Drive Beltless models, such as the one shown below but this same procedure will work for the very many lower-level, belt-driven models.


Post# 231017 , Reply# 1   5/3/2013 at 00:22 (4,008 days old) by gmerkt (Edmonds WA)        

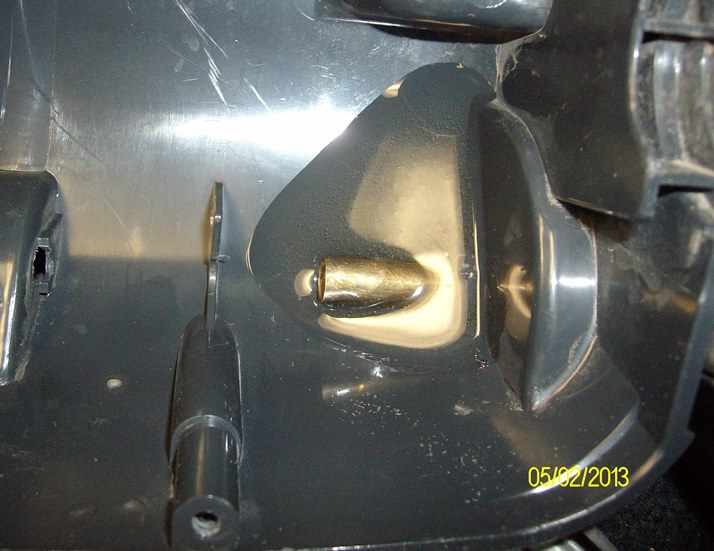
This is what a broken axle hole looks like. Actually, this one isn't too bad. Note the scraping marks in the wheel well on the case from a dragging wheel.

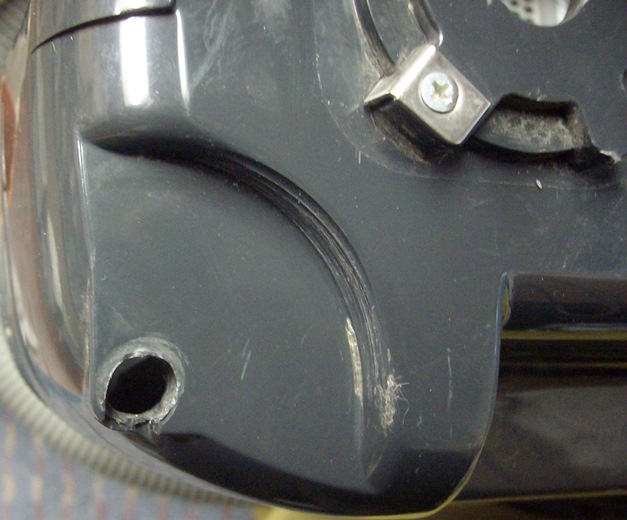
Post# 231018 , Reply# 2   5/3/2013 at 00:24 (4,008 days old) by gmerkt (Edmonds WA)        

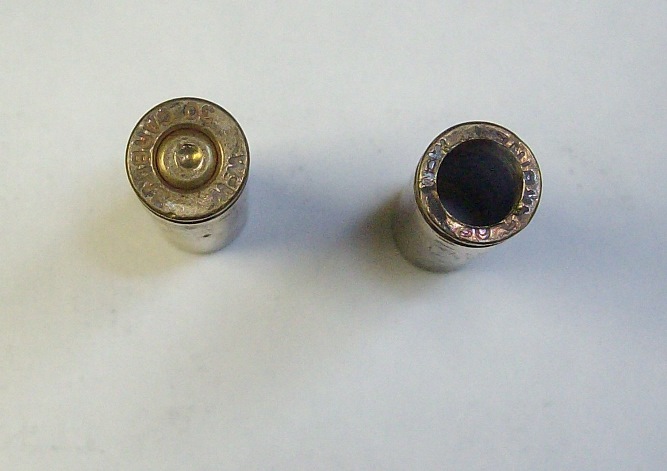
These are .30 US Carbine cartridge cases viewed from the side. They have a straight wall slightly larger than the axle diameter of .25.

Post# 231019 , Reply# 3   5/3/2013 at 00:29 (4,008 days old) by gmerkt (Edmonds WA)        

This picture shows the heads of the cartridge cases. The one on the left still has the spent primer in place; the one on the right has been drilled out to have a centered hole of .25 in it.

Sidebar: I've used spent cartridge cases to repair stuff before. Years ago, I used them to fix Ford electric window motor drives. As originally made, the drives have three fiber roller discs in them. These were designed to shear (disintegrate) in case some tot got his fingers in the window when it was rolling. I discovered that the discs were the same diameter as the head end of a .30-06 cartridge case. So I cut the heads off three of them and replaced the crumbled original rollers. The window drives worked like champs again, but the poor kid who got his fingers in the window after that was gonna lose digits.


This post was last edited 05/03/2013 at 00:48
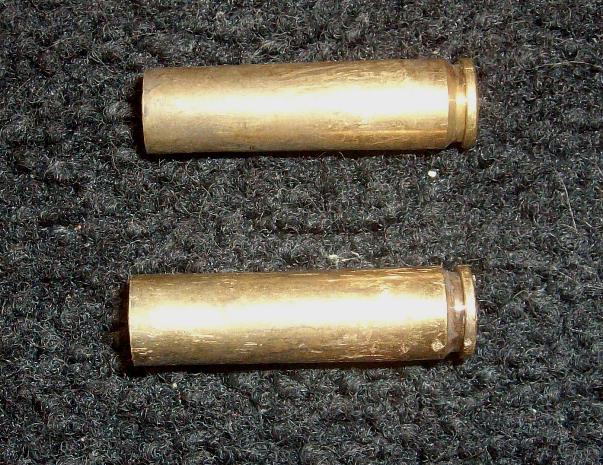
Post# 231020 , Reply# 4   5/3/2013 at 00:31 (4,008 days old) by gmerkt (Edmonds WA)        

Okay, here is the first "bushing" (drilled cartridge case) set in place with the first course of epoxy. Note the axle in place to hold the bushing in alignment while the epoxy cures.

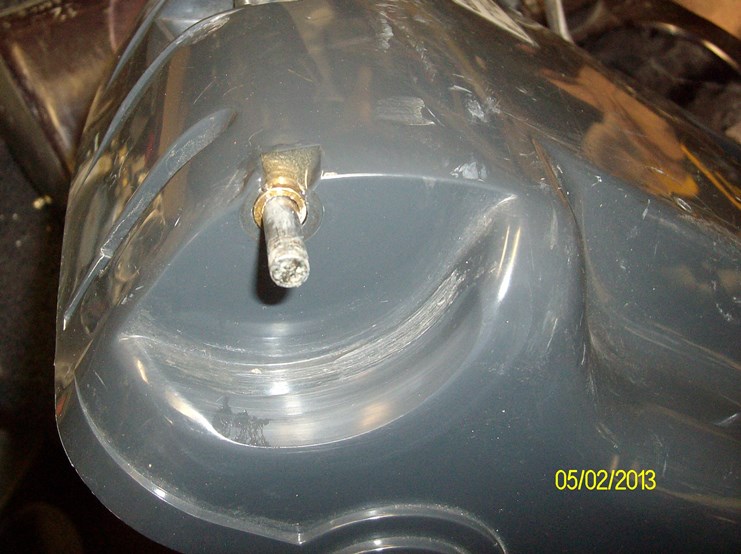
Post# 231021 , Reply# 5   5/3/2013 at 00:33 (4,008 days old) by gmerkt (Edmonds WA)        

This picture shows the inside cavity that the bushing protrudes into. It has the first course of epoxy holding it in place. Note the scuffing from the Dremel tool for the benefit of the follow-on flooding of bulk epoxy.

Post# 231022 , Reply# 6   5/3/2013 at 00:41 (4,008 days old) by gmerkt (Edmonds WA)        

This picture shows the same cavity in the main case after I've flooded the area around the bushing with bulk epoxy. After this epoxy cures, the entire area will be as solid as a rock. I've repaired many broken plastic vacuum cleaner parts using metals and epoxy, parts that normally would be thought to be not useable.

Note how the depth of the cartridge case wall works to your benefit. The deep walls allow the flooded second course of epoxy to be poured in there without the bushing hole having somehow to be plugged to prevent run-away of the epoxy. A short bushing would've been more work to get the epoxy to stay. Remember, only the thick head of the cartridge case was drilled out to .25, about a thickness of .25 or .30, not the entire length of the original case. The inside of the case is .308 down to the head where you drill it out, allowing the axle to float through most of it.

During the curing process, it's necessary to tilt the case at an attitude that will prevent the flooded epoxy from getting into the mouth of the bushing.


Post# 231023 , Reply# 7   5/3/2013 at 00:44 (4,008 days old) by gmerkt (Edmonds WA)        

This final picture shows the repair on the other case I was working on. This hole goes through the motor compartment side of the main case. The repair is shallow enough that there will be no interference with the motor. Note how the flooded epoxy goes right up to but not into the mouth of the bushing.

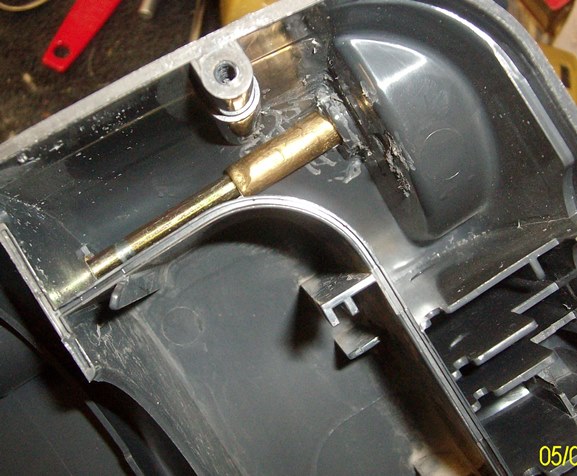
Post# 231030 , Reply# 8   5/3/2013 at 05:46 (4,008 days old) by Blackheart (North Dakota)        
I've heard about this

blackheart's profile picture
I was looking into a vacuum shop and the previous owner was telling me that this happens with certain brands and that his solution was to use...some kirby bushing to fill the hole in.
I've never before seen this problem but wow it really does just dig right into the plastic.


Post# 231107 , Reply# 9   5/3/2013 at 22:06 (4,007 days old) by gmerkt (Edmonds WA)        

There is a pair of tabs swaged onto the axle to keep it indexed and stationary. Only the wheels are supposed to turn. The slot for the tabs is molded into the plastic case on both sides so the tabs will index whichever way the axle is installed. If the broken out hole is on the side with the axle tabs, it will allow the axle to turn and this hastens wear-out of both holes.

Post# 231108 , Reply# 10   5/3/2013 at 22:09 (4,007 days old) by dustin (Jackson, MI)        
Hmmmm....

dustin's profile picture
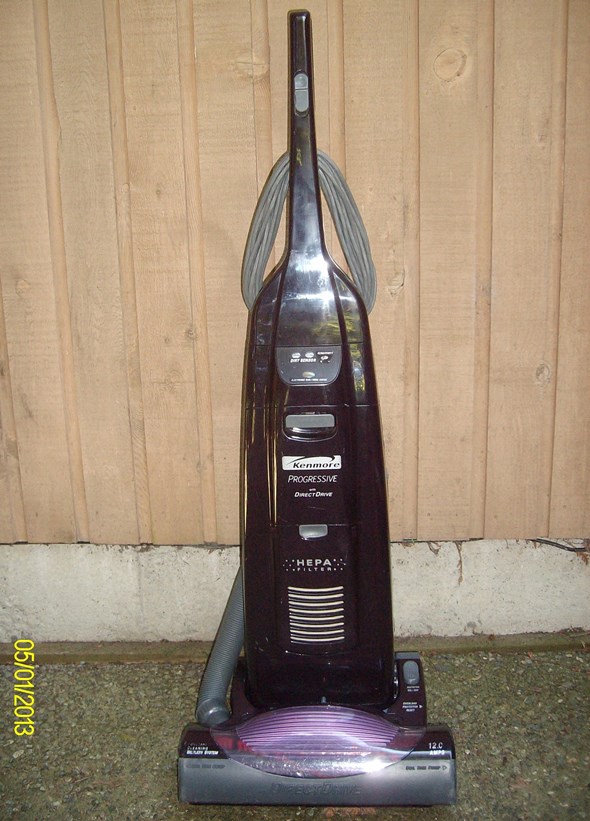
I wonder if my Kenmore Progressive (lower end, blue, belt drive) has this problem. It still rolls, and has the rubber tire on both wheels, but doesnt roll very well. I thought my issue was with the front wheels, but maybe not? I oiled and greased the wheels several times, but never even thought to look at the plastic housing. The vacuum is up at our other house, but I will check it out the next time I go up there...

Post# 231113 , Reply# 11   5/3/2013 at 22:36 (4,007 days old) by gmerkt (Edmonds WA)        

Yes, Dustin, you might want to check and see if one of the rear wheels is grinding away on the case. The amount of drag it creates is very noticeable.

It's difficult for us to imagine how this kind of damage occurs, but if dropped down stairs or similar it could happen. Or while being unloaded out of a car. I also can picture domestic disputes that result in a vacuum cleaner being thrown by one combatant at the other. I've heard it called "The Battle of the Sexes" but some couples might take it to extremes.

I can also picture reluctant family members who were less than enthusiastic about doing chores throwing a tantrum -- and the vacuum cleaner.

If the vacuum case gets broken and or the axle bent, imagine the hole in the drywall that gets made.


Forum Index:       Other Forums:                      


Comes to the Rescue!

Woops, Time to Check the Bag!!!
Either you need to change your vacuum bag or you forgot to LOG-IN?

Discuss-O-MAT Log-In


New Members
Click Here To Sign Up.


automaticwasher.org home
Discuss-o-Mat Forums
Vintage Brochures, Service and Owners Manuals
Fun Vintage Washer Ephemera
See It Wash!
Video Downloads
Audio Downloads
Picture of the Day
Patent of the Day
Photos of our Collections
The Old Aberdeen Farm
Vintage Service Manuals
Vintage washer/dryer/dishwasher to sell?
Technical/service questions?
Looking for Parts?
Website related questions?
Digital Millennium Copyright Act Policy
Our Privacy Policy