Thread Number: 12704
Electrolux Model B21 And B27 Shampooer
[Down to Last]

Vacuumland's exclusive eBay Watch:
scroll >>> for more items --- [As an eBay Partner, eBay may compensate vacuumland.org if you make a purchase using any link to eBay on this page]
Post# 135777   5/8/2011 at 17:12 (4,735 days old) by steve (Makawao)        

I have two Electrolux run shampooers: a green Model B21 and a red Model B27. I have used the B21 for the past few years until it malfunctioned last week when one of the brushes quit either because of stripped gear or bad spindle. I did not use the Model B27 until the B21 malfunctioned but it worked only for a few minutes until it malfuntioned also probably for the same reason. I do not have a manual to take these units apart properly to replace gear or spindle so I will probably junk them unless they are considered collectable.

Post# 135798 , Reply# 1   5/8/2011 at 19:48 (4,735 days old) by Elux89 ()        
Gears are broken

One or both of the two front gears are broken, the back gear hardly ever breaks as it was made of a stronger, more durable plastic since it is the main drive gear. There are four screws on the bottom of the unit, remove these and the top lifts off. Next you'll see the cord winder apparatus, it just lifts off. Now you have to remove the rubber bumper, pop the three caps off where the gear shaft sticks up, remove the lubricating material from around the shaft, remove the c clip, and the bottom and gear will fall out. Very durable and effective machines, the only real problem were the two front gears unfortunately.

Post# 135806 , Reply# 2   5/8/2011 at 20:46 (4,735 days old) by steve (Makawao)        
Bumper removal

Thanks for the info. How do I get the rubber bumper off; it seems to be as tight as a bicycle tire :-)

Post# 135816 , Reply# 3   5/8/2011 at 21:39 (4,735 days old) by Elux89 ()        
Bumper removal

It's been a little more than a year since I last changed one, but I believe I used a small flat bladed screw driver to get the bumper started, and then just kept working my way down the unit as the bumper slipped off. You have to remember that the bumper has a lip that folds over on both the top and bottom sides, gently pry this lip up and over the ridge underneath it. Be careful prying on the bottom side as that is plastic, whereas the top is made of metal. If memory is correct, I think by starting on one side (top or bottom) made it easier than starting on the other??? If you look at the bottom of the unit, right where the brush goes in, you'll see a small ring on the outside, gently pry that off as well. When you replace the bumper, heat it up before putting it on, it will slip into place quite nicely.

By the way, Lux no longer has replacement front gears, they still have the single rear one available though. The front gears are available from the aftermarket. You might have to make a short trip to Vancouver to get them, as Tip Top parts in Surrey is a wholesaler that supplies many vac shops here with them. (Tip Top also has an office in Sacramento) Apparently, someone in the USA is making the replacement gears, and Tip Top and the Johnny Vac distributor in Quebec are marketing them in Canada. I've been trying to locate the manufacturer in the US, but no one seems to know whom that company is.

I like this unit much, much more than the current one lux is offering. The current model is belt driven with all three brushes rotating the same direction. This model that you and I have, the two front brushes rotate counter to the single rear one, in theory scrubbing both sides of the carpet, and making the machine rather balanced and not causing it to pull in one direction only.

Hope this helps!!

Vernon


Post# 136675 , Reply# 4   5/15/2011 at 15:39 (4,728 days old) by steve (Makawao)        
removing gears

Hi Vernon

Finally got the bumper off. But I don't see a way to get the front gears off; it seems that a white plastic ring hold the spindle and don't see a way of removing them (got the small rngs off the groove on the spindles).


Post# 136685 , Reply# 5   5/15/2011 at 18:22 (4,728 days old) by aeoliandave (Stratford Ontario Canada)        

aeoliandave's profile picture
Steve, removing any one of the gears is not quickly done but it is easily done. I tore down mine a few years back because two of the nylon gears were shredded and I happened to find a derilict polisher in the trash with good gears. So it was worth the effort.
The spindles are press-fitted into pierced metal discs and the nylon tooth gear rings are are molded around the disc, essentially a one-piece unit that cannot be repaired when the teeth have shattered and sheared off.
If you don't have replacement gears standing by there's no point in going this far.

The gear spindles pass through bronze bearings in the base plate (as I call it) and are held in place with circlip C washers. the three spindle axles are shrouded in capped wells packed with shredded felt holding grease/oil. DO NOT discard this packing material!

Remove the c-clip and the gears pop out.

But first you have to remove the cordwinder assembly and motor cap to access the wells after removing the caps and packing.

In reverse order then, we begin with the spindle wells exposed after replacing gears and C-clips.


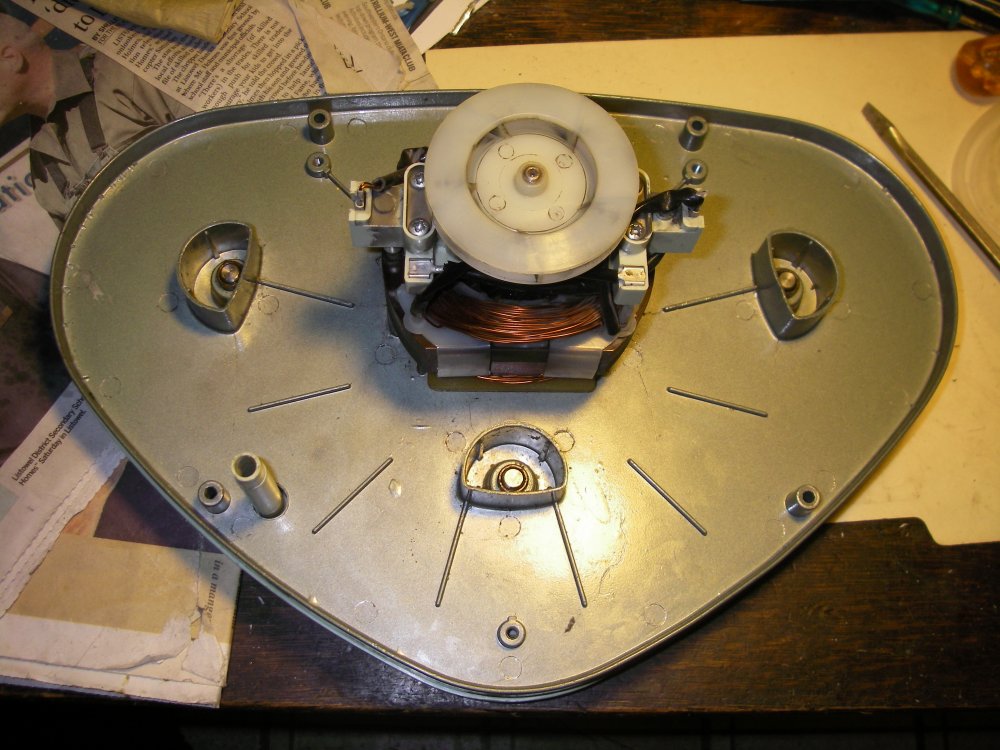
Post# 136687 , Reply# 6   5/15/2011 at 18:26 (4,728 days old) by aeoliandave (Stratford Ontario Canada)        

aeoliandave's profile picture
grease/oil packing replaced and plastic caps put back on.

The packing material is a shredded felt 'crumble' that resembles 'grapenuts cereal'. It is very lightweight and easily lost so spoon it into a teacup or something when removed and put an equal amount back in all three wells.


Post# 136688 , Reply# 7   5/15/2011 at 18:32 (4,728 days old) by aeoliandave (Stratford Ontario Canada)        

aeoliandave's profile picture
Now the cordwinder assembly can go back on. It surrounds the motor like a donut. If you are lucky you did not take the two halves of the cordwinder apart - pre-taping them together as it was removed - and won't have re-coil the winder spring and adjust the action.


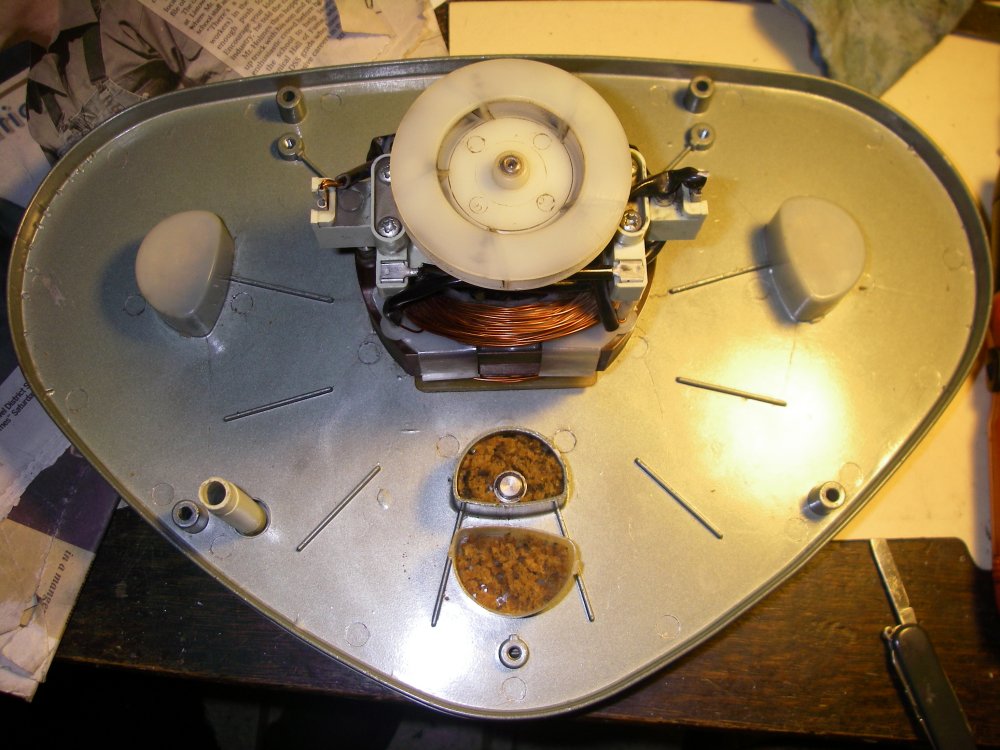
Post# 136689 , Reply# 8   5/15/2011 at 18:43 (4,728 days old) by aeoliandave (Stratford Ontario Canada)        

aeoliandave's profile picture
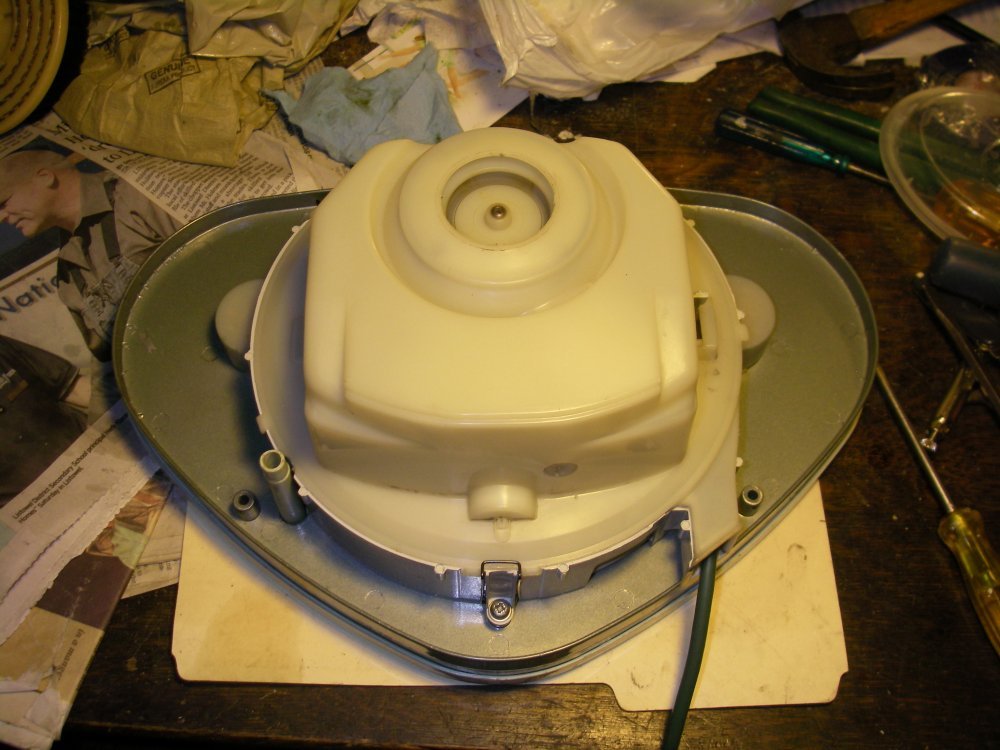
The top cap of the cordwinder is not screwed on - it is a loose fit held in place with three hinged spring clips attached to the base casting. The assembly layers are clamped tightly in place when the outer shell is screwed on at final assembly.

Here's what's underneath.

Note that electrical connections are all flat blades slipping into mating sockets so no re-wiring is required.

You really don't want to disturb the winder workings and a warning - do not hold the cordwinder assembly upside down or tilted when removing/replacing as the various gears and drums can fall out. The top cap holds the gears in close contact mesh. Worse still, if the large angled gear lifts out of the cord reel gear track the tempered steel flatspring will unsproing violently!

Then the spring will have to be re-wound onto the drum it came off. Not a pleasant task...involving both hands, your chin and possibly your big toe all in constant contact...


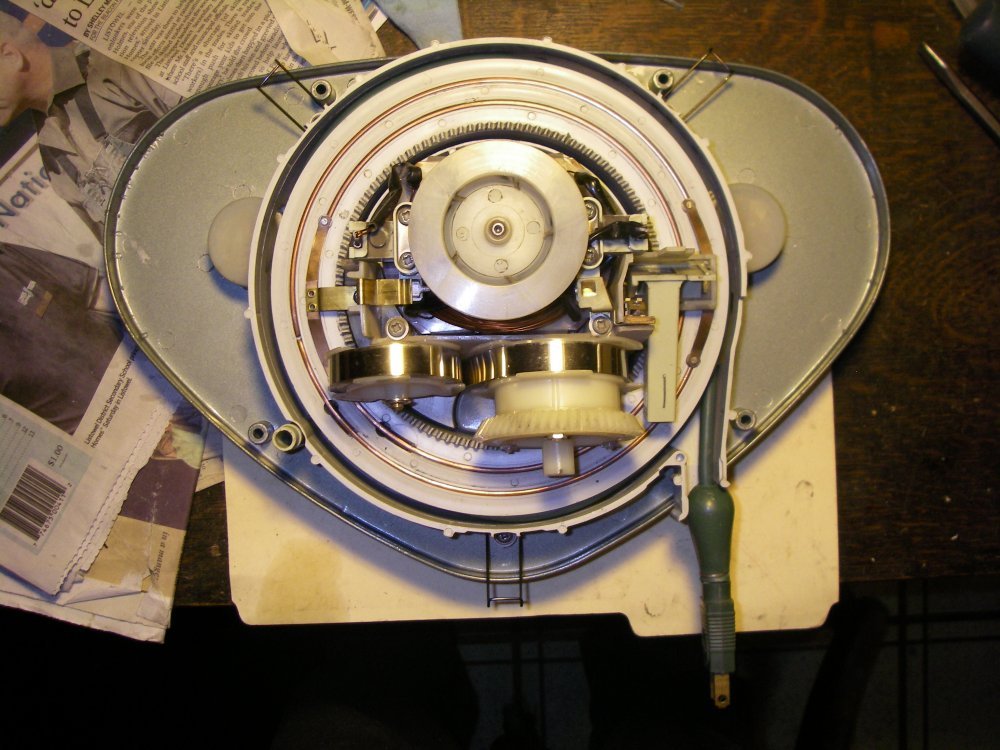
This post was last edited 05/15/2011 at 19:15
Post# 136692 , Reply# 9   5/15/2011 at 18:55 (4,728 days old) by aeoliandave (Stratford Ontario Canada)        

aeoliandave's profile picture
here's the underside showing gears that have crumbled gears cleaned off and it shows the pierced edge of the central disc. The nylon gears are molded in place like a car tire and once shattered cannot be replaced except by an entire assembly from a donor machine, or two. The three gears & spindle axles are interchangeable and as noted previously it seems always that the outer gears are the first to shatter.


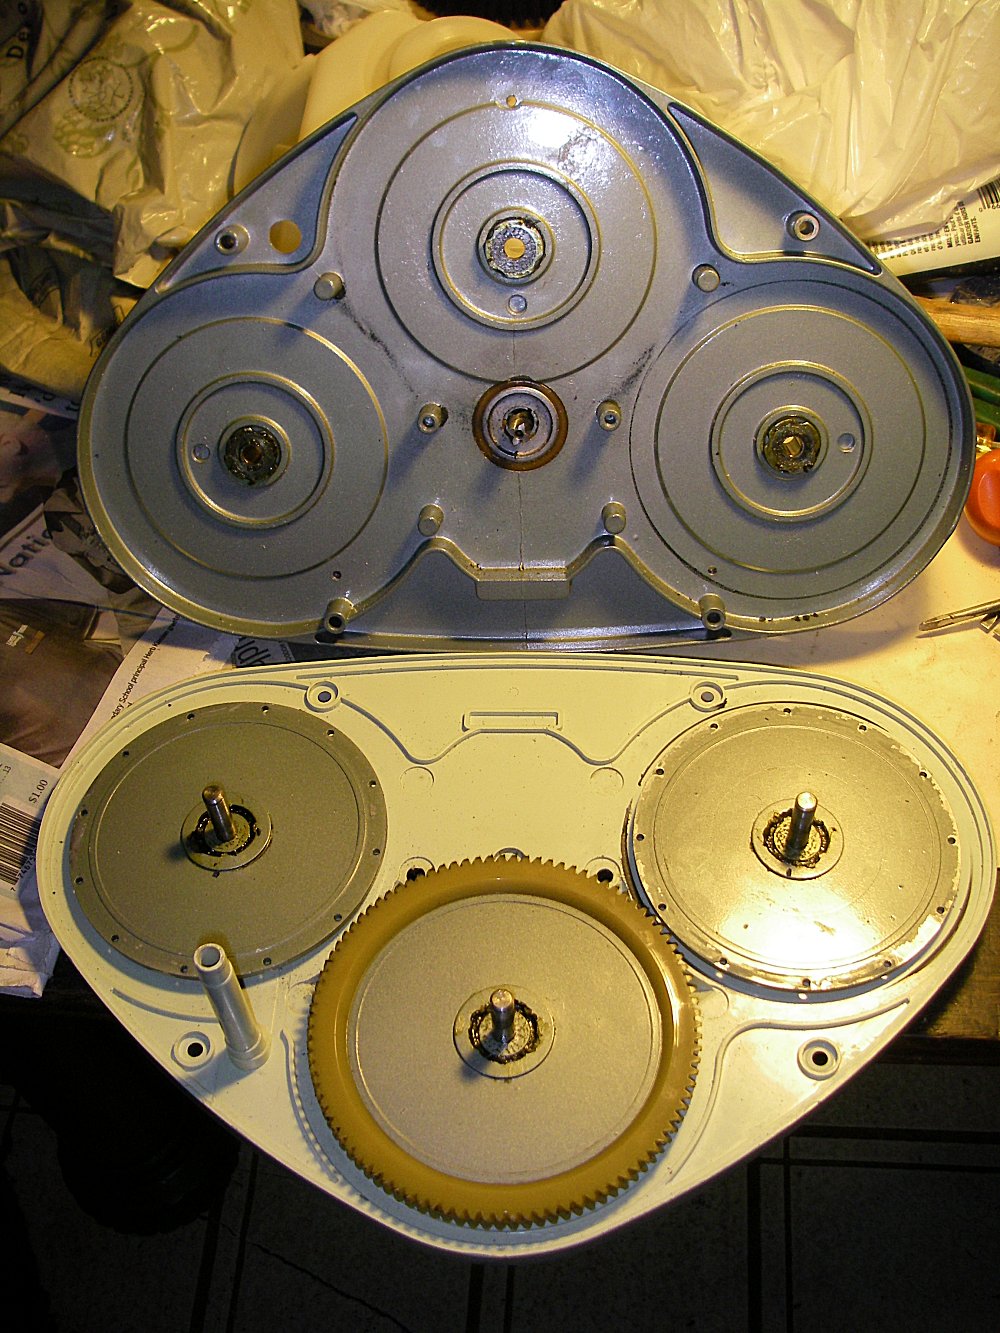
This post was last edited 05/15/2011 at 19:29
Post# 136693 , Reply# 10   5/15/2011 at 19:00 (4,728 days old) by aeoliandave (Stratford Ontario Canada)        

aeoliandave's profile picture
Gears replaced from donor machine; that's why they are cream coloured.

Perhaps the later machines had better shatter-resistant gear material?

machine ready for re-assembly.


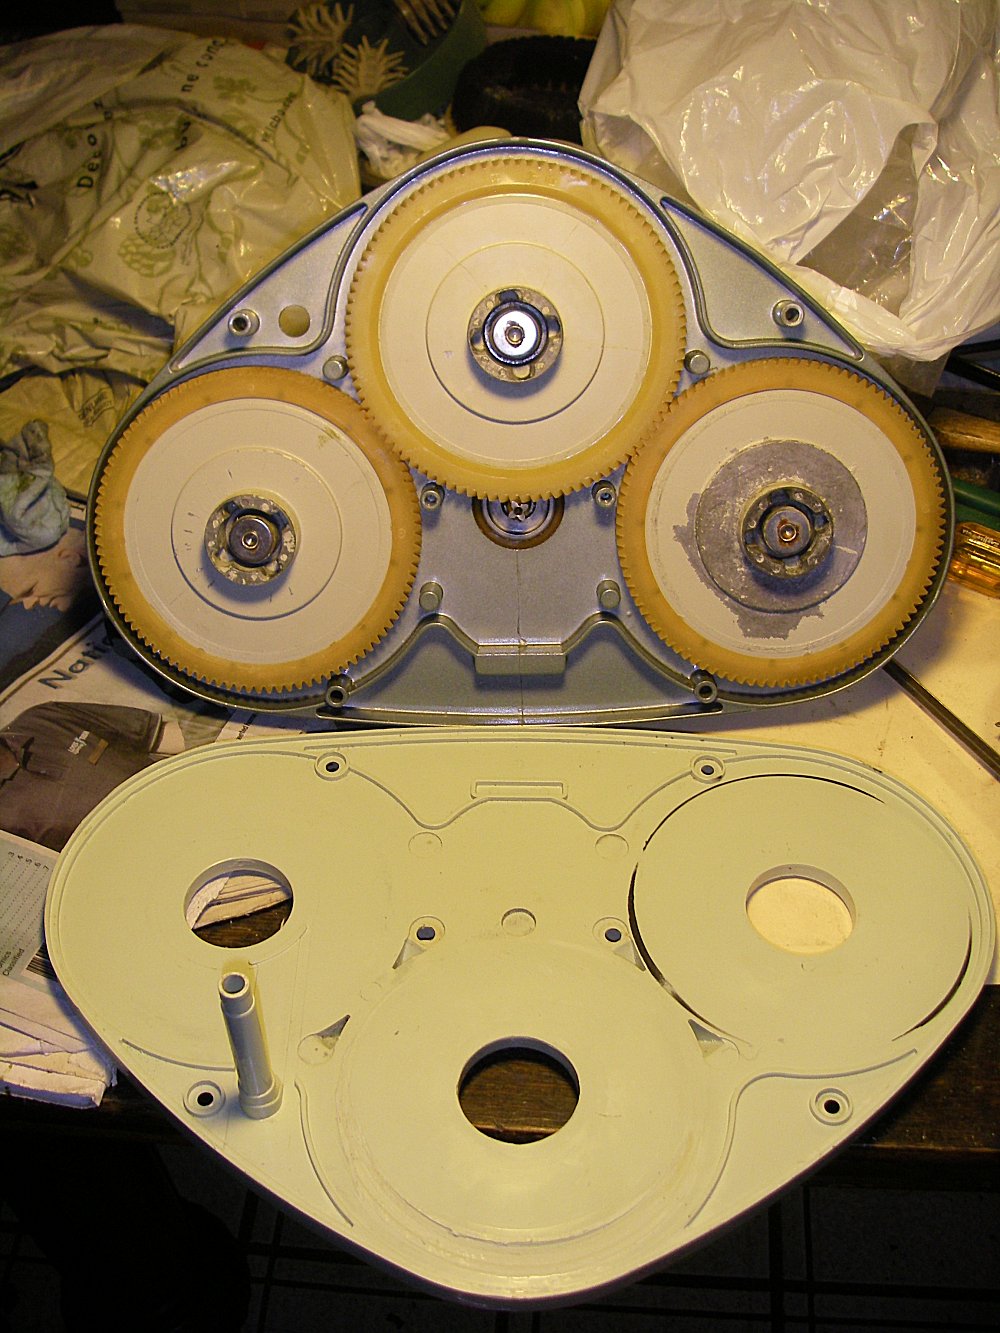
This post was last edited 05/15/2011 at 19:31
Post# 136694 , Reply# 11   5/15/2011 at 19:19 (4,728 days old) by aeoliandave (Stratford Ontario Canada)        

aeoliandave's profile picture
Ready for the top casting.

Post# 136695 , Reply# 12   5/15/2011 at 19:24 (4,728 days old) by aeoliandave (Stratford Ontario Canada)        

aeoliandave's profile picture
Top cast housing & plastic hood in place, the handle can be put back on.
The plastic hood must be screwed to the housing beforehand.
When replacing the housing note the gravity lever's fitment for the on/off pressure switch activated by the handle's release.


Post# 137847 , Reply# 13   5/28/2011 at 14:35 (4,715 days old) by steve (Makawao)        

Thank you very much for the detailed intructions. I removed the c clips from the spindles but they would not drop out but it no longer matters as I could not get replacement gears.


Forum Index:       Other Forums:                      


Comes to the Rescue!

Woops, Time to Check the Bag!!!
Either you need to change your vacuum bag or you forgot to LOG-IN?

Discuss-O-MAT Log-In


New Members
Click Here To Sign Up.


automaticwasher.org home
Discuss-o-Mat Forums
Vintage Brochures, Service and Owners Manuals
Fun Vintage Washer Ephemera
See It Wash!
Video Downloads
Audio Downloads
Picture of the Day
Patent of the Day
Photos of our Collections
The Old Aberdeen Farm
Vintage Service Manuals
Vintage washer/dryer/dishwasher to sell?
Technical/service questions?
Looking for Parts?
Website related questions?
Digital Millennium Copyright Act Policy
Our Privacy Policy